Contacts Edit View
QuickEasy BOS allows users to create an address book of all their Staff, Customers, Suppliers, and other contacts. This address book is named Contacts.
There are two List Views which display a list of Contacts with key information. Edit View allows users to add or edit the information (if they have the required authority).
When you access contacts from a context menu (right click) it is opened with limited functionality.
Navigation: Main Menu > Setup > Contacts
Buttons Explained
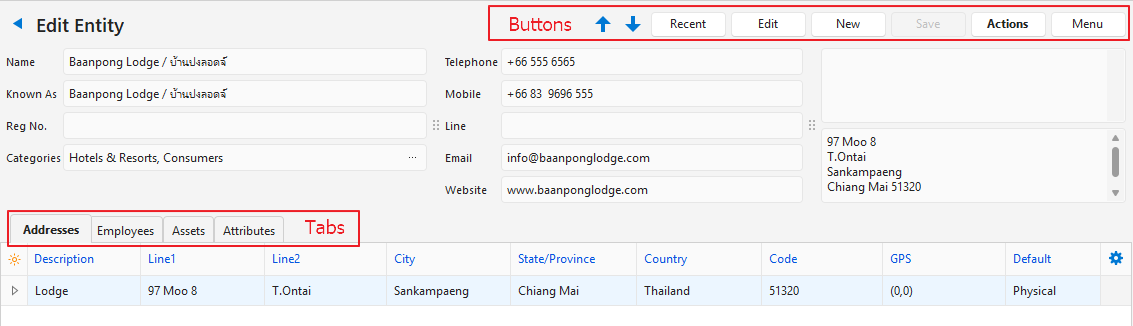
| Button | Description |
|---|---|
| Navigational Arrows | Navigates to the next or previous entry. |
| Recent | A dropdown list of recently viewed records for quick access to those records. The button is supressed if there are no recent items. |
| Edit | Allows Users to edit the entry. |
| New | Creates a new Person or Entity. Select Person for an employee. Select Entity if the contact will be a Customer or Supplier. |
| Save | Saves any changes. |
| Actions | Refresh Lookups: Updates the lookup lists. Delete Contact: Allows users to delete the current Contact. |
| Menu | View/Edit Notes & Attachments View/Edit Image Profile (Person contacts only) Settings – User Access – Edit Statuses (Customers) – Edit Statuses (Suppliers) – Edit Statuses (Assets) – Edit Attributes – Edit Billing Methods – Edit Accounting (Accounts, VAT Types, Currencies, Credit Terms, Bank Profiles) – Edit Categories – Edit Positions – Edit Address Lookup Lists Layout |
Header Explained: Persons
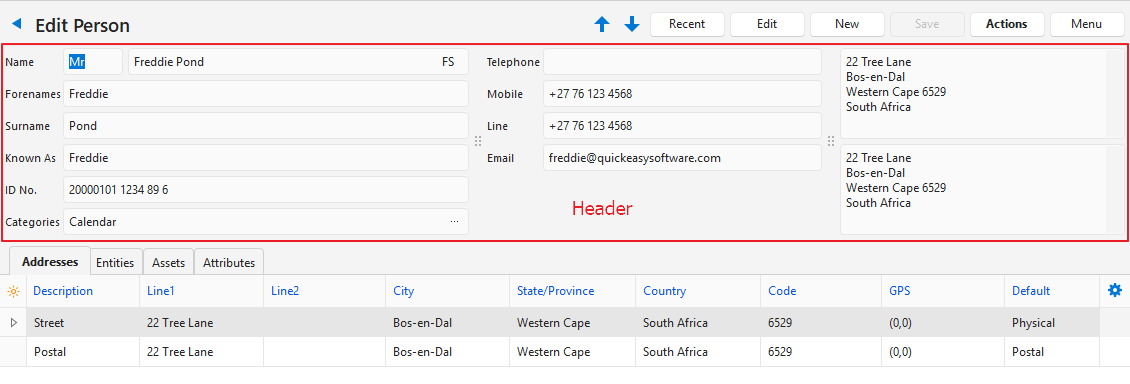
| Field | Description |
|---|---|
| Name | Fields to enter the contact’s Title and Legal Name. |
| Forenames | The First Name of the person. |
| Surname | The person’s Surname. |
| Known As | A field to enter the contact’s Trade or Nickname. |
| ID No. | A field to enter a government-issued number that identifies the person (e.g. Identity or Social Security Number). |
| Categories | The Categories selected for the contact. |
| Telephone | A field to enter the contact’s Telephone Number. For the call or message features to work on the mobile app, the number must be in the international format (e.g. +00 82 123 1234). |
| Mobile | A field to enter the contact’s Mobile Number. For the call or message features to work on the mobile app, the number must be in the international format (e.g. +00 82 123 1234). |
| Messaging Number | A field to enter the contact’s Messaging Number (e.g. WhatsApp or Line). The name of the default app is a General Setting. For the call or message features to work on the mobile app, the number must be in the international format (e.g. +00 82 123 1234). |
| A field to enter the contact’s Email Address. | |
| Website | A field to enter the contact’s Website URL. |
| Postal Address | The contact’s Postal Address filled in from the Addresses (tab). |
| Physical Address | The contact’s Physical Address filled in from the Addresses (tab). |
Header Explained: Entities
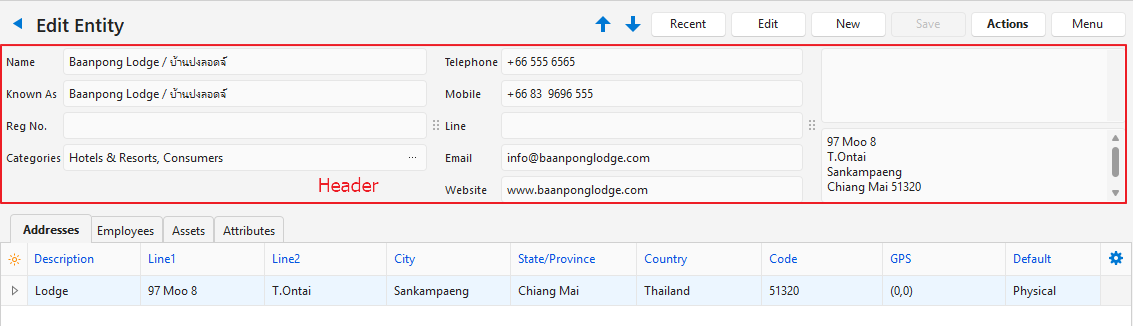
| Field | Description |
|---|---|
| Name | Fields to enter the contact’s Title and Legal Name. |
| Known As | A field to enter the contact’s Trade or Nickname. |
| Reg No. | A field to enter the organisation’s Registration Number. |
| Categories | A lookup list to add Categories to the contact. |
| Telephone | A field to enter the contact’s Telephone Number. For the call or message features to work on the mobile app, the number must be in the international format (e.g. +00 82 123 1234). |
| Mobile | A field to enter the contact’s Mobile Number. For the call or message features to work on the mobile app, the number must be in the international format (e.g. +00 82 123 1234). |
| Messaging Number | A field to enter the contact’s Messaging Number (e.g. WhatsApp or Line). The name of the default app is a General Setting. For the call or message features to work on the mobile app, the number must be in the international format (e.g. +00 82 123 1234). |
| A field to enter the contact’s Email Address. | |
| Website | A field to enter the contact’s Website URL. |
| Postal Address | The contact’s Postal Address filled in from the Addresses (tab). |
| Street Address | The contact’s Street Address filled in from the Addresses (tab). |
Tab Explained: Attributes
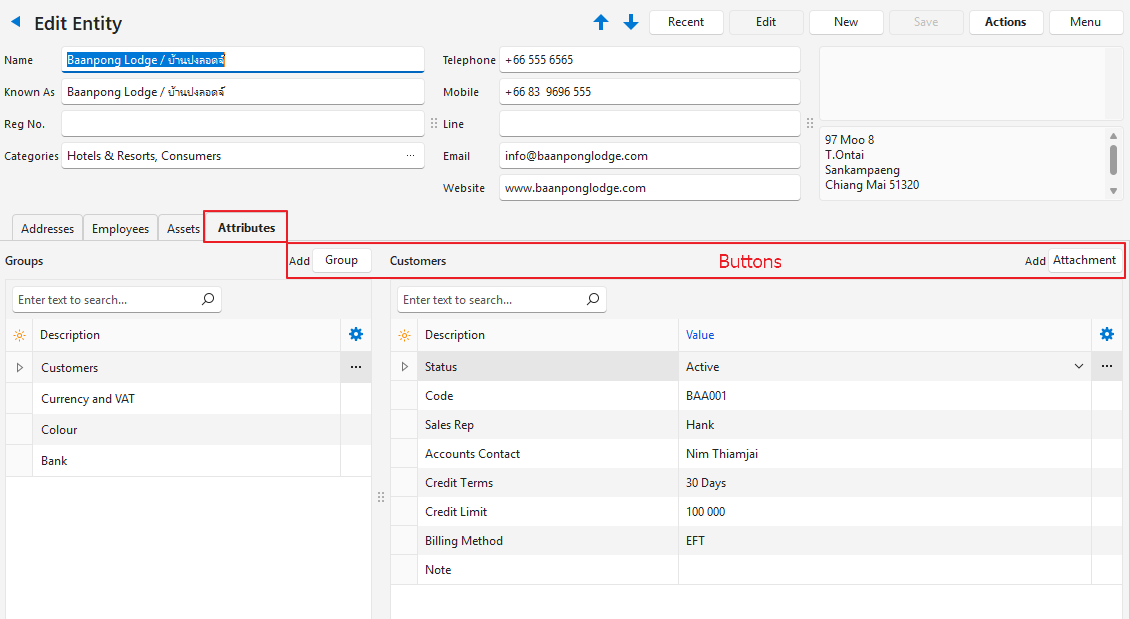
| Field | Description |
|---|---|
| Group (button) next to Add | Allows users to add a Group/Attribute from a predefined list. Once added, the group is listed on the left. Clicking the group displays the fields on the right for users to fill in the relevant details. Some groups can be added multiple times (e.g. the Language group can be added for each language the person speaks). Groups for Persons – Staff: Designates the contact as a rep, or resource for projects and timekeeping. – Bank: Fields to fill in the person’s bank details. – Next of Kin: Fields to fill in the person’s emergency contact details. – Language: Fields to fill in the person’s language and proficiency. – Employment: Fields to fill in past and current employment details. – Credentials: Fields to fill in educational qualifications, skills, or professional memberships. – Job Application: Fields to fill in details of job applicants (e.g. notice period, availability). – Reference: Fields to fill in references. – Medical: Fields to fill in medical details. – Payroll: Fields to fill in details for payroll forms (e.g. tax number, start date, pay rate). Groups for Entities – Customers: Adds the contact to the list of Customers and provides fields for settings and information (e.g. credit terms, contacts). – Suppliers: Adds the contact to the list of Suppliers and provides fields for settings and information (e.g. credit terms, contacts). – Currency and VAT: The currency and VAT Settings for the customer and/or supplier. – Bank: Adds fields for Bank Details that will apply to customers and/or suppliers. Custom > Name of Group: Adds the custom group to the entity. |
| Attachment (button) | Creates an attachment with the name of the selected Attributes group. |
| Groups Section | |
| Field Chooser (*) | Allows users to add or remove columns. |
| ID | The system-generated number for the group. |
| Order ID | The system-generated number for the group’s order. |
| Description | The group’s description. |
| Date Created | The date on which the group was added. |
| Date Updated | The date on which the group’s entries were updated. |
| Updated By | The user who updated the group. |
| Widget | A submenu, which can also be accessed by right clicking the entry, with the following functions: – Move Up Ctrl+U – Move Down Ctrl+D – Delete Group Ctrl+Del |
| Group Entries | |
| Field Chooser (*) | Allows users to add or remove columns. |
| ID | The system-generated number for the entry. |
| Description | The entry’s description. |
| Value | The information for the entry. |
| Widget | A submenu, which can also be accessed by right clicking the entry, with the following function: – Edit Lookups: Allows lookup lists to be edited for fixed attributes. Greyed out if there are no available lookup lists. |
Tab Explained: Addresses
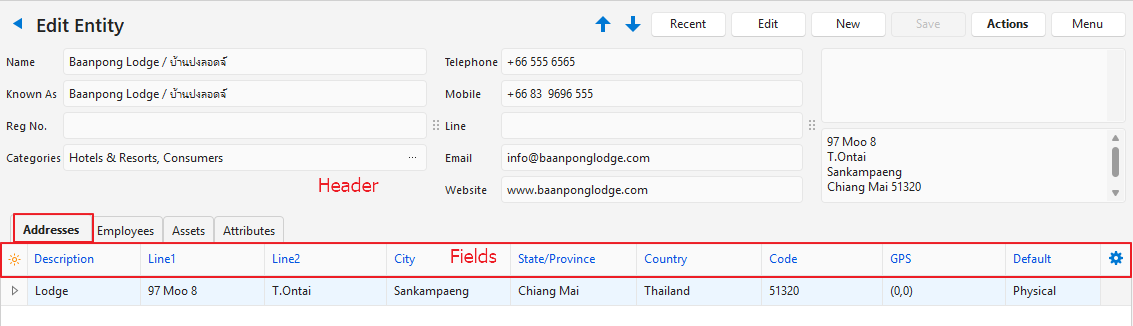
| Field | Description |
|---|---|
| Click here to add a new row | Opens a line for users to type another Address. Multiple addresses are supported. Only displayed if Edit mode is active. |
| Field Chooser (*) | Allows users to add or remove columns. |
| ID | The system-generated number for the entry. |
| Contact ID | The system-generated number for the Contact Person. |
| Description | The description of the address (e.g. Office, Home). |
| Line1 | The first line of the address (e.g. Unit number and building name). |
| Line2 | The second line of the address (e.g. Street name and number). |
| City | A field to enter the city in which the contact is located. |
| State/Province | A field to enter the state or province in which the contact is located. |
| Country | A field to enter the country in which the contact is located. |
| Code | The contact’s Postal or Zip Code. |
| GPS | The contact’s GPS coordinates. |
| Created | The date on which the entry was created. |
| Updated | The date on which the entry was updated. |
| Default | A dropdown list for users to select whether the address is a Physical or Postal Address. |
| Widget | A submenu, which can also be accessed by right clicking the entry, with the following functions: Edit Address Lookup Lists: Allows users to create or edit lookup lists for the following fields: – Addresses – Description – Addresses – City – Addresses – State/Province – Addresses – Country – Addresses – Code Delete: Deletes the entry. Default addresses cannot be deleted. |
Tab Explained: Entities
- This tab is only visible if the contact is a person and if that person was added as an employee to an Entity.
- Column headings in blue (in QuickEasy BOS), indicate the fields are editable.
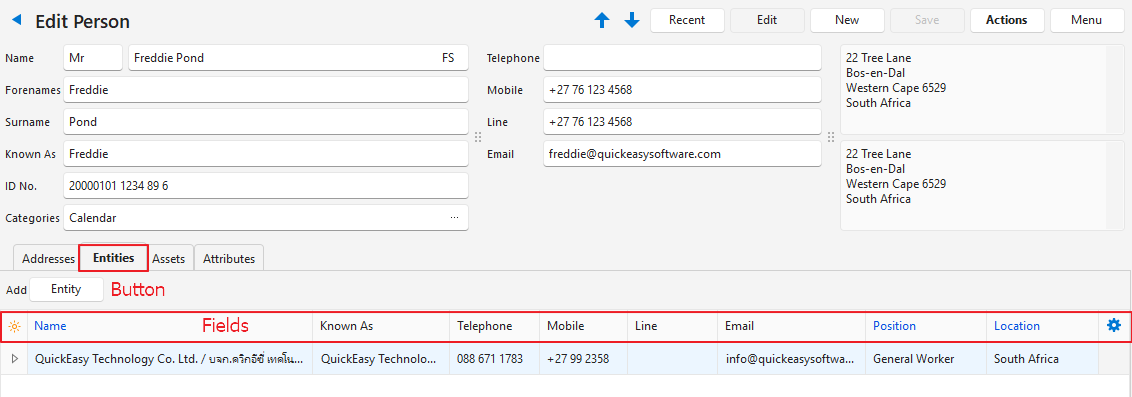
| Field | Description |
|---|---|
| Entity (button) | Allows users to add an Entity. |
| Field Chooser (*) | Allows users to add or remove columns. |
| ID | The system-generated number for the entry. |
| Name | A field to type the entity’s Name. |
| Known As | A field to type the entity’s Trade Name. |
| A field to type the entity’s Email Address. | |
| Position | A dropdown list of Positions for users to select one. |
| Location | A dropdown list of Locations for users to select one. The location is the Description field on Addresses (tab) of the selected entity. |
| Created | The date on which the entry was created. |
| Updated | The date on which the entry was updated. |
| Widget | A submenu to: – Open Contact: Open’s the linked entity’s contact form. – Delete Link to Entity: Removes the entity from the list but does not delete the entity as a contact. |
Tab Explained: Employees
- This tab is only visible if the contact is an Entity.
- Column headings in blue (in QuickEasy BOS), indicate the fields are editable.
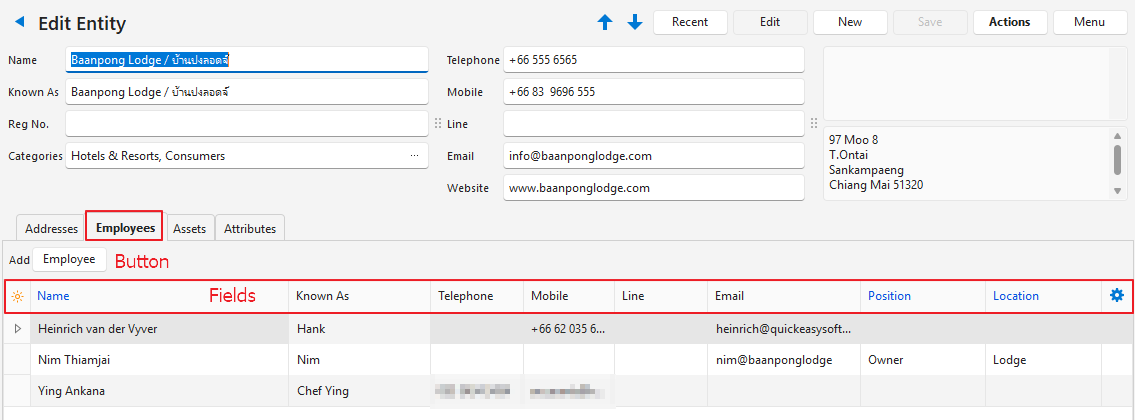
| Button | Description |
|---|---|
| Employee (button) > Select Contact | A new line is opened. A dropdown list of existing contacts is presented in Name field from which a contact can be selected. Once added, the fields with blue captions may be edited. |
| Employee (button) > Add Contact | Allows users to add an employee by filling in a form. |
| Field Chooser (*) | Allows users to add or remove columns. |
| ID | The system-generated number for the entry. |
| Title | The person’s title (e.g. Mr, Ms). |
| Name | The full name of the employee |
| Known As | The nickname by which the employee is known. |
| Telephone | The employee’s telephone number. |
| Mobile | The employee’s mobile phone number. |
| Messaging number | A field to enter the employee’s Messaging Number (e.g. WhatsApp or Line). The name of the default app is a General Setting. |
| The employee’s email address. | |
| Position | The employee’s position / Option to select a Position from the dropdown list of positions. |
| Location | The employee’s location / Option to select a Location from the dropdown list of locations. (The dropdown list contains the description columns on the addresses tab.) |
| Created | The date on which the entry was created. |
| Updated | The date on which the entry was updated. |
| Widget | A submenu that allows users to: – Open Contact: Opens the employee contact’s record. – Edit Employee: Opens a form with the employee header information which can be edited. – Delete Link to Employee: Removes the employee from the list. Does not delete the employee from the list of contacts. |
Tab Explained: Assets
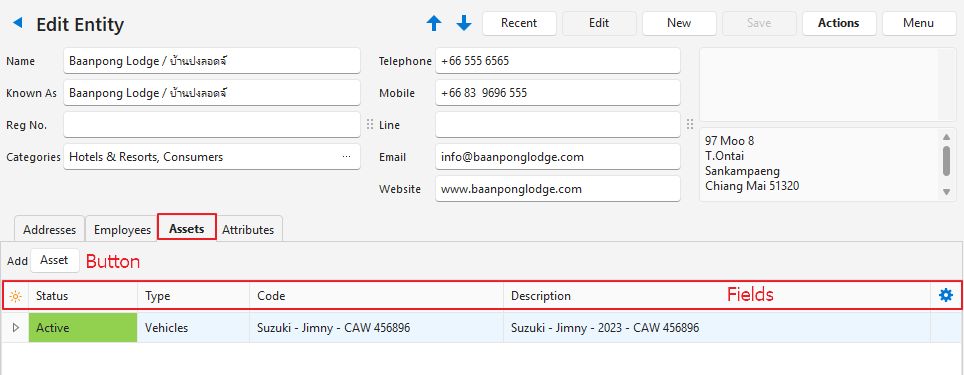
| Button | Description |
|---|---|
| Asset (button) | Provides a dropdown list as follows: Select Assets: Provides a dropdown list of all the assets for users to select one. The list can be filtered by Type. Add Asset > Vehicles: Allows users to create a new vehicle asset and adds it to the contact. Add Asset > Equipment: Allows users to create a new equipment asset and adds it to the contact. |
| Field Chooser (*) | Allows users to add or remove columns. |
| ID | The system-generated number for the entry. |
| Status | The current Status of the entry. |
| Type | The type of asset (e.g. Equipment, Vehicles). |
| Code | The asset’s code. |
| Description | The asset’s description. |
| Created | The date on which the entry was created. |
| Updated | The date on which the entry was updated. |
| Updated By | The User who last updated the entry. |
| Widget | A submenu, which can also be accessed by right clicking the entry, with the following functions: – Edit: Opens the asset’s record for editing. – Remove Linked: Delinks the asset from the contact. |
Learn More
- Contacts Addresses View: Explains the interface for viewing a list of contacts with address details.
- Contacts Default View: Explains the default display of a list of contacts.
- Contacts Tutorials Creating and Editing: These tutorials explain how to create and edit contacts.
- Contacts Tutorials Viewing: These tutorials explain the different views and related functions that are available for contacts.
- Customer Records List and Edit Views: Explains the interface to view a list of customers and to create customer records.
- Customer Records Tutorials: These tutorials explain how to display customer lists and how to create, edit, and delete customer records.
- Supplier Records List and Edit Views: Explains the interfaces from which supplier records are displayed and created.
- Supplier Records Tutorials: These tutorials explain how to display supplier lists, and how to create and edit supplier records.
- Billing Methods: Explains the billing methods’ interface and how to create and edit billing methods.
- Contact Categories: Explains what groups are and how to use them.
- Credit Terms: Explains the interface for credit terms and provides tutorials on how to create them.
- Positions: These tutorials explain how to create, edit, and delete job positions.