Bank Imports
Bank Imports provide an interface to import entries that were exported from a banking app. Currently it speeds up the process by providing a list of transactions and prefilling entries like the date and amounts.
Before importing bank entries for the first time, the following setup steps must be completed:
- Create and link Bank Profiles to the bank accounts.
- Add the Update Bank setting to the applicable transaction types (e.g. Bank Payments, Bank Receipts, Customer Receipts, Supplier Payments).
- Add the Bank module to a menu.
- Set User Access for the bank module: … Bank > Menu (button) > Edit User Access.
- Create statuses for the bank entries:
- … Bank > Menu (button) > Edit Statuses (Bank Header) > Add Default (button).
- … Bank > Menu (button) > Edit Statuses (Bank Item) > Add Default (button).
Bank Reconciliations and Bank Imports share the same interface, settings, and set of statuses.
In the context of bank imports, the import is treated as a bank transaction. The header has its own status, and the imported transactions are treated as the items with their own statuses.
Bank Import List View
Buttons Explained
| Button | Description |
|---|---|
| View | Displays a list of bank recons or import entries. |
| Arrow on View button > Reset Data Filter | Resets the selected filters. |
| New | Creates a new Bank Import or Bank Reconciliation as selected from the dropdown list. |
| Menu | Settings – Edit User Access – Edit Accounting (Accounts, VAT Types, Currencies, Credit Terms, Bank Profiles) – Edit Statuses (Bank Header) – Edit Statuses (Bank Item) Layout |
Filters Explained
| Filter | Description |
|---|---|
| Set | A selection of date options including No Date to display all the entries. |
| Date (radio button) | Works in conjunction with the date. Displays entries that were created on that date (i.e. the date on which the recon or import was created.) |
| Updated (radio button) | Works in conjunction with the date. Displays entries that were updated on that date (i.e. the date on which the recon or import was updated.) |
| Date fields | Allows custom dates to be entered. |
| Arrows | Adjusts the dates in the direction of the arrow. |
| Account | A dropdown list of bank accounts to select one or all. |
| Status Groups | Checkboxes to filter the entries based on the status groups. If none of the boxes are checked, all the entries are displayed. |
Fields Explained
| Field | Description |
|---|---|
| Status | The status of the recon or import. |
| Bank No. | The system-generated number allocated to the entry. |
| Type | Whether the entry is an Import or Recon. |
| Account | The name of the bank account. |
| Date Start | The start date of the recon or import. After the first import is created, this date is automatically set as the day after the previous import ended. |
| Date End | The end date of the recon or import. |
| Bank Balance | The bank balance at the end of the period. |
| Ledger Balance | The ledger balance at the end of the period. |
| Variance | The difference between the bank and ledger balances. |
| Widget | A submenu with the following actions: – Edit: Opens the import or recon for editing. – Delete Bank: Deletes the import or recon. |
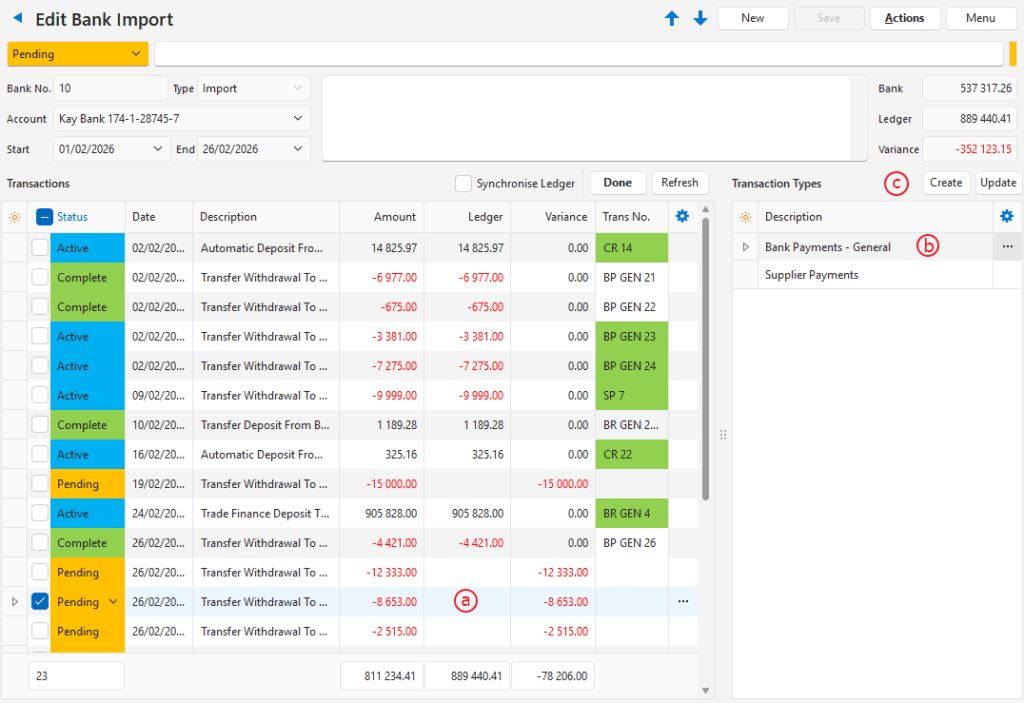
Bank Import Edit View
Buttons Explained
| Button | Description |
|---|---|
| Arrows | Navigates between bank reconciliations / imports. |
| New | Creates a new Bank Import or Bank Reconciliation as selected from the dropdown list. |
| Save | Saves any changes |
| Actions | Upload and Import File: Allows a file to be uploaded to QuickEasy BOS. Download File: Allows a file to be downloaded to a local computer. Delete Bank Import: Deletes the bank import. |
| Menu | Open Ledger: Opens the transaction in the ledger. Settings – Edit Accounting (Accounts, VAT Types, Currencies, Credit Terms, Bank Profiles) – Edit User Access – Edit Statuses (Bank Header) – Edit Statuses (Bank Item) Layout |
Fields Explained: Header
| Field | Description |
|---|---|
| Status | A dropdown list of statuses to select a header status. |
| Status Bar | An area to type a status note. |
| Bank No. | The system-generated number allocated to the entry. |
| Type | Whether the entry is an Import or Reconciliation. |
| Account | A dropdown list of bank accounts to select one. Prefilled with the bank account selected when New (button) was clicked. Only bank accounts with correctly completed Bank Profiles appear on the list. |
| Start | The start date of the import. |
| End | The end date of the import. |
| Note Field | A field to type a note. |
| Bank Balance | The balance on the imported bank statement. This field can be edited. |
| Ledger Balance | The ledger balance at the end of the period. |
| Variance | The difference between the bank and ledger balances. |
Fields Explained: Transactions
| Button and Checkbox | Description |
|---|---|
| Synchronise Ledger (checkbox) | Opens the ledger transaction on the right panel that matches the bank entry clicked on. |
| Done (button) | Changes the status of all the selected entries to Complete. |
| Refresh (button) | Refreshes the display after transactions are created. |
| Create (button) | Creates a transaction from the selected entry and Transaction Type. |
| Update (button) | Opens the selected transaction if it is still active or pending. Works the same as the Create button if a transaction has not been created yet. |
| Field | Description |
|---|---|
| ID | The system-generated number for the entry. |
| Status | The item’s status where item refers to the transaction (which is an item on a bank import). |
| Bank ID | The system-generated number for the bank import. |
| Date | The date of the transaction. |
| Description | The transaction’s description. |
| Amount | The transaction amount. |
| Ledger | The ledger amount. |
| Variance | The difference between the ledger and transaction amounts. |
| Trans No. | The Transaction Type code and number. |
| Created | The date on which the entry was created. |
| Updated | The date on which the entry was last updated. |
| Updated By | The user who last updated the entry. |
| Trans No. | The original Transaction Type code and number. |
| Widget | A submenu with the following action: – Done: Changes the selected entry’s status to Complete. – Open Ledger: Opens the transaction on the right panel or opens the ledger interface on the right panel if a transaction has not yet been created. |
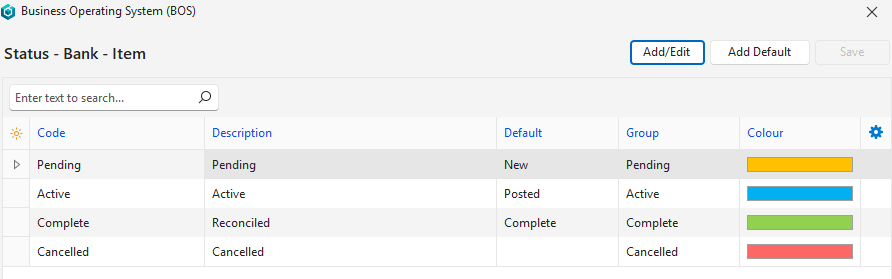
Bank Import Statuses Explained
Header Statuses
- The header status controls the entire Bank Import. It indicates if the bank import is still being processed (Pending) or is complete (Complete).
- There is only one default, New, that must be assigned to the Pending status.

Item Statuses
- The item statuses are used to indicate whether items on the bank import have been captured. They are separate from the transaction statuses.
- There are three defaults:
- New: Allocated to new entries (usually Pending).
- Posted: Automatically changed when Create (button) is clicked and a transaction is created. Currently this status is not reset if the transaction is cancelled. You must manually change it back.
- Complete: Automatically changed when Done (button) is clicked.
- Item statuses can also be changed manually by clicking the dropdown list next to an entry and selecting a new status.
Tutorials
- When importing bank data, the bank account is verified by checking that the Account lookup contains the bank account number.
- The field does not have to consist of only the bank account number (e.g. Kay Bank 174-1-22222-7).
- The bank account must be in the format that it appears on the statement including hyphens and spaces.
- Error Messages are displayed if:
- There is an incorrect character set.
- There is an incorrect lookup.
- No records were returned.
How to Create Bank Import Transactions
- Navigate to Bank.
- Note: The module is named Bank, however, it might be renamed on the menu (e.g. to Bank Recon or Bank Import). It can be added to any menu group (e.g. Accounting).
- Click New (button) > and click the bank account that you want to import under Bank Import.
- Navigate to the file on your computer, click the file name and click Open (button).
- A popup displays information on the import. Click OK (button) after reading the information.
- A list of transactions from the bank import is displayed on the left.
- In the header, the bank statement balance is filled in from the import, and a variance is displayed (difference between the ledger and bank statement).
- To create a transaction:
- Click the entry on the left that you want to create a transaction for (see screenshot a).
- A list of available Transaction Types is displayed in the Transaction Types column. If there is only one, it is automatically selected. If there are multiple available transaction types, click the one you want to create (see screenshot b).
- Click Create (button) (see screenshot c).
- On the opened transaction interface, capture the transaction as you normally would:
- Type or select a Reference.
- Select a Dr or Cr account, whichever is applicable.
- Note: The bank account is automatically selected in either the debit or credit account columns. An account must be selected for the other side of the entry unless it is a supplier or customer. The system fills in the customer or supplier after you select one in the header and press enter.
- Select a different VAT Type if necessary.
- If allocations are used and it is a customer or supplier transaction, click Allocate (button) and allocate the receipt or payment.
- Repeat Step 6 until all the entries are captured and the variance is zero.
- Select all the completed transactions and click Done (button).
How to Update Imported Transactions
- Open the applicable bank import.
- Click the entry you want to update that has an Active or Pending status.
- Click Update (button).
- The transaction is displayed on the right. Edit is as necessary.
Learn More
- Bank Profiles: Creating bank profiles for bank imports.
- Bank Reconciliations: Bank recon interface and tutorial.