
Point of Sale Setup Interface
Point of Sale (PoS) is a digital system that enables businesses to complete sales transactions efficiently and accurately. It typically combines hardware—such as a register, barcode scanner, or card reader—with software that records sales, processes payments, and manages inventory. Modern POS systems such as QuickEasy BOS go beyond simple transactions by offering features like real-time reporting, customer management, and integration with accounting tools.
The PoS module is QuickEasy BOS provides for multiple tills and users. The system can also be used to manage stock transfers from one till or branch to another.
Top Row Buttons Explained
| Button | Description |
|---|---|
| Add/Edit | Allows the fields to be edited or settings to be added. |
| Save | Saves any changes. |
| Menu | Settings – Edit User Access – Clear Device Memory: Clears the last selected till from the computer’s registry. This function can be used if a person moves to a new till to stop BOS from defaulting to the previous till. Layout |
Settings (tab) Explained
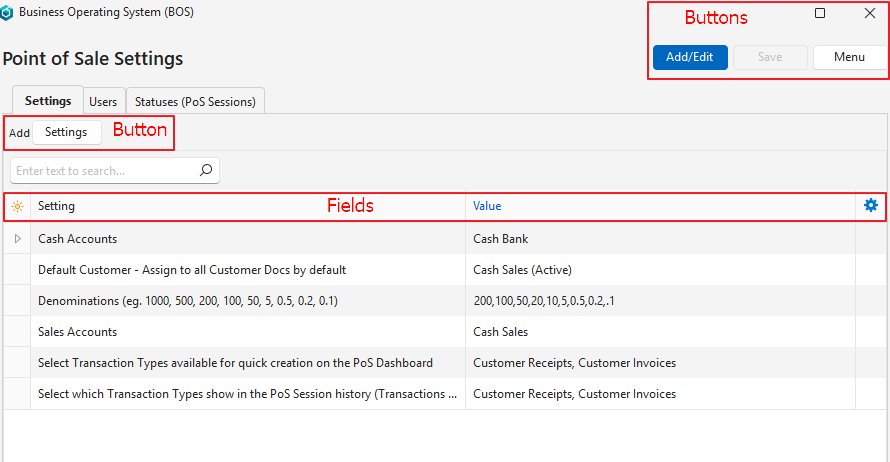
| Buttons / Fields | Description |
|---|---|
| Settings (button) | Opens a list of settings that can be added. |
| Field Chooser (*) | Used to add or remove columns (fields). |
| Editor | The system-generated number allocated to the Language Editor. |
| ID | The system-generated number allocated to the setting. |
| Module ID | The system-generated number allocated to the module. |
| Group | The setting’s group name. |
| Setting | The name of the setting. The settings are blank by default. |
| Value | The setting’s value. This field is editable. |
| Created | The date on which the setting was added. |
| Updated | The date on which the setting was last updated. |
| Updated By | The user who last updated the setting. |
| Widget | A submenu with the following function: – Delete Ctrl+Del: Deletes the setting. The setting reverts to its default value (becomes blank) when removed from the list. It can be added to the list again. |
POS Settings Explained
PoS Setting | Explanation |
Cash Accounts |
|
Default Customer – Assign to all Customer Docs by default | Provides a dropdown list of customer accounts to select the default customer (e.g. Cash Sales). |
Denominations (e.g. 1000, 500, 200, 100, 50, 5, 0.5, 0.2, 0.1) |
|
Sales Account |
|
Select Transaction Types for quick creation on the PoS Dashboard: |
|
Select which Transaction Types show in the PoS Session history (Transactions Tab) |
|
Users (tab) Explained
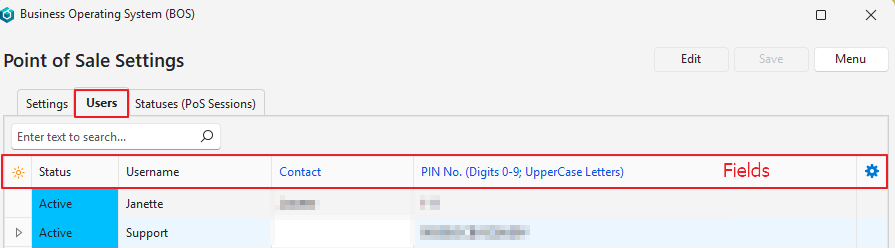
| Fields | Description |
|---|---|
| Field Chooser (*) | Used to add or remove columns (fields). |
| ID (User ID) | The system-generated number allocated to the User. |
| Status | The user’s status. |
| Username | The user’s name. |
| Contact | The name of the Contact linked to the User. This field is editable and provides a dropdown list of contacts for selection. A contact must be linked for users who are using PoS. |
| The user’s email address. | |
| PIN No. (Digits 0-9, Uppercase Letters) | The pin number to access the Point-of-Sale interface. The pin number can be generated (12-digit alpha-numeric) or typed in (any length, numbers and capital letters only). |
| Updated | The date on which the entry was last updated. |
| Updated By | The user who last updated the entry. |
| Widget | A submenu with the following function: – Generate PIN No.: Generates a 12-digit alpha-numeric pin number for barcodes. |
Statuses (PoS Sessions) Explained
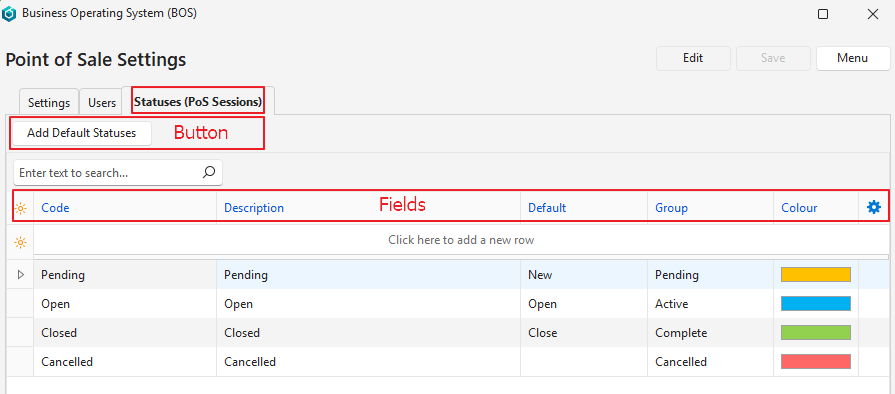
| Button / Fields | Description |
|---|---|
| Add Default Statuses (button) | Creates default statuses. Can only be used if statuses have not yet been created. The default statuses can be freely edited. |
| Field Chooser (*) | Used to add or remove columns (fields). |
| ID | The system-generated number allocated to the entry. |
| Order ID | The system-generated number allocated to the order of the statuses. |
| Code | The brief description of the status. |
| Description | The full description of the status. |
| Default | The defaults assigned to the status. The defaults are: – New: Assigned to new records (usually allocated to pending). – Open: The status allocated to records that are open. – Close: The status allocated to records that are closed. |
| Group | The Status Group that the entry belongs to. The groups are: Pending, Active, Complete, and Cancelled. |
| Colour | The colour of the status. The colour can be changed by clicking the field to display an arrow, clicking the arrow, and selecting a different colour. |
| Widget | A submenu with the following functions: – Move Up Ctrl+U: Moves the status one line higher. – Move Down Ctrl+D: Moves the status one line lower. – Delete Ctrl+Del: Deletes the entry. |
Learn More
- Point of Sale Setup Tutorials: These tutorials explain how to setup the point-of-sale system.
- Using Point of Sale Interface: Explains the point-of-sale interface.
- Using Point of Sale Tutorials: These tutorials explain how to use the point-of-sale interface.
- Point of Sale Reports: Explains the point-of-sale summary interface.