
User Access Interface
- You manage connected users, assign them languages and menu templates, and log them from the Users module.
- You can set user access for all users and modules from this module.
- Each user must have a role. There are three roles:
- Admin:
- Allows access to the users’ module.
- Can grant themselves access rights to all the modules.
- Users:
- Cannot access the users’ module.
- Only has the access rights assigned to them by an Admin user.
- PoS User:
- Forces the user to first clock in and open a point-of-sale session before working in QuickEasy BOS.
- Admin:
- For each user, you must create a separate contact, return to the users’ interface, and link the user to the contact.
- User access can also be set for a module from its menu button.
- You may only login to a database from one device at a time. However, you can login to the mobile and desktop app simultaneously.
- Logins are validated every five minutes. These checks will discontinue sessions if the user has been disabled or has multiple logins.
Navigation: Main Menu > Setup > Users
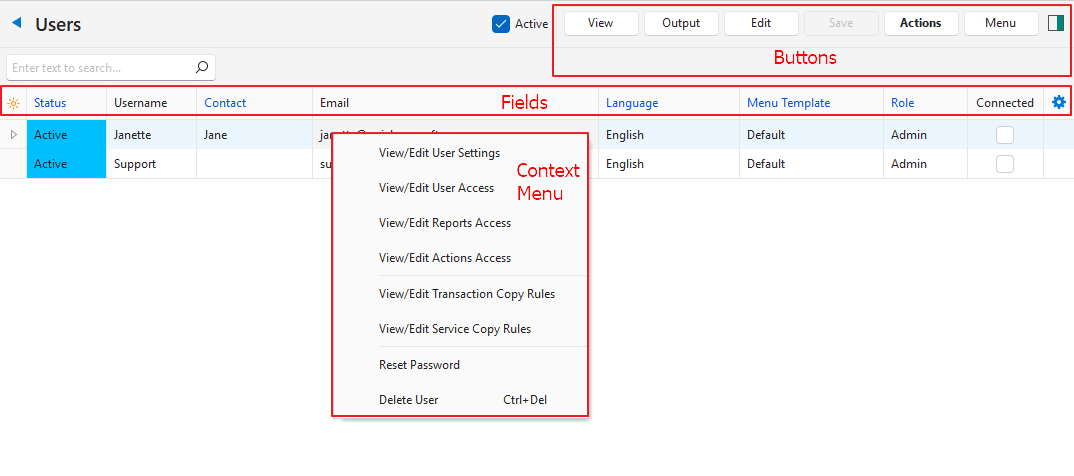
Buttons Explained
Button | Description |
View | Generates a list of users. |
Output | Allows the list of users to be exported in .csv, .htm, or .xlsx format. |
Edit | Allows the entry to be edited. |
Save | Saves any changes. |
Actions | Allows changes to multiple records that can be selected using Ctrl + Left Click or by clicking the checkboxes next to each record. The options are:
|
Menu |
|
Filters Explained
- Active checkbox:
- If checked, only Active Users are displayed.
- If unchecked both Active and Inactive users are displayed.
- If a user is linked to a transaction, that record can no longer be deleted. However, the user can be set to Inactive.
- When selecting user access, inactive users are not displayed (their access is revoked by being set to inactive).
Fields Explained
Fields with blue captions can be edited in QuickEasy BOS.
Field | Description |
Field Chooser (*) | Used to add or remove columns. |
User ID | The system-generated number for the User. |
Status | The user’s Status (Active or Inactive). |
Username | The user’s Name. |
Contact | The selected Contact. / A dropdown list to select a Contact. |
The user’s Email Address as per the database. | |
Language | The user’s Language selection. / A dropdown list to select a Language. |
Menu Template | The user’s assigned Menu Template. / A dropdown list to select a Menu Template. |
Role | The role selected for the user:
|
Connected | A checkbox. Should be checked if the user is connected and Actions (button) > Check Connected Users is clicked. |
Updated | The date on which the record was last updated. This feature was introduced in V1.0.73 and might display the date on which that version was installed. |
Updated By | The user who last updated the record. |

| A submenu with the following options:
|
Learn More
- Understanding User Access and Settings: Explains how user access works and describes the available settings.
- User Access by Module: Explains the interface from which user access can be set for a specific module.
- User Access by User: Explains the interface from which a user’s access can be set for all the modules.
- User Access Setup Tutorials: These tutorials explain how to grant user access and how to allocate menu templates and languages.
- User Access Tutorials: These tutorials explain how to set and edit user access to the various modules.
- User Settings and Connections Tutorials: These tutorials explain how to set user settings and check for connected users.