
Understanding User Access and Settings
- You manage connected users, assign them languages and menu templates, and log them from the Users module.
- You can set user access for all users and modules from this module.
- Each user must have a role. There are three roles:
- Admin:
- Allows access to the users’ module.
- Can grant themselves access rights to all the modules.
- Users:
- Cannot access the users’ module.
- Only has the access rights assigned to them by an Admin user.
- PoS User:
- Forces the user to first clock in and open a point-of-sale session before working in QuickEasy BOS.
- Admin:
- For each user, you must create a separate contact, return to the users’ interface, and link the user to the contact.
- User access can also be set for a module from its menu button.
- You may only login to a database from one device at a time. However, you can login to the mobile and desktop app simultaneously.
- Logins are validated every five minutes. These checks will discontinue sessions if the user has been disabled or has multiple logins.
Navigation: Main Menu > Setup > Users
Creating Users
- A user is a person who has access rights to QuickEasy BOS.
- Users are not created in QuickEasy BOS, they are created by QuickEasy staff.
- Users’ statuses can be set to Inactive which removes their access and removes them from lookup lists.
- Steps for setting up users:
- Contact QuickEasy support and supply the following information:
- List of usernames with their email addresses and the Languages they prefer to work in.
- QuickEasy will:
- Create users for the database and email them login credentials.
- Activate the necessary languages.
- The first person to login is automatically granted admin rights.
- This person must navigate to Main Menu > Setup > Users and click Actions (button) > Update Users.
- They must then assign roles to all the other users.
- After creating any module, user access must be set for the module before anyone can use it.
- Contact QuickEasy support and supply the following information:
User Access Explained
- Access is granted to users for every feature in QuickEasy BOS.
- The features are referred to as modules.
- Access to one module is independent of access to a different module.
- For transactions and contacts (including customers and suppliers), access must be granted for each step:
- Setup: This access allows users to change the setups for the module (e.g. transaction types).
- Edit: This access allows users to edit the records or transactions. Users must have View access before they can receive Edit access.
- Delete: This access allows users to delete entries (e.g. customer accounts or transactions). Users must have View access before they can receive Delete access.
- New: This access allows users to create new entries (e.g. create a new customer account, create a new transaction). Users must have View and Edit access before they can receive New access.
- View: This access allows users to view entries. However, this access may be divided into several options (see the topic View Access Explained).
- When a Transaction Type is created, user access must be set for the transaction type and also for the commands that determine if transactions can be copied (referred to as Copy Rules).
- A user with copy-rule access can create a new transaction by copying another transaction, regardless of whether that user has rights to create new transactions.
- When a Service Type is created, user access must be set for the service type and also for the commands that determine if tickets can be copied (referred to as Copy Rules).
- User Access settings are available from the Menu (button) of every module and in some cases from the right-click context menu.
- User Access can be set globally from the Users’ interface (Main Menu > Setup > Users).
- Using this method is much faster because you can use batch updates to allocate access rights to multiple users simultaneously.
- You can also copy one user’s access rights to another user.
- When users do not have access to certain features they will either not see that feature at all, or be shown a popup message alerting them that they do not have the necessary access rights.
Users and Contacts
- A Contact should be created for every user.
- Once created, contacts must be linked to their respective users. Please close the contact form before attempting to link the contact. The contact’s name is shown as Null on the dropdown list until the form is closed or the data is refreshed.
- Contacts are used in tasks, projects, service tickets, and timekeeping.
- If a contact is not created and linked, the specific user cannot use functions such as timekeeping in the Mobile App.
- In addition to linking the contact as a user, this contact must be linked to:
- All the cost centres (entities) for which they are the Operators.
- All the Customer accounts for which they are the rep.
- The Project’s settings if they participate in projects.

View Access Explained
- View access can be all or nothing (e.g. Contacts, Customers, Suppliers): the person can view or not view the records. This view access is managed by a checkbox.
- Checked: The user has access.
- Unchecked: The user has no access.
- View access can be divided into:
- None: The user has no access whatsoever. Any access rights granted are removed once Save (button) is clicked.
- All: The user has full access to all the records.
- Own (User): The user can only view the records they created.
- Own (Rep): The user can only view records where they are the rep selected on the transaction.
Access and Entities Explained
- There are different types of entities. User Access is only set for Registered Entities.
- When setting User Access there is an Entity column with a dropdown list of all the registered entities:
- All: Allows access to all the entities.
- Specific Entity: Restricts access to only the selected entity.
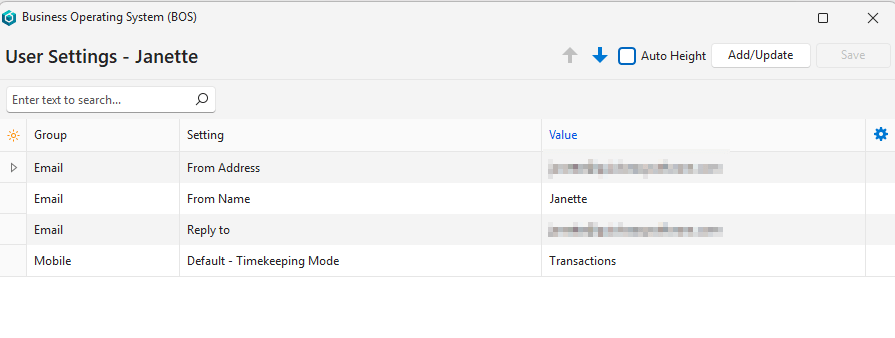
User Settings Explained
Navigation: Main Menu > Setup > User > Right click a Username > View/Edit User Settings (context menu)
Setting | Value column | Default | When Required |
Email > From Address | The email address that is displayed in the from field on emails. | The user’s registered email address | If the user will use the email features. |
Email > From Name | The name that should be displayed on emails (e.g. Ana from Support). | If the user will use the email features. | |
Email > Reply to | The email address that will be filled in when recipients click reply. | The user’s registered email address | If the user will use the email features. |
General > Enable Batch Updates | Checkbox. Checked: Access granted. | Unchecked | To allow access to the Batch Update features. |
General > Enable Export (.csv, .xlsx, .html) | Checkbox. Checked: Access granted. | Unchecked | To allow access to export transaction lists and reports. |
Mobile > Dashboard (Select from Custom Reports) | Edit (button) provides a list of custom reports. Move reports from Available to Selected to display them on the Mobile App under the Dashboard heading. | If custom reports have been created and the user wants mobile access to them. | |
Mobile > Default – Timekeeping Mode | The selected default timekeeping assignment. Users can still select one of the other options from the Menu button of the mobile app. / Option to select one of these defaults:
| Transactions | If the user will capture timekeeping records on the mobile app. |
Learn More
- User Access by Module: Explains the interface from which user access can be set for a specific module.
- User Access by User: Explains the interface from which a user’s access can be set for all the modules.
- User Access Interface: Explains the Users setup interface.
- User Access Setup Tutorials: These tutorials explain how to grant user access and how to allocate menu templates and languages.
- User Access Tutorials: These tutorials explain how to set and edit user access to the various modules.
- User Settings and Connections Tutorials: These tutorials explain how to set user settings and check for connected users.