BOS Document Designer Tutorials
The BOS Document Designer is a flexible designer that allows organisations to create and customise their own forms such as invoices and quotations. These forms can be output in JSON, HTML or PDF.
Navigation: Main Menu > Setup > Form Designer > BOS Document Designer
How to Design a Document
The design is flexible. You can move bands around and edit them as often as you like. If you return to the document later, click Edit (button) to make changes.
- Navigate to the Document Designer.
- Click New (button).
- Complete the header fields as follows:
- Description = Type a description for the document (e.g. Quotation).
- Code = Type a brief description for the document (e.g. QT).
- Page Size – Depth x Width (mm) = Type the size of the page in mm in the blocks below.
- Note: Popular page sizes:
- A3: 420 mm x 297 mm
- A4: 297 mm x 210 mm
- A5: 210 mm x 148 mm
- Note: Popular page sizes:
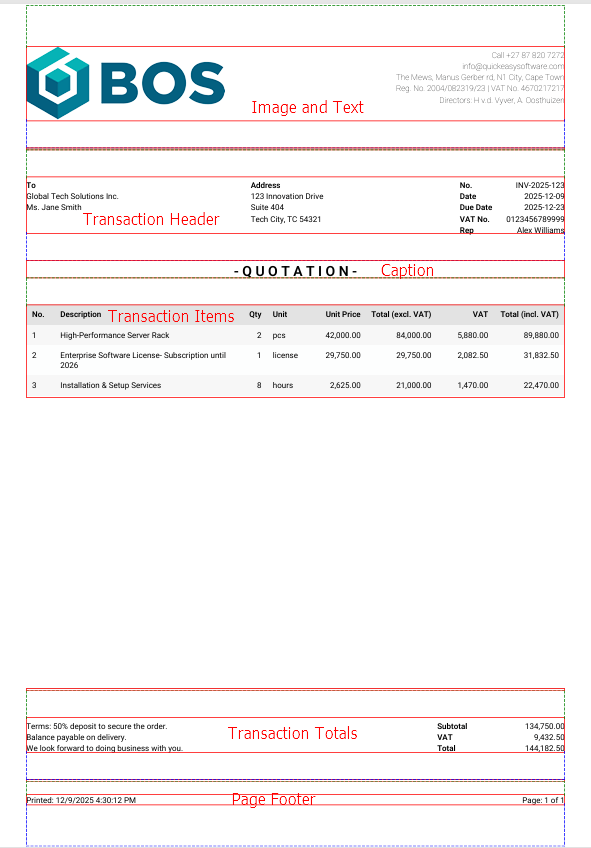
- Click Band (button) > Image and Text and complete the fields as per the instructions below.
- Click Band (button) > Line. Change the Placement = Top under section 2. Layout. Accept the rest of the defaults.
- Click Band (button) > Transaction Header and complete the fields as per the instructions below.
- Click Band (button) > Caption and complete the fields as per the instructions below.
- Click Band (button) > Transaction Items and complete the fields as per the instructions below.
- Click Band (button) > Line. Change the Placement = Bottom under section 2. Layout. Accept the rest of the defaults.
- Click Band (button) > Transaction Totals and complete the fields as per the instructions below.
- Click Band (button) > Line. Change the Placement = Bottom under section 2. Layout. Accept the rest of the defaults.
- Click Band (button) > Page Footer and complete the fields as per the instructions below.
- Click Save (button).
- Click Actions (button) > PDF to preview the document.
- Make any changes as needed.
How to Complete: Image and Text
1. Image
- Image URL = Paste the URL from your image in the block provided.
- In the Attachments Module, edit the applicable attachment.
- Click Actions (button) > Copy Link.
- Return to Document Designer and paste the link.
- Note: If you update the image in the attachment’s module a new URL is issued, and you must repeat this step to paste the new URL. It is not automatically updated.
- Placement = Select Left from the dropdown list.
- Width (mm) = 70
- Height (mm) = 70
2. Text
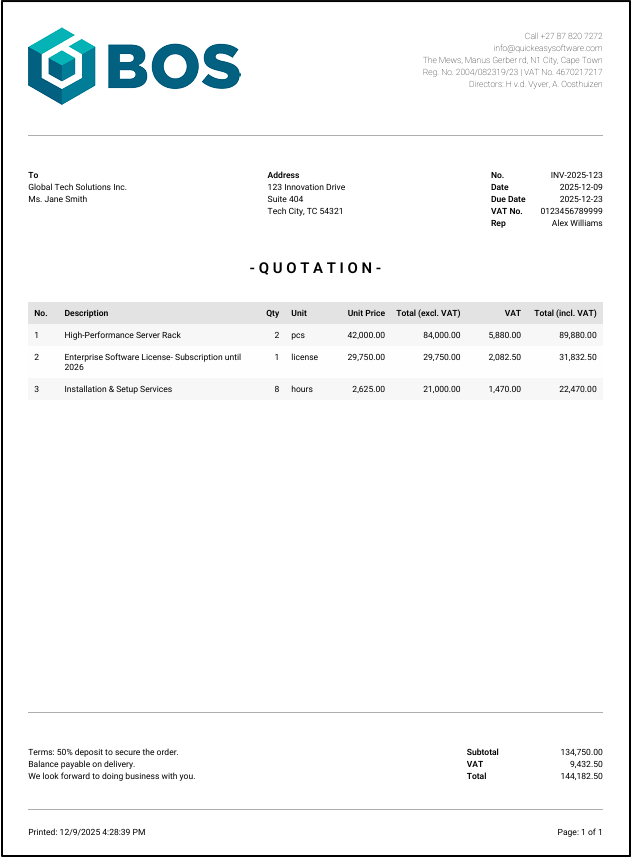
- Content = Click the pencil and type or paste all the company information.
- See the screenshot for an example.
- The information was taken from the Entity‘s Output tab and pasted in the block provided.
- Alignment = Select Right from the dropdown list.
- Font Name = Select Roboto – Thin from the dropdown list.
- Font Size = 8
- Line Height (em) = 1.4
3. Layout
- Placement = Select Top from the dropdown list.
- Start New Page = Uncheck the checkbox.
- Show on first page = Check the checkbox.
- Show on last page = Check the checkbox.
- Column Gap = 50
4. Margins
- Top (mm) = 15
- Note: This margin represents blank space at the top of the page and is necessary to compensate for the printable area of basic printers (e.g. if your customer wants to print the document).
- Bottom (mm) = 0
- Left (mm) = 10
- Right (mm) = 10
How to Complete: Transaction Header
1. Text
- Label – Number = No.
- Label – Date = Date
- Label – Due Date = Look at the applicable Transaction or Transaction Type to see what this caption is used for. Type an appropriate caption. (In this example, it was left blank.)
- Label – VAT No. = VAT No.
- Label – Rep = Rep
- Font Name = Select Roboto – Regular from the dropdown list.
- Font Size = 8
- Line Height (em) = 1.4
2. Layout
- Placement = Select Top from the dropdown list.
- Start New Page = Uncheck the checkbox.
3. Margins
- Top (mm) = 10
- Bottom (mm) = 10
- Left (mm) = 10
- Right (mm) = 10
How to Complete: Caption
1. Caption
- Content = Type QUOTATION.
- You can type any variation of the name (e.g. Q U O T A T I O N, ~~ Quotation ~~).
- Alignment = Select Center from the dropdown list.
- Font Name = Select Roboto – Bold from the dropdown list.
- Font Size = 14 (or any other value if you want the text larger or smaller (e.g. 12 or 16).
2. Layout
- Placement = Select Top from the dropdown list.
- Start New Page = Uncheck the checkbox.
- Show on first page = Check the checkbox.
- Show on last page = Check the checkbox.
3. Margins
- Top (mm) = 0
- In this example, the margin is set by the preceding Transaction Header field.
- Bottom (mm) = 0
- In this example, the margin is set by the Transaction Items field that follows.
- Left (mm) = 10
- Right (mm) = 10
How to Complete: Transaction Items
01. Column – Item No.
- Label = No.
- Alignment = Select Left from the dropdown list.
- Visible = Check the checkbox.
- Width (mm) = 10
02. Column – Description
- Label = Description
- Alignment = Select Left from the dropdown list.
- Visible = Check the checkbox.
- Width (mm) = 63
03. Column – Quantity
- Label = Qty
- Alignment = Select Right from the dropdown list.
- Visible = Check the checkbox.
- Width (mm) = 12
04. Column – Unit
- Label = Unit
- Alignment = Select Left from the dropdown list.
- Visible = Check the checkbox.
- Width (mm) = 15
05. Column – Unit Price
- Label = Unit Price
- Alignment = Select Right from the dropdown list.
- Visible = Check the checkbox.
- Width (mm) = 20
06. Column – Total Exc
- Label = Total (excl. VAT)
- Alignment = Select Right from the dropdown list.
- Visible = Check the checkbox.
- Width (mm) = 25
07. Column – VAT
- Label = VAT
- Alignment = Select Right from the dropdown list.
- Visible = Check the checkbox.
- Width (mm) = 20
08. Column – Total Inc
- Label = Total (incl. VAT)
- Alignment = Select Right from the dropdown list.
- Visible = Check the checkbox.
- Width (mm) = 25
09. Text
- Font Name = Select Roboto – Regular from the dropdown list.
- Font Size = 8
10. Layout
- Placement = Select Body from the dropdown list.
- Start New Page = Uncheck the checkbox.
11. Margins
- Top (mm) = 10
- Bottom (mm) = 0
- Left (mm) = 10
- Right (mm) = 10
How to Complete Transaction Totals
1. Column – Left
- Text = Type any text you want to display to your customer. See the screenshot for an example.
- Width (mm) = 60
- Note: You can increase the width if there is no centre text.
2. Column – Center
- Text = Type any text you want to display to your customer or leave it blank for no text.
3. Column – Right
- Label – Subtotal = Subtotal
- Label – VAT = VAT
- Label – Total = Total
- Width (mm) = 45
- Label Width (mm) = 20
4. Text
- Font Name = Select Roboto – Regular from the dropdown list.
- Font Size = 8
- Line Height (em) = 1.4
5. Layout
- Placement = Select Bottom from the dropdown list.
- Start New Page = Uncheck the checkbox.
6. Margins
- Top (mm) = 10
- Bottom (mm) = 10
- Left (mm) = 10
- Right (mm) = 10
How to Complete Page Footer
1. Column – Left
- Left = Select Date Printed from the dropdown list to display the date and time that the document was created.
- Custom Text = Leave blank.
2. Column – Center
- Center = Select Custom Text from the dropdown list.
- Custom Text = Type any text you want to display, else leave the field blank.
3. Column – Right
- Right = Select Page Set from the dropdown list to display the number of pages.
- Custom Text = Leave blank.
4. Text
- Font Name = Select Roboto – Regular from the dropdown list.
- Font Size = 8
5. Layout
- Placement = Select Footer from the dropdown list.
- Show on First Page = Check the checkbox.
- Show on Last Page = Check the checkbox.
6. Margins
- Top (mm) = 5
- Bottom (mm) = 15
- Note: This margin represents blank space at the bottom of the page and is necessary to compensate for the printable area of basic printers (e.g. if your customer wants to print the document).
- Left (mm) = 10
- Right (mm) = 10