Transaction Types Edit View
Before transactions can be captured, these steps must be completed:
- Create a Transaction Type for every transaction needed (e.g. Customer Invoices, Credit Notes, General Journal, Bank Payments) and complete the additional tabs:
- Choose the Settings.
- Create Statuses.
- Create Categories (optional).
- Create rules for copying the transactions and set user access for those rules (referred to as Copy Rules).
- Create or import forms (e.g. Invoices) that are applicable to the transactions (known as Output Templates).
- Set the User Access for the Transaction Type.
- Add the Transaction Type to the Menu.
Organisations can create as many transaction types as they want.
Navigation: Main Menu > Setup > Transaction Types
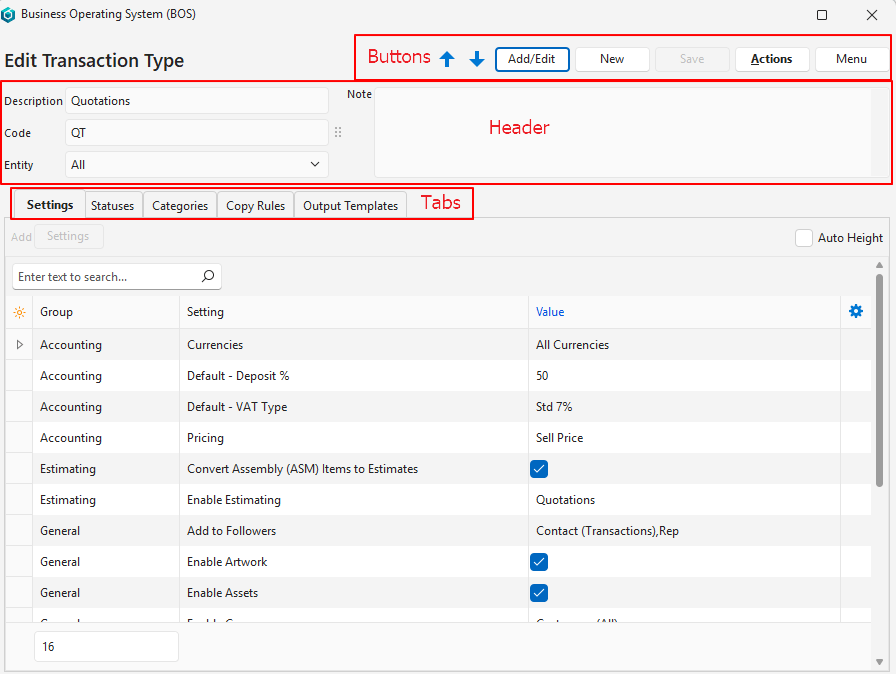
Buttons Explained
| Button | Description |
|---|---|
| ↑ ↓ | Navigates between transaction types. |
| Add/Edit | Allows users to add data or edit the fields. |
| New | Creates a new transaction type. |
| Save | Saves any changes. |
| Actions | Refresh Lookups: Refreshes the lookup lists. Update Starting/Next No.: Allows users to change the numbering sequence. However, the next number cannot be smaller than the last number used. Update Transaction Number (Trans No) Sequences: Allows users to set the sequence of transaction numbers per entity. This action is required when a new Entity is created, and Transaction Types are limited to specific entities. Copy Transaction Type: Allows users to copy the selected transaction type to create a new one. Delete Transaction Type Ctrl+Del: Allows users to delete the transaction type as long as it has not been used. |
| Menu | Settings – User Access – Edit Accounting (VAT Types, Currencies, Credit Terms, Accounts) – Edit Proposal Templates – Edit Statuses (Production Materials) (Only appears if Production is selected as the Enable Estimating option.) – Edit Statuses (Production Tasks) (Only appears if Production is selected as the Enable Estimating option.) – Edit Statuses (Production Outwork) (Only appears if Production is selected as the Enable Estimating option.) Layout |
Fields Explained: Header
| Field | Description |
|---|---|
| Description | A field for users to type a description. |
| Code | A field for users to type an abbreviation of the description (Code). Many reports only include the code and transaction number in their displays (e.g. CI 5). |
| Entity | A dropdown list for users to select All or a specific Entity. |
| Note | A field for users to type a Note. |
Tabs Explained
Each tab is explained in detail on its own page.
| Tab | Description |
|---|---|
| Settings | Allows users to create or edit Settings for the transaction type. Settings (button) next to Add: When clicked opens a list of all the available settings that have not been added. All the settings can be displayed by checking the Show All checkbox. Auto Height checkbox: Adjusts the height of the rows to fit the view (applicable if lookup lists have been created). Settings determine the transaction’s features. |
| Statuses | Allows users to create or edit Statuses for the transaction type. Statuses are used to manage transactions (e.g. whether the transaction can be edited or is posted to the ledger). |
| Categories | Allows users to edit or create Categories for the transaction types. Categories are optional and used to sort and filter transactions. |
| Copy Rules | Allows users to copy transactions and sets the conditions for copying transactions. User Access must be set for each copy rule. |
| Output Templates | Allows users to edit or create Output Templates for the transaction type. Output templates are the forms or reports generated from transactions (e.g. quotations, invoices). |