Item Attributes
Attributes provide:
- A fixed set of features (attributes).
- A fixed set of units with the conversion calculations prefilled.
- A description generator with an option to override it.
Navigation: Main Menu > Setup > Items > Menu (button) > Edit Attributes
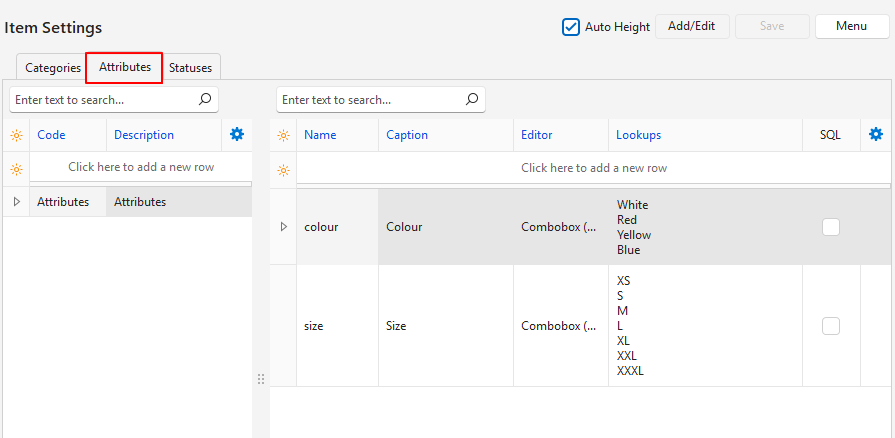
Edit Custom Attributes Interface
Buttons Explained
| Button | Description |
|---|---|
| Auto Height Checkbox | If checked, it expands the row to include the entire lookup list. If unchecked, it collapses the row to only show the first item on the lookup list. |
| Add/Edit | Enables editing the entries or adding new entries. |
| Save | Saves any changes. |
| Menu | Layout |
Fields Explained: Group Name
- All the custom attributes for items must be added to a group.
- A group can have as many attributes as needed.
- It is better to create many groups with fewer attributes in each group, than one long group that may be difficult to manage afterwards.
- The group feature was introduced in October 2025, and existing custom attributes are automatically added to a group named Attributes.
| Field | Description |
|---|---|
| Field Chooser (*) | Allows users to add or remove columns. |
| ID | The system-generated number for the attribute group. |
| Code | A field to enter a brief description of the group. |
| Description | A field to enter the group’s name. |
| Widget | An option to delete the group. |
Fields Explained: Attributes
| Field | Description |
|---|---|
| Field Chooser (*) | Allows users to add or remove columns. |
| ID | The system-generated number for the attribute. |
| Group | The name of the attribute group. |
| OrderID | The system-generated number for the order of the entries. |
| Name | The name is auto generated from the caption but may be changed. The name must be lowercase. No spaces or special characters are allowed. |
| Caption | A field to type the caption that is displayed to users. |
| Editor | A field to select an attribute option from this list: – Text: Accepts any text. – Number (0 Decimals): Accepts an integer. – Number (2 Decimals): Accepts a number with two decimals. – Number (4 Decimals): Accepts a number with four decimals. – Combobox (Fixed): An item must be selected from the lookup list. – Combobox (Edit): An item may be selected or manually entered (items typed in are not added to the lookup list). – Lookup SQL: Users can write an SQL query to create a lookup list. Right-click the entry and select View/Edit Lookup SQL from the context menu. |
| Lookups | Only applies to Combo boxes. Allows users to type a lookup list: one entry per line. |
| Created | The date on which the entry was created. |
| Updated | The date on which the entry was updated. |
| Updated by | The User who updated the entry. |
| SQL | A checkbox. Checked if a valid SQL query exists. |
| Widget | A submenu, which can also be accessed by right clicking the entry, with the following functions: – View/Edit Lookup SQL: Allows users to write SQL queries that create lookup lists from the output of that query. – Clear Attribute Values on Items: Clears all the values on items for that attribute. This function applies when the Editor field is changed, and the options selected for items are no longer valid. – Move Up Ctrl+U: Moves the entry one line higher. – Move Down Ctrl+D: Moves the entry one line lower. – Delete Ctrl+Del: Deletes the custom attribute. |
Estimating
- There is only one option to add Estimating on the Attributes (tab).
- The estimating option (as listed below) is automatically chosen based on the item’s Extension Type.
- The Attributes button next to Add is also used to remove attributes.
Estimating (Materials or Assemblies)
| Field | Description |
|---|---|
| Qty Type | The Quantity Type determines how the Quantity field is used in calculating the Unit Cost. |
| Description | A checkbox. If checked the Item’s Description is shown in the Estimate’s Description. |
| Waste % | A field for users to type a number with up to two decimal places for the percentage that is wasted during production. |
| Round Up | A checkbox. If checked rounds the price up. |
| Min Qty | A field for users to type a number with up to two decimal places for the Minimum Quantity that can be ordered. |
| Adj % | A field for users to type a number with up to two decimal places for the percentage the Cost Price must be adjusted by. |
| Unit | A lookup list of Units from which to select a unit. A Unit must be selected. |
Estimating (Tasks)
| Field | Description |
|---|---|
| Qty Type | The Quantity Type determines how the Quantity field is used in calculating the Unit Cost. |
| Qty | A field for users to type a number with up to two decimal places for the Quantity that is needed. |
| Description | A checkbox. If checked, the Item’s Description is shown on the Estimate’s Description. |
| Setup (Hrs) | A field for users to type a number with up to two decimal places for the time it takes to set up the production. |
| Speed (Qty/Hr) | A field for users to type a number with up to two decimal places for the Quantity that can be produced per hour. |
| Adj % | A field for users to type a number with up to two decimal places for the percentage the Cost Price must be adjusted by. |
| Cost Centre | A lookup list of Cost Centres for users to select one. |
| Fixed Cost | A field for users to type a number with up to two decimal places for the Fixed Cost. |
| Unit Cost | A field for users to type a number with up to two decimal places for the Unit Cost. |
| Min Cost | A field for users to type a number with up to two decimal places for the Minimum Cost. |
Estimating (Outwork)
| Field | Description |
|---|---|
| Qty Type | The Quantity Type determines how the Quantity field is used in calculating the Unit Cost. |
| Qty | A field for users to type a number with up to two decimal places for the Quantity that is produced. |
| Description | A checkbox. If checked, the Item’s Description is shown on the Estimate’s Description. |
| Adj % | A field for users to type a number with up to two decimal places for the percentage the Cost Price must be adjusted by. |
| Supplier | A dropdown list of Suppliers for users to select one. |
| Fixed Cost | A field for users to type a number with up to two decimal places for the Fixed Cost. |
| Unit Cost | A field for users to type a number with up to two decimal places for the Unit Cost. |
| Min Cost | A field for users to type a number with up to two decimal places for the Minimum Cost. |
Estimating (Costing)
| Field | Description |
|---|---|
| Description | A checkbox. If checked, the item’s description is shown as part of the Estimate’s Description. |
Constraints
| Field | Description |
|---|---|
| Type | A lookup list for users to select Sheets or Reels. |
| Max Depth | A field for users to type a number with up to two decimal places for the Maximum Depth. |
| Max Width | A field for users to type a number with up to two decimal places for the Maximum Width. |
| Margin – Top | A field for users to type a number with up to two decimal places for the Top Margin. |
| Margin – Bottom | A field for users to type a number with up to two decimal places for the Bottom Margin. |
| Margin – Side | A field for users to type a number with up to two decimal places for the Side Margin. |
Substrate Waste
| Field | Description |
|---|---|
| Type | A lookup list for users to select Sheets or Reels. |
| Setup (units) | A field for users to type a number with up to two decimal places for the number of Setup Units required. |
| Run% | A field for users to type a number with up to two decimal places for the percentage that is wasted during the run. |
Attribute Tutorials
When to Add Estimating Attributes
- You should add Estimating Attributes to an item to use that item in Estimates.
- There are several Estimating Attributes, and the applicable set is automatically chosen based on the Type of Item.
- The following parameters are added:
- Tasks:
- Qty Type
- Qty
- Description
- Speed (Qty/Hr)
- Adj %
- Cost Centre
- Fixed Cost
- Unit Cost
- Min Cost
- Outwork:
- Qty Type
- Qty
- Description
- Adj %
- Supplier
- Fixed Cost
- Unit Cost
- Min Cost
- Materials or Assemblies:
- Qty Type
- Description
- Waste %
- Round Up
- Min Qty
- Adj %
- Unit
- Costing:
- Description
- Tasks:
When to Add Substrate Waste Attributes to Materials
- You can consider adding the Substrate Waste Attribute to items, if:
- You use substrates that consist of Sheets or Reels.
- You use the following parameters:
- Maximum Depth
- Maximum Width
- Margins: Top, Bottom, and Side
When to Add Substrate Waste Attributes to Costings or Assemblies
- You can consider adding the Substrate Waste Attribute to items, if:
- You use substrates that consist of Sheets or Reels.
- You use the following parameters:
- Setup (Units)
- Run %
When to Add Constraint Attributes
- You can consider adding the Constraints Attributes to items, if:
- You use substrates that consist of Sheets or Reels.
- You use the following parameters:
- Max Depth
- Max Width
- Margins: Top, Bottom and Side
How to Add a Fixed Attribute Set
- Navigate to the Item you want to edit (Main Menu > Setup > Items > Double-click the item).
- Click Edit (button) on the top row of buttons if it is not already greyed out.
- Click Detail (tab).
- Click the arrow on Attributes (button), hover your mouse over Add and click one of these options:
- Estimating
- Note: The Item Type determines which Estimating Set is added.
- Substrate Waste
- Constraints
- Estimating
How to Remove a Fixed Attribute Set
- Attribute sets are automatically created when you create a new Substrate. These sets cannot be removed.
- Navigate to the Item you want to edit (Main Menu > Setup > Items > Double-click the item).
- Click Edit (button) on the top row of buttons if it is not already greyed out.
- Click Detail (tab).
- Click the arrow on Attributes (button) next to Add.
- Click Remove and click one of these options:
- Estimating
- Substrate Waste
- Constraints
How to Create Custom Attributes
- Custom Attributes are used to provide additional information on items. For example, if you sell clothing, you might want attributes for features such as size, colour, designer, material, distributor, and country of origin.
- Custom Attributes must be added to a group. You can create as many groups as you need.
- Navigate to Main Menu > Setup > Items.
- Click Menu (button) > Edit Attributes.
- Click Attributes (tab).
- Click Add/Edit (button) on the top row.
- Fill in the top row as follows:
- Group (group section left) = Type a name for the group if you are creating a new group.
- Group (attribute section) = Select a group from the dropdown list or leave blank if you are creating a new group (the group name is added after you click Save (button).
- Name = Type a name for the attribute using lowercase letters and no special characters.
- Caption = Type a caption that users will see.
- Editor = Select an option from the lookup list by typing the fields.
- Text: Users must type text.
- Number (0 Decimals): Users must type a number with no decimals.
- Number (2 Decimals): Users must type a number and can include up to 2 decimals.
- Number (4 Decimals): Users must type a number and can include up to 4 decimals.
- Combobox (Fixed): Users must select an option from the lookup list.
- Combobox (Edit): Users may select an option from the lookup list or type a different option.
- Lookup SQL: Creates a lookup list and restricts users to select one.
- Right-click the field and select View/Edit Lookup SQL.
- Edit the SQL as needed, Test and Save it.
- Lookups = Create a Lookup list if a Combobox (Edit) or Combobox (Fixed) was selected under Editor.
- Type a field (lookup item), press Enter, type the next field and so on.
- Click the checkbox next to Auto Height to display/hide the full lookup lists.
- Click Save (button).
How to Delete Custom Attributes
If Custom Attributes have been added to items, they must first be removed from the items before they can be deleted.
- Navigate to Main Menu > Setup > Items.
- Click Menu (button) > Edit Attributes.
- Click Attributes (tab).
- Right click the Attribute to delete and select Delete from the context menu.
- Confirm the deletion on the popup.
How to Delete Custom Attribute Groups
- Navigate to Main Menu > Setup > Items.
- Click Menu (button) > Edit Attributes.
- Click Attributes (tab).
- Follow the instructions above (How to Delete Custom Attributes) and remove all the attributes from the group.
- Right click the applicable group name and select Delete on the context menu.
- Confirm the deletion on the popup.
How to Edit Custom Attributes
- This procedure is to edit the created Attribute.
- For example, if you have an Attribute Colour and a lookup list, this tutorial explains how to edit the lookup list or change the Caption: Colour.
- Navigate to Main Menu > Setup > Items.
- Click Menu (button) > Edit Attributes.
- Click Attributes (tab).
- Click Add/Edit (button) on the top row.
- Make any changes.
- Click Save (button).
How to Add Custom Attributes to Items
- Navigate to Main Menu > Setup > Items.
- Double-click an item to edit it or click New (button) to create a new Item.
- Click Edit (button) on the top row if it is not greyed out.
- Click Detail (tab).
- On the second section, click Attributes (button) hover over Add and click the attribute you want to add.
- Repeat Step 5 to add more attributes.
- Once the Attributes are added:
- Click the arrow next to the various attributes to expand the list.
- Edit the fields in the Value column.
How to Remove a Custom Attribute from an Item
- Navigate to the item you want to edit (Main Menu > Setup > Items > Double-click the item).
- Click Edit (button) on the top row of buttons.
- Click Detail (tab).
- On the Attribute section, click Attributes (button) hover over Remove and click the attribute you want to remove.
- Note: This feature removes the Attribute from the item, it does not delete it from the list of Custom Attributes.