Entities Edit View
- In QuickEasy BOS, an organisation must have at least one registered entity.
- A registered entity in this context is an organisation with its own VAT registration number, and possibly income tax and company registration numbers.
- Entity selections and filters are hidden by default if the database only has one registered entity.
- An organisation may create non-registered entities such as Branches, Departments, Stock Locations, Cost Centres, or Tills (PoS).
- The hierarchy is Registered > Branch > Department > Till (Pos)/Cost Centre/Stock Location.
- Stock Locations, Cost Centres, and Tills (Pos) cannot have entities nested below them.
- The following data can be linked to Entities:
- Static information like Contacts, Customers, Suppliers, and Users.
- Transactions.
- Service Manager entries.
- General Settings and Currencies apply to all the Entities. A database can only have one Local Currency and one set of General Settings.
Navigation: Main Menu > Setup > Entities > Double-click an entity
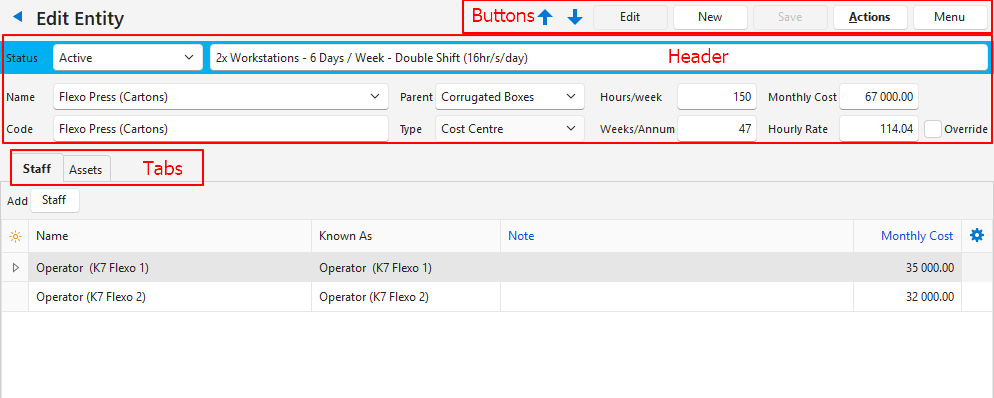
Buttons Explained
| Button | Description |
|---|---|
| ↑ ↓ | Navigates between entities. |
| Edit | Allows users to edit the fields. |
| New | Creates a new entity of the type selected from the dropdown list. |
| Save | Saves any changes. |
| Actions | Refresh Lookups: Refreshes the lookups. Delete Entity: Deletes the entity (see below). Entities can only be deleted if: All Entities: -There are no linked Assets. -There are no linked Staff. Cost Centres: -There are no linked Service Attributes on Items. -There are no linked Costing Services on Items. Stock Locations: – There are no linked Transaction Items. – There are no Items with linked Locations (Inventory (tab)). Registered Entities: – There are no linked Transactions (Entity selected in the transaction header). |
| Menu | View/Edit Notes & Attachments: Allows users to create, edit, or view any notes and attachments. Settings – User Access: Sets the User Access for Entities. – Edit Statuses (Entities): Allows users to create or edit Statuses for Entities. – Edit Statuses (Assets): Allows users to create or edit Statuses for Assets. – Edit Positions: Allows users to create or edit staff Positions. Layout |
Fields Explained: Header
| Field | Description |
|---|---|
| Status Bar | A dropdown list of available Statuses for users to change the Status. A field to enter a Status Note. |
| Name | A field for users to type the Name of the entity. Arrow on Name Field: Click the arrow to select an existing contact from a list of Contacts. |
| Code | The entity’s Code (abbreviation of the name). |
| Parent | A dropdown list of Parent Entities for users to select from. |
| Type | The Type of entity that was selected when the entity was created. |
| Hours/week | The number of Operating Hours in a week. Field must be manually entered. |
| Weeks/Annum | The number of weeks the entity operates in a year. Field must be manually entered. |
| Monthly Cost | The Monthly Cost. Field is automatically calculated from assets and staff but can also be manually entered. |
| Hourly Rate | The entity’s Hourly charge-out Rate which is calculated from the monthly cost and production hours. |
| Override | A checkbox. If checked the hourly rate can be edited. |
| Staff (tab) | See Staff (tab) below. |
| Assets (tab) | See Assets (tab) below. |
| Output (tab) | This tab is only displayed if the Entity Type is a Registered entity. – Masthead (.jpf, .png): Option to upload or paste a Master Header to be displayed on Output forms (e.g. invoices). – Logo (.jpg, .png): Option to upload or paste a Logo to be displayed on Output forms (e.g. invoices). – Bank Detail: Fields for users to type the entity’s bank details which are displayed on forms (e.g. invoices). |
Staff (tab) Explained
| Field | Description |
|---|---|
| Staff (button) | Select Contact: Opens a list of contacts for users to select one to add. Add Staff: Opens a Contact – Person form for users to complete. |
| Field Chooser (*) | Allows users to add or remove columns. |
| ID | The system-generated number for the entry. |
| Entity ID | The system-generated number for the entity. |
| Name | The name of the staff member. |
| Known As | The staff member’s nickname. |
| Forenames | The staff member’s first name/s. |
| Surname | The staff member’s surname. |
| Tel | The staff member’s telephone number. |
| Mobile | The staff member’s mobile phone number. |
| The staff member’s email address. | |
| Note | Any Note created for the staff member. |
| Monthly Cost | The staff member’s Monthly Cost. |
| Created | The date on which the record was created. |
| Updated | The date on which the record was updated. |
| Updated By | The User who updated the record. |
| Widget | A submenu that can also be accessed by right clicking an entry with the following options: – Edit: Opens the contact form for editing. – Delete link to Staff Ctrl + Del: Removes the entry from the staff tab but does not delete the contact. |
Assets (tab) Explained
To use all the features on the Assets tab (e.g. Edit), users must have access to Assets.
| Field | Description |
|---|---|
| Asset (button) | Provides a dropdown list as follows: – Select Assets: Provides a dropdown list of all the assets for users to select one. The list can be filtered by Type. – Add Asset >Vehicles: Allows users to create a new vehicle asset and adds it to the contact. – Add Asset > Equipment: Allows users to create a new equipment asset and adds it to the contact. |
| Field Chooser (*) | Allows users to add or remove columns. |
| ID | The system-generated number for the entry. |
| Entity ID | The system-generated number for the entity. |
| Status | The status of the asset. |
| Type | The type of asset (e.g. Equipment or Vehicles). |
| Entity | The entity’s code (short description). |
| Code | The asset’s code. |
| Description | A description of the asset. |
| Monthly Cost | A field to enter the estimated monthly cost of the asset. |
| Created | The date on which the record was created. |
| Updated | The date on which the record was updated. |
| Updated By | The User who updated the record. |
| Widget | A submenu, which can also be accessed by right clicking the entry, with the following functions: – Edit: Opens the asset’s record for editing. – Remove Linked: Delinks the asset from the entity. |
Learn More
- Entities List View: Explains the different views that are available for entities.
- Entities Tutorials Creating and Editing: These tutorials explain how to create and edit entities.
- Entities Tutorials List Views: These tutorials explain how to access the various entity displays.
- Entity Types: Explains the types of entities that are available.