Production Planning Tasks
- Production planning is activated per Transaction Type on the Settings tab.
- Organisations with multiple departments or processes, can create multiple Work Order Transaction Types and activate production planning for each one.
- Each Work Order Transaction Type has its own production planning board.
- A single Work Order can contain multiple items that must be produced. The production planning module separates the jobs and tasks for each item that is part of an estimate.
- The expected transaction flow is Quotation > Sales Order > Work Order. However, work orders may be created directly.
- Behind the scenes, planning fields are integrated into the materials and routing sections (tasks and outwork) of estimates.
- As part of the Work Order Menu options, production views are used to manage outwork, materials, services, and timekeeping.
Tasks List View
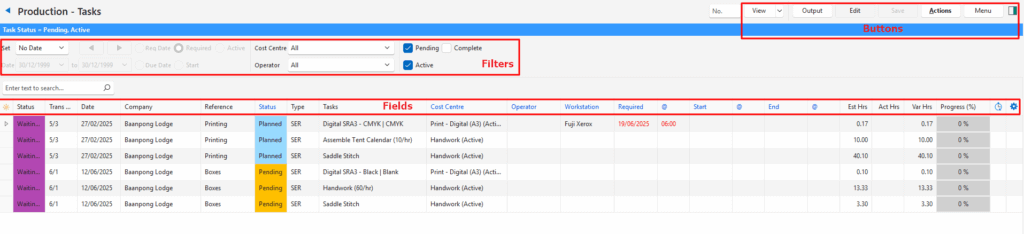
Buttons Explained
| Button | Description |
|---|---|
| View | Generates a list of entries as per the selected data filters. |
| Arrow on View Button | Reset Data Filter: Resets all the data filters. |
| Output | Prints, previews, or exports the selected report if Output Templates are added. Exports the current display in .xlsx format. |
| Edit | Allows Users to edit the entry. |
| Actions | Allows for changes to be made to multiple records that can be selected using Ctrl Left Click. The options are: Batch Update: Changes all the selected records when Update (button) is clicked. The options are: – Cost Centre: Sets the cost centre to the one selected from the dropdown list. – End: Sets the end date to the one selected on the calendar. – Operator: Sets the operator to the one selected from the dropdown list. – Required: Sets the required date to the one selected on the calendar (the date on which the task is required). – Start: Sets the start date to the one selected on the calendar. – Status: Sets the task’s status to the one selected from the dropdown list. – Workstation: Sets the workstation to the one selected from the dropdown list. |
| Menu | Settings – User Access – Edit Transaction Type Views – Transaction – Transactions – Items Views – Production – Jobs – Materials – Tasks – Outwork Layout |
Filters Explained
| Filter | Description |
|---|---|
| Set | A dropdown list with date options (e.g. No Date, Today, This Year). |
| ← → | Adjusts the Date in the direction of the arrow. |
| Date … to … | Allows users to set their own Dates (based on the selection under Set). |
| Due Date (radio button) | Applies the selected date to filter the records according to their Transaction Due Dates. |
| Req Date (radio button) | Applies the selected date to filter the records according to their Transaction Required Dates. |
| Required (radio button) | Applies the selected date to filter the records according to their Task Required Dates. |
| Start (radio button) | Applies the selected date to filter the records according to their Task Start Dates. |
| Active (radio button) | Applies the selected date to filter the records that are Active (e.g. if the date is set for today, it shows all records changed or updated today). |
| Cost Centre | Allows users to select a specific Cost Centre or All. |
| Operator | Allows users to select a specific Operator or All. |
| Status Checkboxes | Filters the tasks to only show the checked Statuses. |
Fields Explained
| Field | Description |
|---|---|
| ID | The system-generated number for the entry. |
| Trans ID | The system-generated number for the transaction. |
| Status (Trans) | The Status of the transaction. |
| Trans No. | The transaction and item numbers. |
| Date | The Transaction Date. |
| Req Date | The Required Date as per the transaction. If the date is before today, it is shown in red. Required dates are typically used to indicate the date by which the customer requires the goods. |
| Due Date | The Due Date as per the transaction. This date is shown in red if it is later than the required date. Due dates are typically used to indicate when the goods must be ready. |
| Company | The name of the Customer or Supplier. |
| Reference | The reference typed on the transaction. |
| Product | The name of the product. |
| Status (Tasks) | The Status of the Task. Statuses are created here: Edit Transaction Type (e.g. Work Order) > Menu (button) > Edit Statuses (Production Tasks). |
| Type | The type of task (e.g. SER for Service). |
| Tasks | The name of the task. |
| Unit | The unit of the task. |
| Cost Centre | The task’s Cost Centre. |
| Operator | The task’s Operator as set by the Cost Centre or a dropdown list to select an operator if there is more than one linked to the cost centre. |
| Workstation | The task’s Workstation as set by the Cost Centre or a dropdown list to select a workstation if there is more than one linked to the cost centre. |
| Required (Date Req (Tasks)) | The date on which the Task is Required. |
| @ (Time Req) | The time by which the Task is Required. |
| Start (Date Start) | The start date of the task. If the start date and time are filled in, the end date is automatically calculated by adding the estimated hours to the start date and time. |
| @ (Time Start) | The start time of the task. |
| End (Date End) | The end date of the task. If the end date and time are filled in, the start date is automatically calculated by deducting the estimated hours from the end date and time. |
| @ (Time End) | The end time of the task. |
| Est Hrs | The Estimated Hours the job should take. |
| Act Hrs | The Actual Hours the job took. |
| Var Hrs | The difference between the estimated and actual hours. |
| Progress (%) | The percentage of progress made. |
| Timekeeping (Clock) | Timekeeping indicator. Displays a clock if timekeeping is active. |
| Created | The date on which the entry was created. |
| Updated | The date on which the entry was updated. |
| Updated By | The User who last updated the entry. |
| Timekeeping (Clock) | Timekeeping indicator. Displays a clock if timekeeping is active. |
| Widget | A submenu, which can also be accessed by right clicking the entry, with the following functions: – Start / Stop: Starts or stops timekeeping for the task. – Open Transaction: Opens the related work order. – Open Timekeeping: Opens the linked timekeeping record. – Open Linked Item: Opens the linked item on a popup. The item can be edited, but the popup has limited functionality. – View Item Summary: Displays the item summary. |
Tasks Tutorials
How to Edit Individual Tasks
- Navigate to Work Orders.
- Click Menu (button) > Tasks.
- Set the filters as needed.
- Click View (button).
- Click Edit (button).
- Click any of the fields in the columns with blue captions and select alternate options from the dropdown lists, calendars, or time choosers.
- Click Save (button).
How to Edit Multiple Entries (Batch Updates)
- Navigate to Work Orders.
- Click Menu (button) > Tasks.
- Set the filters as needed.
- Click View (button).
- Click Actions (button) > Batch Update.
- Select the entries you want to change. (Use Ctrl Left click to multi-select.)
- Select one of these options next to Update:
- Cost Centre: Select a cost centre from the dropdown list.
- End: Select an end date on the calendar.
- Operator: Select an operator from the dropdown list.
- Required: Select a required date on the calendar.
- Start: Select a start date on the calendar.
- Status: Select a status from the dropdown list.
- Workstation: Select a workstation from the dropdown list.
- Click Update (button).
- Confirm the change.
How to View a Linked Item
- Navigate to Work Orders.
- Click Menu (button) > Tasks.
- Set the filters as needed.
- Click View (button).
- Right click an entry and select Open Linked Item from the context menu.
- Note: The item is opened on a popup and can be edited. However, the popup does not provide for general item-related functions such as creating new items.
How to View an Item Summary
- Navigate to Work Orders.
- Click Menu (button) > Tasks.
- Right click an entry and select View Item Summary from the context menu.
- If the entry is an item (as opposed to a custom entry), the summary is displayed on the right.
How to View the Work Order Transaction
- Navigate to Work Orders.
- Click Menu (button) > Tasks.
- Set the filters as needed.
- Click View (button).
- Right click an entry and select Open Transaction from the context menu.
- The Work Order is opened. Use the navigational arrow next to the text Edit Work Orders to return to the Tasks production view.
How to Start Timekeeping
- Navigate to Work Orders.
- Click Menu (button) > Tasks.
- Set the filters as needed.
- Click View (button).
- Right click an entry and select Start Timekeeping from the context menu.
- A clock is displayed in the Timekeeping column.
How to Stop Timekeeping
- Navigate to Work Orders.
- Click Menu (button) > Tasks.
- Set the filters as needed.
- Click View (button).
- Right click an entry that has a clock displayed in the Timekeeping column and select Stop Timekeeping from the context menu.
- The Act Hrs (Actual Hours) column is updated to display the hours worked.
How to View / Edit the Timekeeping Transaction
- Navigate to Work Orders.
- Click Menu (button) > Tasks.
- Set the filters as needed.
- Click View (button).
- Right click an entry that has an amount in the Timekeeping column and select Open Timekeeping from the context menu.
- The Timekeeping record is opened.
- Edit the record by clicking Edit (button) if needed.