
Edit Reports List and Edit Views
You can use the Custom Reports module to create, edit, and manage custom reports with accompanying charts. It has a user-friendly interface to define report headers, fields, filters, and drilldown options, enabling tailored data analysis and reporting.
Creating customised reports for customers is one of the services QuickEasy offers.
Custom reports include two interfaces:
- Edit Reports: Reports are created or edited using SQL. Edit Reports can be found in the Setup menu.
- Custom Reports: Displays the created reports. Custom reports can be added to any Menu Group as a whole or as individual reports. When added as a group, users select reports to display from a dropdown list. This list only contains reports they are authorised to view.
List View
Buttons Explained

Button | Description |
View | Displays a list of reports. |
New | Creates a new custom report. |
Menu |
Fields Explained
Field | Description |
Field Chooser (*) | Used to add or remove columns. |
ID | The system-generated number allocated to the entry. |
Description | The name of the report. |
Code | The abbreviated name of the report. |
Chart Type | The chart that can be displayed on the mobile app. |
Note | Any note for the report. |
Created | The date on which the entry was created. |
Updated | The date on which the entry was last updated. |
Updated By | The user who last updated the entry. |

| A submenu with these options:
|
Edit Views
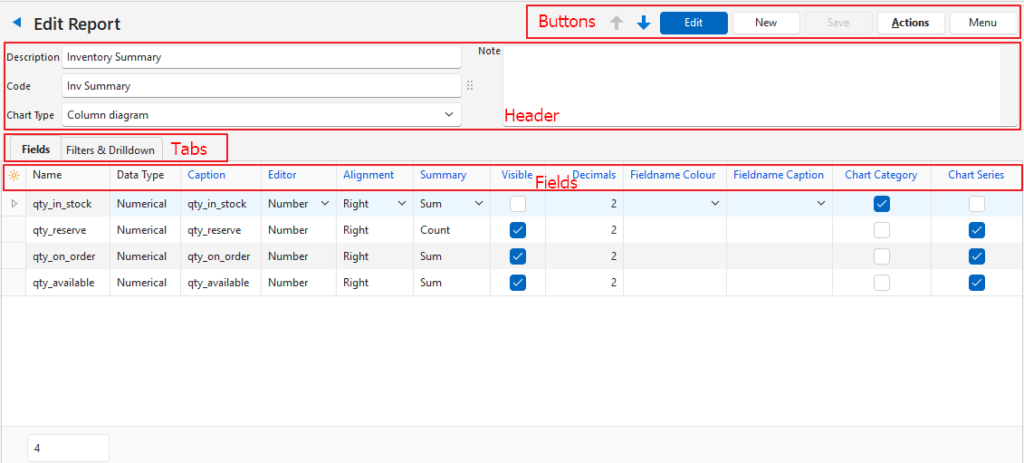
Buttons Explained
Button | Description |
Arrows | Navigates to the next or previous entry. |
Edit | Allows the entry to be edited. |
New | Creates a new custom report. |
Save | Saves any changes. |
Actions |
|
Menu | Settings
|
Header Explained
Field | Description |
Description | Enter a description (name) for the report. |
Code | Enter a brief description for the report. |
Chart Type | Select a chart type from this list:
|
Note | Enter a note (optional). |
Fields (tab) Explained
- The fields are automatically generated based on the report’s SQL query.
- Fields in blue can be edited.
Field | Description |
Field Chooser (*) | Used to add or remove columns. |
ID | The system-generated number allocated to the entry. |
Name | The field’s name from the SQL query. |
Data Type | The type of data (e.g. text, numerical, date). |
Caption | The field’s name in the database. Can be edited to insert a more descriptive label. |
Editor | The type of data in the database. A different option can be selected from this list:
|
Alignment | Choose the text alignment from this list:
|
Summary | Choose a calculation option from this list:
|
Visible | Checkbox. If checked the field is visible in the report. Should be checked for fields that contain the data that is displayed in the report. Should be unchecked for fields that contain the functions being used in other fields (e.g. custom captions or colour changes). May be unchecked for fields that contain the database or entry ID. |
Decimals | Sets the number of decimal places for numerical fields. |
Fieldname Colour | A dropdown list of all the field names for users to choose which fields should have a colour filter applied. |
Fieldname Caption | A dropdown list of all the field names, to select as captions for the fields. |
Created | The date on which the entry was created. |
Updated | The date on which the entry was last updated. |
Updated By | The user who last updated the entry. |
Chart Category | Checkbox. Check one entry that represents the vertical access (e.g. Amount). |
Chart Series | Checkbox. Multiple entries can be checked (e.g. Rep, Customer, Period). |
Filters Section Explained
- The fields are automatically generated based on the report’s SQL query.
- Filters are used to refine the data shown under Fields.
- Fields in blue can be edited.
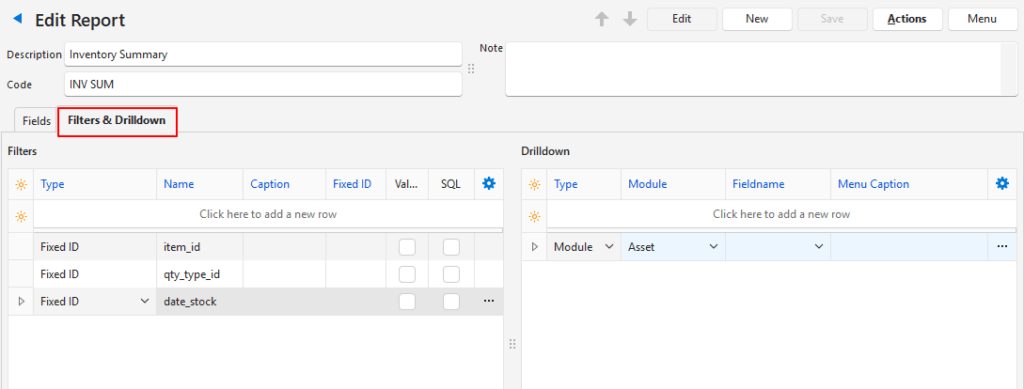
Field | Description |
Field Chooser (*) | Used to add or remove columns. |
ID | The system-generated number for the entry. |
Type | The type of filter. Default = Fixed ID. The options are:
Information for the selected Type (e.g. Text List, SQL) can be entered in the respective columns or by accessing the context menu (right-click). |
Name | The Parameter Name used in the SQL query. |
Caption | The displayed name of the filter. |
Created | The date on which the entry was created. |
Updated | The date on which the entry was last updated. |
Updated By | The user who last updated the entry. |
Fixed ID | The value if Type = Fixed ID (e.g. the ID of the Transaction Type). |
Value List | Checkbox. Automatically checked once a Key-Value List is defined. The key list is defined via the context menu. |
SQL | Checkbox. Automatically checked once the SQL query is written. Use the context menu to open the SQL interface. |
|
| A submenu that changes depending on the type of entry. It contains one or more of these options:
|
Drilldown Section Explained
- The drilldown function is optional.
- You can define certain actions that will be available via the context menu (e.g. open customer account).
- You can include multiple drilldown options.
- The available drilldown modules are: Contact, Item, Service Manager, and Transaction.
Field | Description |
Field Chooser (*) | Used to add or remove columns. |
ID | The system-generated number for the entry. |
Type | Select a type from this list:
|
Module | A dropdown list of available modules. Applies if Type = Module. |
Fieldname | Select a field name for the drilldown function from the list of all the field names. The selected field name should be the primary key (ID) for that module. |
Menu Caption | The label that is shown in the report’s context menu. |
Created | The date on which the entry was created. |
Updated | The date on which the entry was last updated. |
Updated By | The user who last updated the entry. |
|
| A submenu with the following options:
|
Learn More
- Custom Reports: Explains the interface for displaying custom reports and includes tutorials on using the related features.
- Edit Reports Edit SQL: Explains the interface from which SQL queries can be written for custom reports.
- Edit Reports Formatted Text: Provides examples of formatted text that can be used in custom reports.
- Edit Reports Tutorials: These tutorials explain how to create custom reports. However, you will need to know how to use SQL to use this module effectively.