Transactions Edit View Tutorials
In QuickEasy BOS, transactions (e.g. Customer Invoices, Quotations, Supplier Invoices) have two interfaces. The first lists the transaction with details such as the Status, Date, Customer, or Supplier, and the transaction amounts. This is known as the List View. List View is further divided into two views: Items which lists every item on the transaction and Transactions which only lists the transaction totals. The second, known as Edit View, is where transactions are captured.
A transaction type must be added to a menu before transactions can be entered. Transaction types can be added to any menu. User access is set per transaction type.
How to Create a Transaction
- The available fields depend on your user rights, and the Transaction’s setup (e.g. if you are locked to a specific Entity, you cannot select any other Entity).
- Fields that are inaccessible may still be displayed but an error message is returned if they are clicked.
- Navigate to a Transaction.
- Click New (button).
- Fill in the Header details as follows:
- Status Bar = Complete the information as follows:
- Status = The status is the default status for new transactions as per the setups. Statuses can be updated manually or automatically (e.g. when the transaction is copied to another transaction). The status should only be changed when the transaction is complete and can be set automatically by clicking Done (button) if the feature is enabled.
- Blank field = Type a Status Note (optional). This can be useful to explain why a transaction has been cancelled, or to leave a note to the person approving the transaction.
- Req Date = Click the arrow and select the date on which the items are Required (e.g. when the customer wants the goods).
- Note: The caption for this field is determined by the Transaction Type’s setting. If a caption is not provided, this field is not displayed.
- Due Date = Click the arrow and select the date by which the items are Due (e.g. when production must be finished).
- Note: The caption for this field is determined by the Transaction Type’s setting. If a caption is not provided, this field is not displayed.
- @ = Click the arrow and select the Time by which the items are due (e.g. when production must be finished time).
- Note: The caption for this field is determined by the Transaction Type’s setting. If a caption is not provided, this field is not displayed.
- No = The transaction number is automatically generated. However, for documents such as Supplier Invoices, a Transaction Type setting allows you to enter the number manually.
- Date = The date defaults to today. Click the arrow and select a different date if needed.
- Customer/Supplier = Select a Customer/Supplier from the dropdown list and press Enter to auto-complete some of the other linked fields.
- Contact = Select a Contact from the dropdown list if a contact is not automatically filled in.
- Rep = Select a Rep from the dropdown list (customer transactions only).
- Assign To = Select a User to assign the transaction to.
- Reference = Type a Reference for the transaction (e.g. project name).
- Note = Type any additional Notes for the transaction.
- Entity = Select an Entity from the dropdown list. The field is hidden if there is only one entity.
- Category = Select a Category from the dropdown list for reporting purposes.
- Order No. = Type an Order Number (e.g. the customer’s order number).
- Terms = Select the Terms from the dropdown list. (Customer transactions only.)
- Deliver to = This field is usually auto filled.
- If a Contact is selected and a Location was allocated to the contact (on the customer record), that location is filled in as the delivery address.
- If a contact is not selected or has no location, the customer’s default delivery address is entered.
- If no address is auto filled, you can select or enter an address.
- Status Bar = Complete the information as follows:
- To add the details of the transaction, click one of the buttons next to Add. This setting: Transaction Items > Enable Adding Items determines which items can be added:
- Item
- On the popup, select the items you want to add. Use Ctrl Left click to multi-select.
- Note: You can filter the list of items by main or subcategory.
- Click Add (button).
- Close the popup when you have finished adding items or press Esc key.
- For each item that was added, fill in the details as follows:
- Qty = Type the applicable Quantity.
- Fixed Cost = Type a Fixed Cost if applicable (a Fixed Cost applies regardless of the Quantity).
- Unit Cost = Type a Unit Cost if applicable (a Unit Cost is multiplied by the Quantity).
- On the popup, select the items you want to add. Use Ctrl Left click to multi-select.
- Custom
- A new line is opened in the detail section. Fill in the details as follows:
- Qty = Type the applicable Quantity.
- Description = Type a Description.
- Fixed Cost = Type a Fixed Cost if applicable (a Fixed Cost applies regardless of the Quantity).
- Unit Cost = Type a Unit Cost if applicable (a Unit Cost is multiplied by the Quantity).
- A new line is opened in the detail section. Fill in the details as follows:
- Estimate
- Select an Estimate Type from the dropdown list.
- See Estimates on how to fill in the details.
- Click the arrow next to Edit to return to the transaction when the estimate is complete.
- The line item is filled in from the Estimate.
- Item
- Continue to add items until the transaction is complete.
- Note: You can copy a line item by right clicking the line you want to copy and selecting Copy Item from the context menu.
- Click Save (button) or click Done (button).
- Note: A Done button is only shown if a default Complete status is set for the transaction type. Clicking the button saves any changes and sets the status as per the setting (i.e. marks the transaction complete).
How to Display Line-Item Entries on a Calendar
- The calendar settings must be completed on the Transaction Type’s settings. These settings determine the name of the fields as follows:
- Resource Calendar (Transaction Items): The name of the Calendar Type (e.g. Transaction Calendar) is the name of the field on the transaction from which a resource is selected.
- Enable Date Start (Enter Caption): The name entered here (e.g. Calendar Start) is the field name for the start date and time on the transaction.
- Enable Date End (Enter Caption): The name entered here (e.g. Calendar End) is the field name for the start date and time on the transaction.
- This setting determines whether the quantity is auto calculated or not: Set Quantity from Calendar (Duration between Start and End dates). If checked, the End Dates or Quantity fields are automatically updated when one of the two fields are changed.
- Create a transaction and add the line items.
- Click Field Chooser (*) and check the checkboxes next to the following fields if they are not already displayed:
- Calendar End – Date: Displayed as Calendar End (where End is the custom caption).
- Calendar End – Time: Displayed as @.
- Calendar Start – Date: Displayed as Calendar Start (where Start is the custom caption).
- Calendar Start – Time: Displayed as @ (where Start is the custom caption).
- Calendar Transaction Calendar: Displayed as Transaction Calendar (where Transaction Calendar is the user-defined calendar name).
- Complete these fields for every line item as follows:
- Calendar Start – Date: Select the start date from the calendar.
- Calendar Start – Time: Select the start time from the time chooser.
- Calendar End – Date: Select the end date from the calendar.
- Calendar End – Time: Select the end time from the time chooser.
- Transaction Calendar: Select the resource from the dropdown list or leave it blank if the calendar provides for unallocated entries. A dropdown list is unavailable for Estimate items, but these line items can still be dragged on the actual calendar from unallocated to a resource. The dates and times must be filled in.
- Qty: Fill in the quantity unless it is automatically calculated. The quantity should be the working hours between the end and starting times.
- Complete the rest of the transaction as you normally would.
How to Edit a Transaction
- To edit a transaction, you need Edit permission under User Access. The transaction’s status must also allow editing.
- Depending on your user rights, you can change the status back to an editable status, edit the transaction, and revert the status.
- Display a List of Transactions.
- Right click the transaction you want to edit and select Edit from the context menu.
- Make the necessary changes.
- Click Save (button).
How to Edit Multiple Items on a Transaction Simultaneously
If features are not enabled for the transaction type, they are not available on the Batch Update options either.
- Display a List of Transactions.
- Right click the transaction you want to edit and select Edit from the context menu.
- Select the items you want to edit. (Use Ctrl Left click to multi-select.)
- Click Actions (button) > Batch Update.
- Select one of these options from the dropdown list next to Update:
- Adj %: Type a number in the adjacent block by which the prices must be adjusted. Adjustments can be positive (additional markup) or negative (discount).
- Cr Account: Select a ledger account that must be credited from the dropdown list.
- Dr Account: Select a ledger account that must be debited from the dropdown list.
- Fix: Checkbox: Check or uncheck the checkbox.
- If checked both the fixed and unit prices can be edited, and they override the mark-up percentage (MU%) which is calculated based on the entered prices.
- If unchecked, the MU% is applied to the cost price to determine both the fixed and unit prices. The MU% overrides any entered prices and the prices are adjusted to reflect the MU%.
- Changes made to the transaction automatically adjust this checkbox: If a price is entered the checkbox is checked. If a MU% is entered, the checkbox is unchecked.
- Group: Type a name for the group. Group names are transaction specific. Groups allow items to be sorted.
- Location: Select a location for the inventory item from the dropdown list.
- MU%: Type a number in the adjacent block to change the markup percentage. This process automatically unchecks the Fix checkbox.
- Resolve: Select a resolve option from the dropdown list of resolves selected for the transaction type.
- Service Number: Select a service ticket number from the dropdown list.
- Status: Select a new status from the dropdown list.
- Transaction Calendar: Select a new resource from the dropdown list. (Transaction Calendar is a custom description. The name of the calendar selected for the transaction is displayed.)
- Calendar Start: Sets the date and time to the ones selected. (Calendar Start is a custom description.)
- Calendar End: Sets the date and time to the ones selected. (Calendar End is a custom description.)
- VAT: Changes the VAT Type to the one selected and whether prices are entered inclusive or exclusive.
- VAT Category: Changes the VAT Category to the one selected.
- Click Update (button).
- Confirm the change.
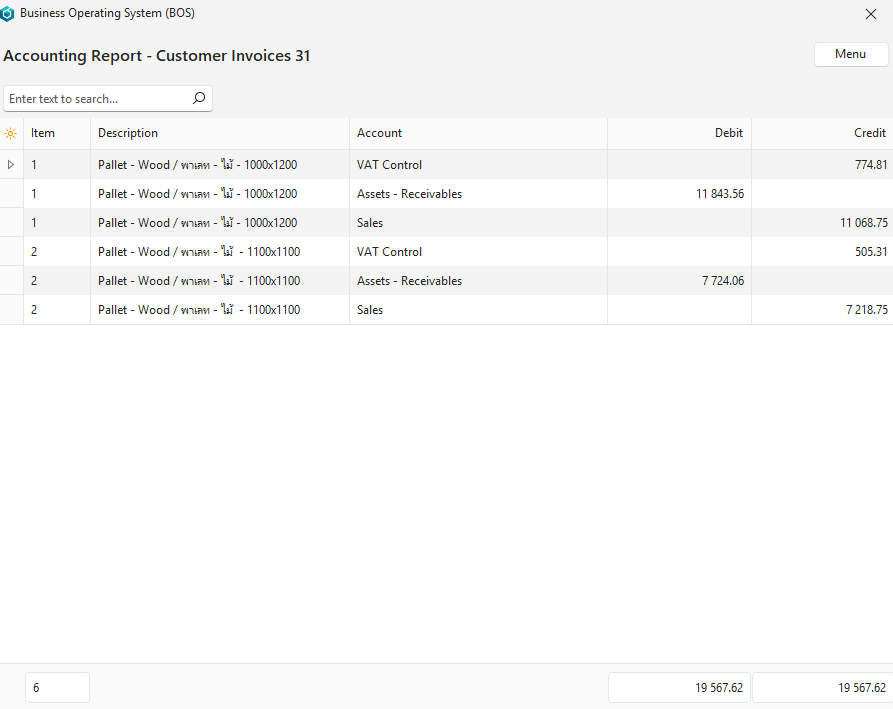
How to Display a Transaction’s Accounting Report
The Accounting report shows how the transaction will be posted to the ledger. The report is only displayed if the transaction is in an accounting status (i.e. a Status for which the Accounting column is checked – See Transaction Types.)
- Create a transaction.
- Set the transaction’s status to a final status (e.g. Complete).
- Click Menu (button) > View Accounting.
- The transaction’s accounting report is displayed (see example below).
- Click the X to close the report.
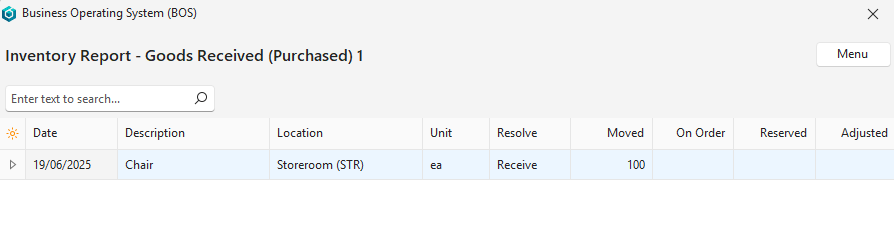
How to Display a Transaction’s Inventory Report
The Inventory report shows how the effect that the transaction has on inventory. The report is only displayed if the transaction is in an inventory status (i.e. a Status for which the Inventory column is checked – See Transaction Types.)
- Create a transaction.
- Click Menu (button) > View Inventory.
- The transaction’s inventory report is displayed (see example below).
- Click the X to close the report.
How to Copy a Transaction: List View
To copy a transaction, the necessary Copy Rules must be created. You must have User Access to copy the transaction manually. When copying a transaction, a new transaction is created even if you do not have the required rights to create new transactions from scratch.
- Display a List of Transactions.
- Right click the transaction you want to copy and select the applicable Copy option from the context menu.
- Confirm the copy on the popup.
- Click Save (button).
How to Copy a Transaction: Edit View
- To copy a transaction, the necessary Copy Rules must be created.
- You must have User Access to copy the transaction manually.
- Additional fields such as From (source transaction) and Group can be displayed using the Field Chooser (*).
- The layout can be saved by clicking Menu (button) > Layout.
- The Outstanding checkbox toggles displaying all the items or only those that have not yet been copied.
- The Select checkbox, allows items to be selected.
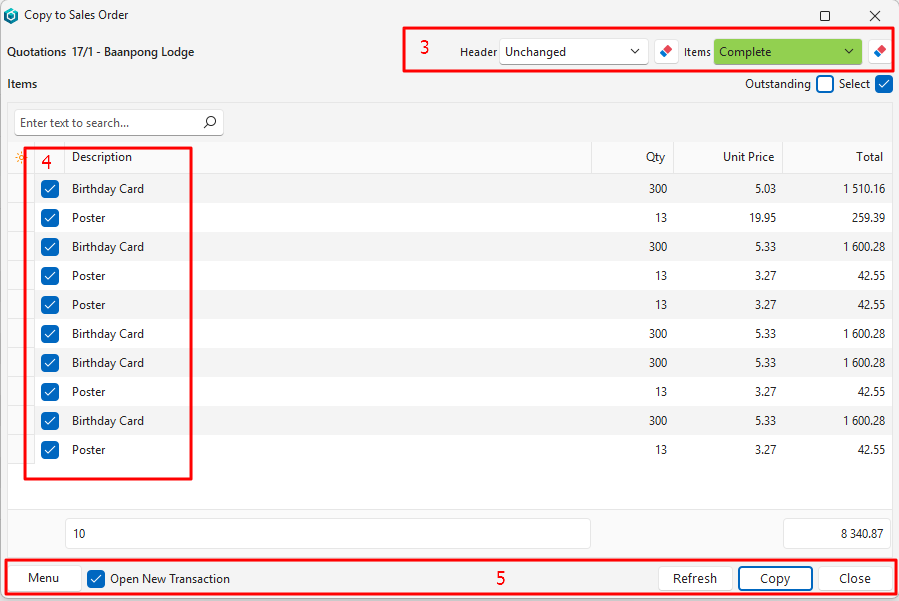
- Edit a Transaction.
- Click Actions (button) and select the applicable Copy option from the dropdown list below Actions.
- Note: All the manual copy options that were created are listed there.
- Select the statuses for the existing and new transaction on the top right (optional).
- Select the items on the dropdown list that must be copied by checking or unchecking the checkboxes.
- Click Copy (button).
- Confirm that you want to copy the transaction.
How to Delete a Transaction
- You need the necessary User Access to delete a transaction.
- The deleted transaction is moved to the Recycle Bin from where it can be permanently deleted or restored.
- Display a List of Transactions.
- Note: You can also delete a transaction from Edit View, using Actions (button).
- Right click the transaction you want to delete and select Delete from the context menu.
- Confirm the deletion on the popup.
- Click Save (button).
How to View Linked Transactions
- From Edit View, click Links (button).
- Click on any of the links listed there to open that document. The links consist of the transaction type’s code, and the transaction number. Non-transaction items are also included (e.g. service tickets).
- Note: The current document you are accessing Links from is also on the list and might be the only document available.
How to View a Linked Estimate
- From Edit View, right click one of the line items that displays the type of EST and select Open Estimate from the context menu.
How to Show or Hide Notes
- From Edit View, click Actions (button) > Show Notes.
- Note: If checked, the notes are displayed below the items. If unchecked, the notes are not displayed.
How to Create a Note or Attachment
You can toggle displaying any notes below the line items by clicking Menu (button) > Show Notes.
- From Edit View, click Menu (button) > View/Edit Notes & Attachments.
- A panel opens on the right and displays any previously created Notes and Attachments.
- Click Add (button) and follow the instructions here.
Artwork Tutorials and Information
- Artwork is a type of attachment.
- It requires the Transaction Type setting General > Enable Artwork to be enabled (checked).
- The option to View/Edit Artwork is available from the Actions button of an Estimate.
- It can also be accessed by right clicking a line item on a transaction.
- If artwork is uploaded, it is available to other linked transactions (e.g. if you copy a quotation to a sales order the artwork can be opened from the sales order).
- Only one artwork can be linked to an item but every item on a transaction can have its own artwork.
- You can include artwork in custom templates (see Form Designer and Output):
- trans_item_artwork stores the artwork linked to a transaction item.
- trans_artwork stores all the artwork linked to a transaction (e.g. if you want to add artwork on a second page instead of with the items).
How to Add Artwork to an Item: Upload
- From Edit View of an estimate, click Actions (button) > View/Edit Artwork.
- Click Edit (button).
- Click Upload from Device (tab) and select an upload option:
- Drag a file onto the text: Drop File Here.
- Click Select Files from Your Device. Click the file you want to upload, click Open (button).
- The artwork is automatically saved.
How to Add Artwork to an Item: Capture
- From Edit View, click Actions (button) > View/Edit Artwork.
- Click Edit (button).
- Click Capture Image (tab).
- If camera permission is granted, the image is displayed. Use the following functions to capture and save the image:
- Click Switch (button) to switch to a different camera.
- Click the Settings icon on the image to change the size or resolution.
- Click Play (button) to start capturing the image.
- Click Pause (button) to stop capturing the image.
- Click Save (button) on the top row of buttons on the popup.
How to View an Item’s Artwork
- From Edit View, click Actions (button) > View/Edit Artwork.
- Click Actions (button) > Open File.
- Note: You can also click Actions (button) > Copy Link and paste the link in your browser.
How to Add Followers
- Followers are the people you want to email the transaction to.
- The followers selected for the Transaction Type are automatically added.
- This step is only needed if you want to add additional followers.
- From Edit View, click Menu (button) > View/Edit Followers.
- Note: The command is not there if Followers under Transaction Type settings = N/A.
- Click Edit (button).
- Click the top row that states: Click here to add a new Follower and fill in the details as follows:
- Contact = Select a contact from the dropdown list of contacts that have email addresses.
- Description = Describe the type of follower.
- Type = Select Internal if the contact person is a staff member. Select External if the contact person is the Customer or Supplier’s contact person.
- Click Save (button).
- Repeat Step 3 to add additional followers.
- To delete a follower, click the X in the last column.