Transaction Allocations
Debit and credit transactions can be offset against each other to determine the outstanding amounts. This feature is mostly used in Customer and Supplier transactions to identify which invoices have been paid and which are still outstanding.
If an allocation is complete and the outstanding amount is zero, the transaction is set to the status for which the default Complete was selected. This change only happens if the transaction is in a lower status than the default Complete status and there is no missing information on the transaction.
In QuickEasy BOS the allocations can be managed from any linked transaction (e.g. from the invoice or from the customer receipt).
Settings
The Allocation features are disabled by default. A general setting is used to activate them.
Navigation: Main Menu > Setup > Settings
Accounting > Enable Customer and Supplier Allocations: Checkbox. If checked allocations are enabled.
Transaction Allocations
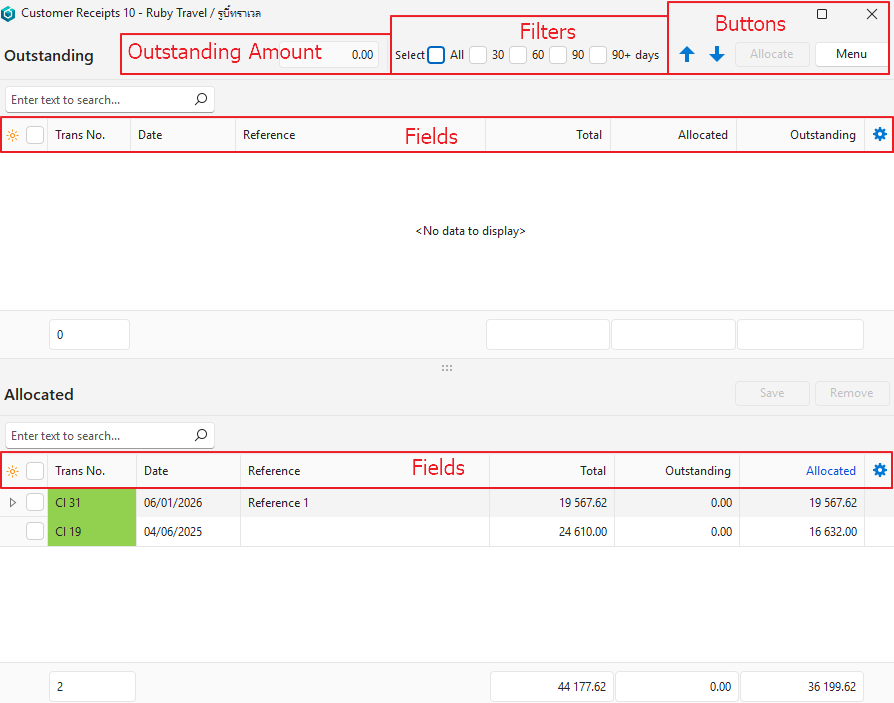
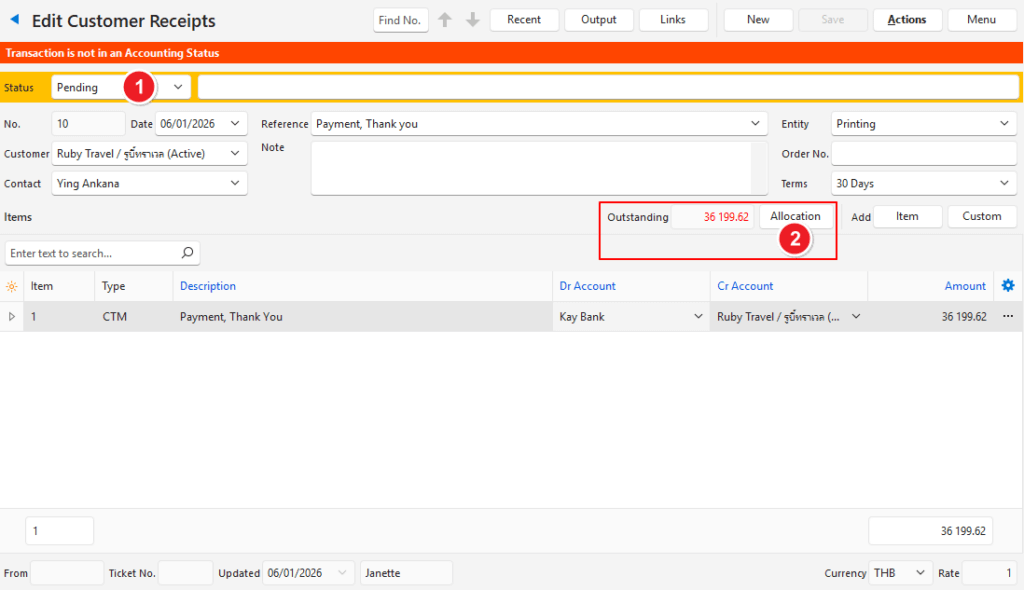
Relevant Fields:
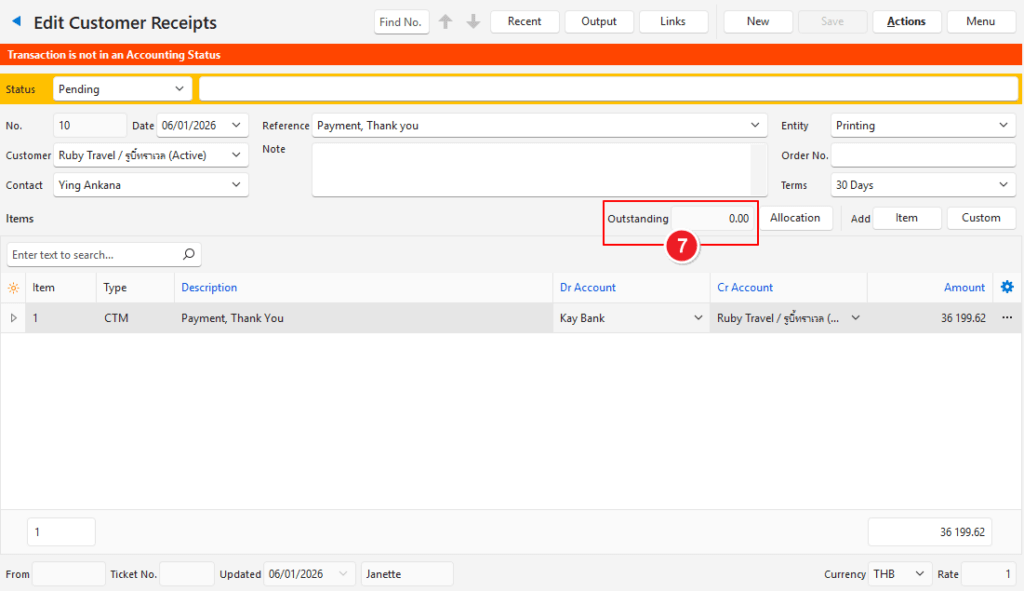
- Outstanding: Indicates the amount that has not been allocated.
- Allocation (button): Opens an interface to allocate the transaction.
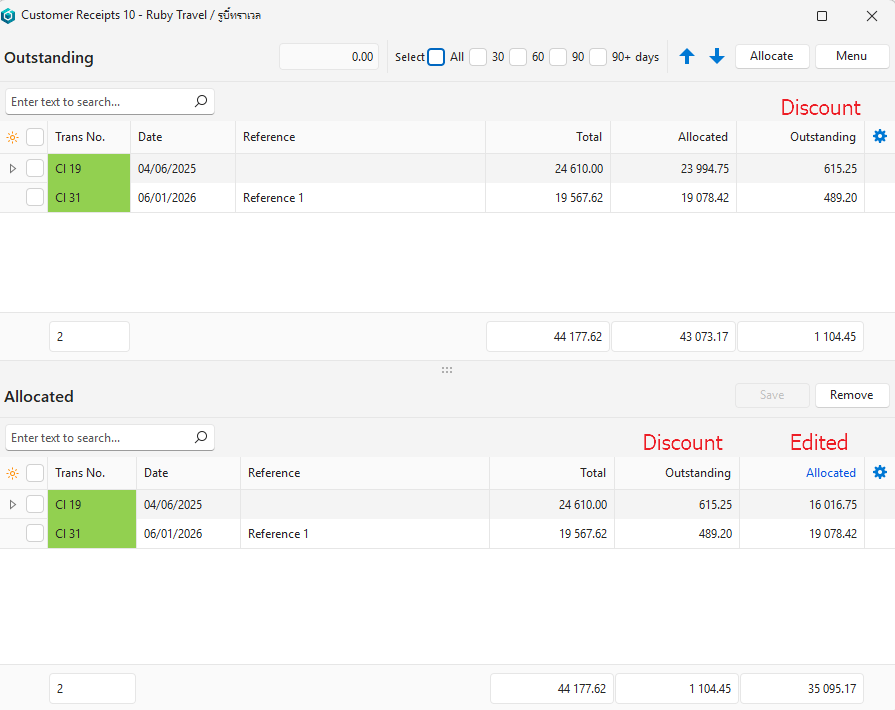
Allocations Interface
Buttons Explained
| Button | Description |
|---|---|
| Arrows | Navigates between transactions and shows the allocations for the transaction it scrolled to. Warning: When closing the allocation popup whichever transaction was scrolled to remains open. |
| Allocate | Allocates the selected entry. If the amount due differs from the amount on the transaction, users are asked if they want to change the amount when they return to the transaction. Only applicable if the transaction consists of a single line item. |
| Menu | Layout |
| Save | Saves the allocations. However, allocations are automatically saved. It is only necessary to click Save (button) if the allocation amounts are changed. |
| Remove | Removes all the allocations regardless of whether they are selected or not. |
Filters Explained
| Filter | Description |
|---|---|
| All | If checked, selects all the filters and displays all the transactions. All the transactions are also displayed if all the filters are unchecked. |
| 30 | Displays transactions that have been outstanding for longer than 1 month. |
| 60 | Displays transactions that have been outstanding for longer than 2 months. |
| 90 | Displays transactions that have been outstanding for longer than 3 months. |
| 90+ | Displays transactions that have been outstanding for longer than 4 months. |
Outstanding Fields Explained
| Field | Description |
|---|---|
| Field Chooser (*) | Allows fields to be added or removed. |
| Selection Checkbox | Allows fields to be selected by clicking the box or deselected by clicking the checkmark. |
| ID | The system-generated number for the entry. |
| Trans No. | The transaction code and number, colour-coded to match the transaction’s status. |
| Date | The transaction date. |
| Reference | The transaction’s reference. |
| Total | The transaction’s total amount. |
| Allocated | The amount that has already been allocated. |
| Outstanding | The total amount on the transaction that has not yet been allocated. |
Allocated Fields Explained
| Field | Description |
|---|---|
| Field Chooser (*) | Allows fields to be added or removed. |
| Selection Checkbox | Allows fields to be selected by clicking the box or deselected by clicking the checkmark. |
| ID | The system-generated number for the entry. |
| Trans ID | The transaction’s ID number. |
| Trans No. | The transaction code and number, colour-coded to match the transaction’s status. |
| Date | The transaction date. |
| Reference | The transaction’s reference. |
| Total | The transaction’s total amount. |
| Outstanding | The total amount on the transaction that has not yet been allocated. |
| Allocated | The amount that has already been allocated. |
| Widget | A submenu that can also be accessed by right clicking an entry with the following options: – Remove Allocation: Moves the entry to the Outstanding section. – Open Transaction: Opens the original transaction. |
How to Allocate a Payment
In this example, a payment is allocated to invoices. However, credit notes can be allocated to invoices using the same procedure. If activated from an invoice, the list of outstanding entries are unallocated credit notes or customer receipts.
- Ensure the transaction can be edited (i.e. the transaction’s Status must allow editing). Change the status if necessary.
- Click Allocation (button) to open the allocations interface.
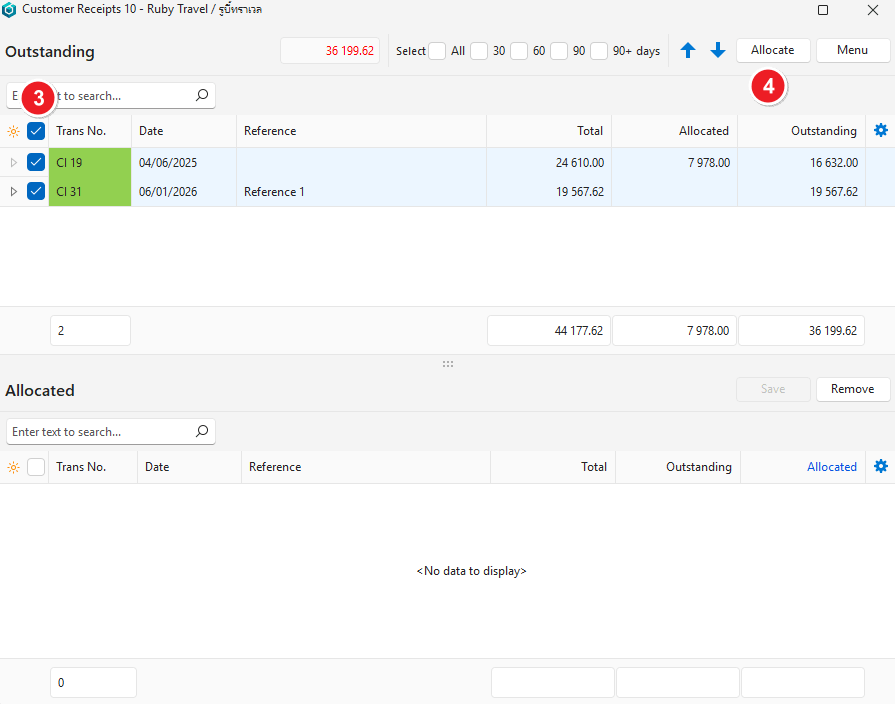
- Click the checkboxes on the left to select unallocated entries. Click the checked checkboxes to deselect them.
- Click Allocate (button).
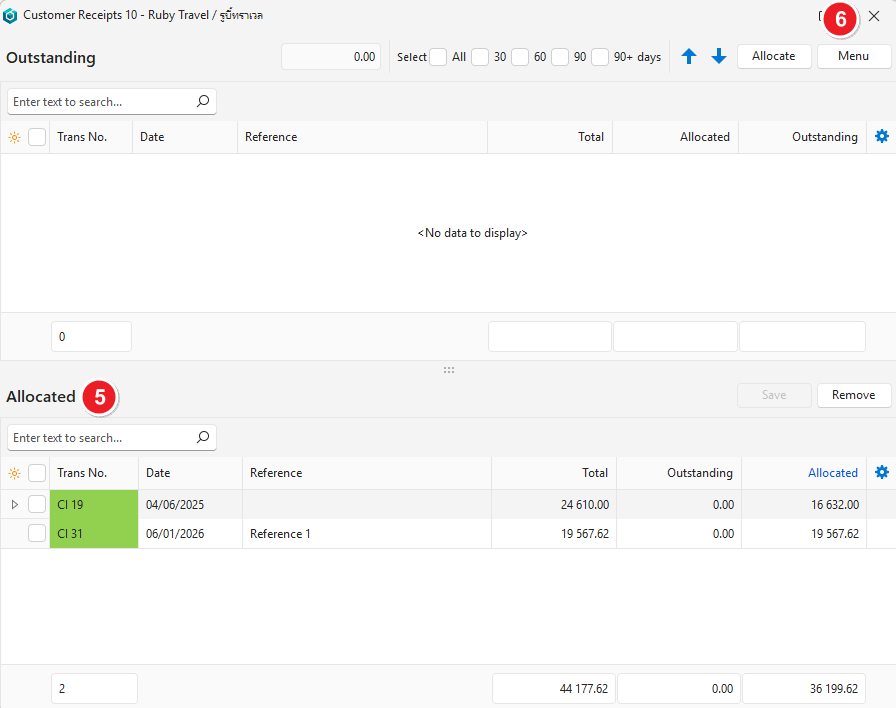
- The invoices that were paid are moved to the Allocated section.
- Close the popup.
- If the allocated amounts differ from the receipt amount, you are asked if you want to change the receipt amount.
- The allocated amount on the transaction will change.
- Complete the transaction as needed (e.g. change the status to complete) if there was missing information. If the transaction was filled in, completing the allocation sets the transaction’s status to complete as well.
How to Change the Transaction Amount
This process changes the transaction total to match the allocations. For example, if all the outstanding amounts are going to be written off as a discount.
- Ensure the transaction can be edited (i.e. the transaction’s Status must allow editing). Change the status if necessary and if you have the required permissions.
- Click Allocations (button) to open the allocations interface.
- Click the checkboxes on the left to select unallocated entries. Click the checked checkboxes to deselect them.
- Click Allocate (button).
- Close the popup.
- A popup displays: Update Transaction to Allocated Amount? Click Yes (button).
- Complete the transaction as needed.
How to Change the Allocation Amounts
Even though the unallocated portions are moved back to the Outstanding section, none of the features (double-clicking or Allocate button) work on those amounts. You must either edit the amount in the Allocation section or remove all the allocations and re-allocate the entries.
- Ensure the transaction can be edited (i.e. the transaction’s Status must allow editing). Change the status if necessary and if you have the required permissions.
- Click Allocations (button) to open the allocations interface.
- Click the checkboxes on the left to select unallocated entries. Click the checked checkboxes to deselect them.
- Click Allocate (button).
- Edit the amounts in the Allocated column by overtyping them. For example, if a customer receives a settlement discount, each payment should be reduced by the discount amount.
- Click Save (button).
- Close the popup.
- If a popup displays: Update Transaction to Allocated Amount? Click No (button).
- Note: The receipt should be fully allocated. If you see the popup, double check that the amounts were changed correctly.
- Complete the transaction as needed.
- Create an additional transaction for the discount (i.e. the amount outstanding).
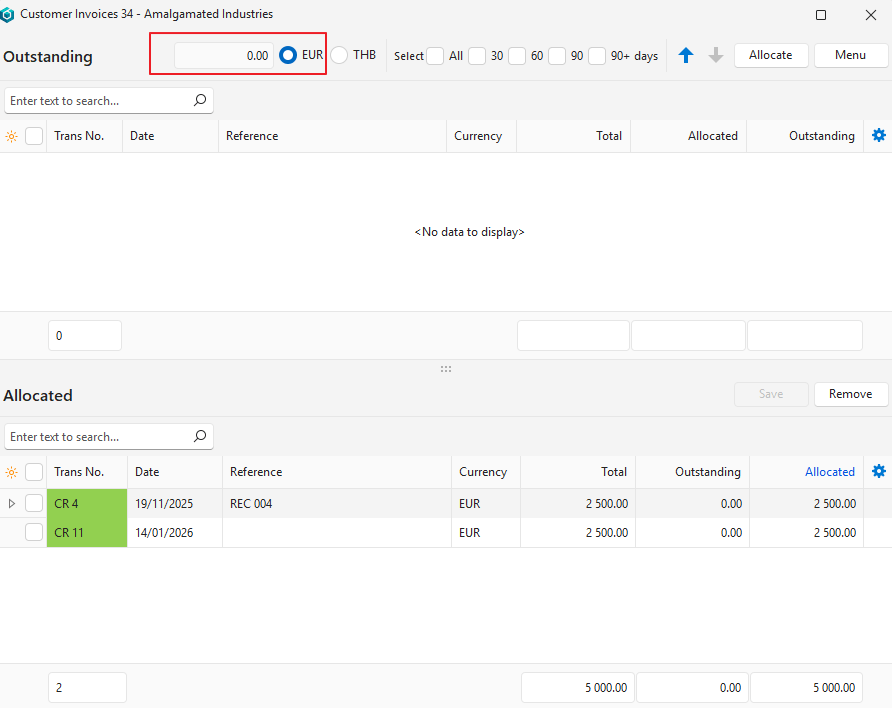
Foreign Currency Allocations Explained
- Foreign currency allocations are done the same way as the local currency allocations.
- The interface allows you to switch between the local and foreign currency using the radio buttons on the top row.
- Allocations in the foreign currency usually do not match allocations in the local currency due to exchange rate fluctuations.
- The transaction’s foreign currency may show an underpayment while showing an overpayment in the local currency and vice versa.
- Always use the transaction’s currency (i.e. the foreign currency) to determine if an amount is still due.
- The currency displayed in the Currency column is the transaction’s currency, not the allocation’s currency.
- See Ledger Tutorials on how to resolve outstanding amounts in the local currency.