Timekeeping User Access Tutorials
A timekeeping system is a tool or method used to record, track, and manage the time that employees work. It ensures accurate calculation of work hours, overtime, and attendance. The data collected is used for payroll, compliance with labour laws, performance tracking, and related functions.
In QuickEasy BOS, the Timekeeping module can be used to track both Work and Travel.
Timekeeping can be recorded from the desktop or Mobile App.
When timekeeping records are started or stopped, the following rules apply:
- Projects: Timekeeping records are linked to the Resource on the project, not the logged in user.
- Production: Timekeeping records are linked to the Operator, not the logged in user.
Navigation Example: Main Menu > Operations > Timekeeping
How to Add or Remove a User
- Navigate to Timekeeping.
- Click Menu (button) > User Access.
- Click Actions (button) > Add/Remove Users.
- Click the User you want to add and using the arrows move the user from the Available to the Selected section.
- Note: You can remove a user by moving them from the Selected to the Available section.
- Click Save (button).
- Edit the fields to grant the required access.
- Click Save (button) if it is not greyed out.
How to Change Multiple Records (Batch Update)
- Navigate to Timekeeping.
- Click Menu (button) > User Access.
- Select all the records you want to change (Use Ctrl Left click to multi-select).
- Click Actions (button) > Batch Update.
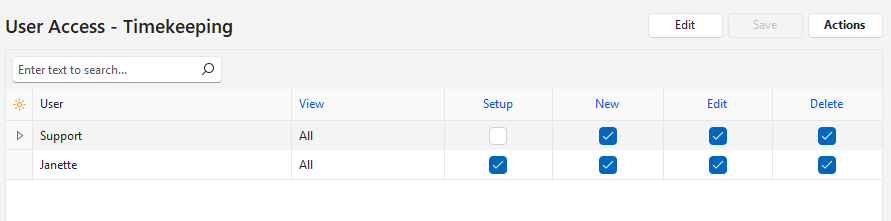
- Select one of these options and check the checkbox to grant access, or leave it unchecked to remove access:
- View
- Change the access to All or None.
- This access allows users to view timekeeping records or not.
- If None is selected, New, Edit, and Delete access is automatically revoked.
- Setup: Grants access to Timekeeping Settings.
- New: Allows users to create new timekeeping records.
- Edit: Allows users to edit timekeeping records.
- Delete: Allows users to delete timekeeping records.
- View
- Click Update (button).
- Confirm the update on the popup.
How to Edit User Access
- Navigate to Timekeeping.
- Click Menu (button) > User Access.
- Click Edit (button).
- Edit any of the records.
- Click Save (button).
How to Restrict User Access to Timekeeping Records – Users
- Navigate to Timekeeping.
- Click Menu (button) > User Access.
- Click Edit (button).
- For each user’s access you want to change, select Own (User) from the dropdown list in the View column.
- Click Save (button).
How to Restrict User Access to Timekeeping Records – Resource
Service Tickets, Projects, and Tasks all have the feature that Users can be selected as Resources. Those users can be restricted to only viewing records where they are the selected resource.
- Navigate to Timekeeping.
- Click Menu (button) > User Access.
- Click Edit (button).
- For each user’s access you want to change, select Own (Resource) from the dropdown list in the View column.
- Click Save (button).