Timekeeping Statuses Tutorials
A timekeeping system is a tool or method used to record, track, and manage employees’ time. It ensures accurate calculation of work hours, overtime, and attendance. The data collected is used for payroll, compliance with labour laws, performance tracking, and related functions.
In QuickEasy BOS, the Timekeeping module can be used to track both Work and Travel.
Timekeeping can be recorded from the desktop or Mobile App.
When timekeeping records are started or stopped, the following rules apply:
- Projects: Timekeeping records are linked to the Resource on the project, not the logged in user.
- Production: Timekeeping records are linked to the Operator, not the logged in user.
Navigation Example: Main Menu > Operations > Timekeeping
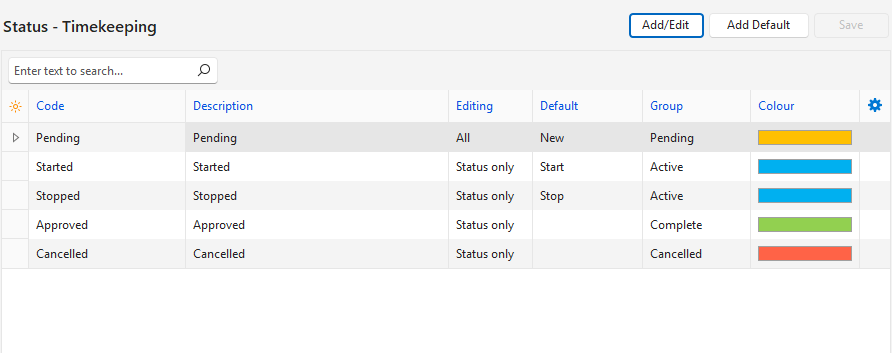
How to Create Default Statuses
- This feature is only available if Statuses have not yet been created. The following statuses are added:
- Pending
- Started
- Stopped
- Approved
- Cancelled
- Navigate to Timekeeping.
- Click Menu (button) > Edit Statuses.
- Click Add Default (button).
- Edit the Statuses, as necessary.
- Click Save (button) if it is not greyed out.
How to Create Unique Statuses
You can create statuses from scratch or edit the default statuses to suit your requirements.
- Navigate to Timekeeping.
- Click Menu (button) > Edit Statuses.
- Click Add/Edit (button).
- Click the top row and fill in the details as follows:
- Code = Type a short description for the code (e.g. Pending).
- Description = Type an explanation of when the status is used.
- Editing = Select None (no editing), All (editing allowed), or Status only (only the status may be changed).
- Default =
- Select New from the dropdown list if the status applies to newly created entries. One status must have the default New option.
- Select Start to automatically change the status of the timekeeping record when it is started. This feature only works if the Mobile App is used.
- Select Stop to automatically change the status of the timekeeping record when it is stopped. This feature only works if the Mobile App is used.
- Group = Select a group from the lookup list of groups. The options are:
- Pending: The entry can be edited.
- Active: The entry is active.
- Complete: The entry is complete.
- Cancelled: The entry is cancelled.
- Colour: Click inside the colour block and select a different colour from the available colours.
- Click Save (button) if it is not greyed out.
How to Edit Statuses
- Navigate to Timekeeping.
- Click Menu (button) > Edit Statuses.
- Click Add/Edit (button).
- Edit any of the fields.
- Click Save (button) if it is not greyed out.
How to Delete Statuses
Once a Status is used, it cannot be deleted.
- Navigate to Timekeeping.
- Click Menu (button) > Edit Statuses.
- Click Add/Edit (button).
- Right click the Status to remove and select Delete from the context menu.
- Confirm the deletion on the popup.
How to Change the Order of Statuses
- The order of the statuses should match the order in which they are used (e.g. Started > Stopped > Approved).
- This order helps to automatically set the next status in the hierarchy when certain processes are completed.
- Navigate to Timekeeping.
- Click Menu (button) > Edit Statuses.
- Click Add/Edit (button).
- Right click the Status to move and select Move Up or Move Down from the context menu.
- Click Save (button) if it is not greyed out.