Service Types Edit View Interface
A service manager is a tool used to manage and streamline an organisation’s service management processes. It helps organisations automate and track service requests, incidents, queries, changes, and problems. It includes features for ticketing, management, and reporting. It aims to improve efficiency, reduce downtime, and ensure a higher level of service quality by enabling organisations to manage, prioritise, and resolve issues effectively.
The Service Manager in QuickEasy BOS can also be used to track and follow up on leads and to manage Projects.
A Service Type defines the interface for service tickets. Organisations may have an unlimited number of Service Types.
Navigation: Main Menu > Setup > Service Types
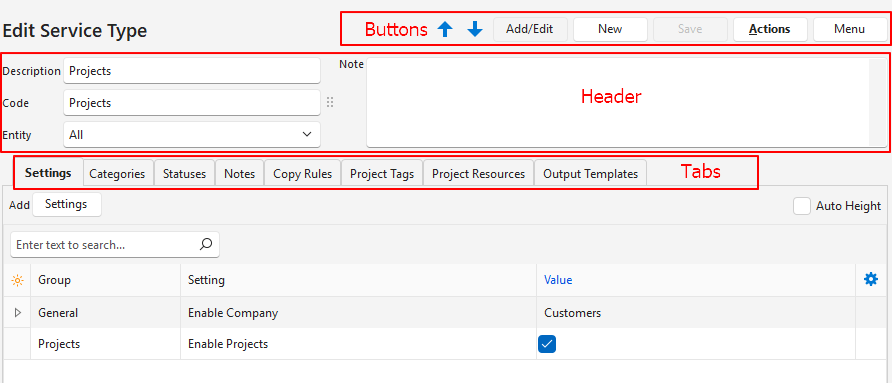
Buttons Explained
| Button | Description |
|---|---|
| Arrows | Navigates between service types. |
| Add/Edit | Allows information to be added or edited. |
| New | Creates a new service type. |
| Save | Saves any changes. |
| Actions | – Refresh Lookups: Refreshed lookup lists. – Rebuild Profit/Loss Report: Refreshes the profit/loss report with the latest changes. Must be run if the selected transactions are changed. – Update Starting/Next No.: Allows the numbers to be changed. However, the new starting number must be larger than the last number used. – Update Service Number (No.) Sequences: Updates the number sequences for all the entities. – Delete: Deletes the service type if it has not yet been used. |
| Menu | User Access: Sets User Access for the specific Service Type. Edit Project Templates: Allows the project templates to be edited. Layout |
Header
| Header | Description |
|---|---|
| Description | A field to type a description for the service type. |
| Code | A field to type a brief description for the service type. |
| Entity | A dropdown list of registered entities for users to select one or all. |
| Note | A field for a note. |
Settings (tab)
Settings are customised on the Settings tab. If a setting is not added, it still applies, at its default state.
Buttons and Filters Explained
| Button / Filter | Description |
|---|---|
| Settings | Adds a setting |
| Auto Height | Adjusts the row heights to fit lookup lists. |
Fields Explained
| Field | Description |
|---|---|
| Field Chooser (*) | Allows users to add or remove columns. |
| Editor | The system-generated number for the language editor. |
| ID | The system-generated number for the entry. |
| Module ID | The system-generated number for the Module. |
| Group | The group to which the setting belongs. |
| Setting | A description of the setting. |
| Value | The setting’s value or input field. |
| Created | The date on which the setting was added. |
| Updated | The date on which the setting was updated. |
| Updated By | The user who last updated the settings. |
| Menu (…) | Option to Delete the setting. The setting is removed from the list but still applies at its default value. |
Settings Explained
- If transaction types are selected for the Profit / Loss settings, a profit and loss statement is displayed for the service ticket as a tab on the central panel of the Detail tab.
- The transaction types included on the Profit/Loss:
- Must be linked to a ticket to be included.
- Do not need to post to the ledger (e.g. Purchase Orders can be used).
- Are included for any status other than cancelled.
- QuickEasy BOS must be restarted after the Service Ticket is setup.
| Setting | Explanation |
|---|---|
| Defaults > Default – Data Filter | Provides a list of default filters for selection: – Today – This Month – Pending – Active – Pending & Active (default) |
| General > Add to Followers | An option to select followers from this list by checking one or more of the checkboxes: – Contact – Rep – Assign to – User |
| General > Detail Function | A field to paste a Stored Procedure (SQL) to auto fill the Detail section with information. |
| General > Disable Assign To (Change with Note) | A checkbox. If checked the user whom the ticket is assigned to can be changed by adding a note or using batch update in list view (i.e. direct edits are blocked). |
| General > Disable Status (Change with Note) | A checkbox. If checked the ticket’s status can only be changed by adding a note or using batch update in list view (i.e. direct edits are blocked). |
| General > Enable Assets | A checkbox. If checked Assets are enabled. If assets are enabled there is a dropdown list on the ticket from which a specific asset can be selected. |
| General > Enable Company | A dropdown list to select one of these options: – Internal: Use for inhouse projects. – Customers: Use for account queries or sales. – Suppliers: Used for projects that involve suppliers or supplier queries. This setting does not apply to NCRs. See Categories below. |
| General > Enable Service Level Agreements (SLA) | A checkbox. If checked SLAs are enabled. If enabled: – The expected duration (SLA Hours) must be filled in for each category on the categories’ tab. – A severity option (low, medium, or high) must be selected for each category. |
| General > Enable Staff | A dropdown list to select one of these options: – None: The tickets cannot be assigned. – All: The tickets can be assigned to users and to reps. – Rep: The tickets can only be assigned to reps. – Assign To: The tickets can only be assigned to users. |
| General > Enable Version Numbers | Checkbox. If checked, versions of the ticket can be created (e.g. to offer customers different proposals). |
| General > Reference Lookup | An option to create a list of references for users to select from. Entries can be created by typing them in the Value column and pressing Enter after each entry. To see all the entries click the checkbox next to Auto Height. If left blank, users must type the reference when creating the ticket. |
| General > Transactions | An option to select one or more transactions. Clicking Edit in the Value column opens an interface with all the created transaction types in the Available section. – Move the transaction types to the Selected section to include them. – Move selected transaction types to the Available section to remove them. You only need to include the first transaction in a transaction flow because the other transactions are created by copying that one (e.g. a Quotations can be copied to Sales Order > Delivery Note > Customer Invoice). |
| NCR > Enable NCR | A checkbox. If checked the service type is used for non-conformance reporting. |
| Profit/Loss > Timekeeping – Expenses (+) | A checkbox. If checked the hourly rate multiplied by the time worked is added to expenses. The timekeeping must be linked to the service ticket, or to a transaction that is linked to the service ticket. |
| Profit/Loss > Transactions – Expenses (-) | Allows users to select the transaction types that capture refunded expenses related to the service type (e.g. Supplier Debit Notes). |
| Profit/Loss > Transactions – Expenses (+) | Allows users to select the transaction types that capture expenses related to the service type (e.g. Bank Payments, Supplier Invoices). |
| Transactions – Income (-) | Allows users to select the transaction types that capture refunded income related to the service type (e.g. Credit Notes). |
| Transactions – Income (+) | Allows users to select the transaction types that capture income earned related to the service type (e.g. Customer Invoices). |
| Projects > Enable Projects | Checkbox. If checked Projects are enabled. Click Save after checking the box, to create these two tabs for the project: – Project Tags – Project Resources |
| Projects > Used to create Project Quotations | Provides a dropdown list of all the created transaction types for users to select the one used for Quotations. |
| Sales > Enable Sales (Lead Source, Referrer, Value, Probability) | Enables the four additional fields as listed on the setting. |
| Sales > Lead Source Lookup | An option to create a list of leads for users to select from (e.g. Website, Telemarketing, Rep). Entries can be created by typing in the Value column and pressing Enter after each entry. To see all the entries click the checkbox next to Auto Height. If left blank, users must type the lead source themselves. |
Statuses (tab)
Different statuses can be created for each service type.
Button Explained
| Button | Description |
|---|---|
| Add Default Statuses | Only available if statuses have not yet been created. Default statuses can be edited. Option to select these default statuses: – Standard: Pending, Active, Complete, Cancelled. – Sales Pipeline: Pending, Lead Qualified, Demo or Meeting, Proposal, Negotiation and Commitment, Opportunity Won, Post Purchase, Lost – Price too high, Lost – Can’t meet Deadline, Lost – Unhappy with Quality, Lost. – NCR: Problem, Containment, Correction, Root Cause, Corrective Action, Evaluation, Complete, Cancelled. |
Fields Explained
| Field | Description |
|---|---|
| Field Chooser (*) | Allows users to add or remove columns. |
| ID | The system-generated number for the entry. |
| Order ID | A system-generated number for the order of the statuses. |
| Code | A brief description of the status. |
| Description | The full description of the status. |
| Default | One status must receive the default: New. When a new ticket is created, it is automatically set to this status. |
| Group | The applicable Status Group. The options are: – Pending – Active – Complete – Cancelled |
| Notification | Sends an email to notify of status changes. The options are: – None: Nobody is notified. – Internal: Internal staff are notified (e.g. the user who created the ticket, the rep, and the person the ticket is assigned to). – All: All followers are notified (e.g. everyone under Internal and the Customer or Supplier’s contact person). Followers can be added or removed from the ticket’s Edit View > Menu (button) > View/Edit Followers. |
| Colour | The colour allocated to the status. The colour can be changed by clicking the arrow next to the colour block and selecting a new colour. |
| Menu (…) | A submenu, which can also be accessed by right clicking the entry, with the following functions: – Move Up: Moves the entry one line higher. – Move Down: Moves the entry one line lower. – Delete: Deletes the entry. |
Copy Rules (tab)
- Allows tickets to be copied to create new tickets.
- Categories are copied if the new service type has the exact same category else the field is left blank.
Buttons and Filters Explained
| Field | Description |
|---|---|
| Notes | Shows or Hides Notes. |
| Dropdown: All, From, To | Filters the records to show All, only those copied From, or only those copied To the Service Type. |
Fields Explained
| Field | Description |
|---|---|
| Field Chooser (*) | Allows users to add or remove columns. |
| ID | The system-generated number for the entry. |
| Copy From | The service type to Copy From (usually the one from which the Copy Rules are accessed) |
| Copy To | The service type to Copy To. |
| Set From Status | Select a status that the ticket must be in to allow it to be copied. Leave blank to allow any status. |
| Caption | A field to type a caption (e.g. Copy). |
| Reset Flow | A checkbox. If checked, starts a new transaction flow (i.e. removes the links to other tickets and transactions). |
| Copy Projects | A checkbox. If checked, projects are also copied. |
| User Access | Displays users who have access. |
| Updated by | The user who last updated the rule. |
| Created | The date on which the entry was created. |
| Updated | The date on which the entry was updated. |
| Widget | A submenu, which can also be accessed by right clicking the entry, with the following functions: – View/Edit Note: Allows notes to be viewed, edited, or created. – Edit User Access: Sets user access for the copy rules. – Delete: Deletes the copy rule. |
Notes (tab)
Notes refer to the responses and messages that are added to a service ticket.
Buttons Explained
| Button | Description |
|---|---|
| Add Default Notes | Only available if notes have not yet been created (or all the notes are deleted). Default notes can be edited. Option to select default notes: – Standard: Note, Message, Call, Meeting, Resolved. – Helpdesk: Note, Message, Call, Meeting, No Response in 72 hours, Resolved. – NCR: 1.Problem, 2.Containment, 3.Correction, 4.Root Cause, 5.Corrective Action, 6.Evaluation, 7.Approval. |
| Preview | Displays any additional notes (created through the context menu) below the entries. |
Fields Explained
| Field | Description |
|---|---|
| Field Chooser (*) | Allows users to add or remove columns. |
| ID | The system-generated number for the entry. |
| Reference | The name of the note. |
| Set Status | A dropdown list of all the created statuses. Users can select what the ticket’s Status must be after the note is added or select Unchanged from the dropdown list. Statuses can be manually selected when notes are added. |
| Assign To | A dropdown list of users. The ticket is assigned to the selected user when the note is added. Can be left blank. The user the ticket is assigned to can be manually changed when notes are added. |
| Transaction | Provides a dropdown list of all the created transaction types. Allows a note to be added when a linked transaction’s status is changed to a particular status as selected in the Trans Status column. If the added note, changes the ticket’s status, the change is only applied if the status is later in the hierarchy of statuses than the ticket’s current status (i.e. it can change a ticket from Active to Complete, but not from Complete to Active). |
| Trans Status | Provides a dropdown list of all the transaction’s statuses (the one selected in the Transaction column). |
| Created | The date on which the entry was created. |
| Updated | The date on which the entry was updated. |
| Updated By | The User who last updated the entry. |
| Menu (…) | A submenu, which can also be accessed by right clicking the entry, with the following functions: – View/Edit Note: Allows an additional note to be created, edited, or viewed. – Delete: Deletes the note entry. |
Categories (tab)
- Categories allow service tickets to be grouped.
- Categories are copied to new tickets following these rules:
- Tickets in the same service type, the categories are copied.
- Tickets in differing service types, the categories are copied only if the new service type (copy to) has an identical category.
Button Explained
| Button | Description |
|---|---|
| Add Default Categories > NCR | Adds these categories: – Audit Finding – Process Related – Production Related – Safety, Health & Environment (SHE) – Supplier Return |
Fields Explained
| Field | Description |
|---|---|
| Field Chooser (*) | Allows users to add or remove columns. |
| ID | The system-generated number for the entry. |
| Description | The category’s description. |
| Enable Company | The field is only shown if the setting NCR > Enable NCR is checked. Replaces the general setting to enable company for NCRs. Allows a company to be selected for every category. The options are: – Internal – Customers – Suppliers |
| Severity (icon) | Only applicable if this setting is enabled: General > Enable Service Level Agreements (SLA). A dropdown list of severity icons. The options are: – Low – Medium – High |
| SLA Hours | Only applicable if this setting is enabled: General > Enable Service Level Agreements (SLA). Provides a field to type the number of hours resolving the ticket should take. |
| Colour | Options to select a colour for the category. |
| Created | The date on which the entry was created. |
| Updated | The date on which the entry was updated. |
| Updated By | The User who last updated the entry. |
Project Tags (tab)
Project Tags allow projects to be grouped and classified. This tab is only displayed if this setting is enabled: Projects > Enable Projects.
Fields Explained
| Field | Description |
|---|---|
| Field Chooser (*) | Allows users to add or remove columns. |
| ID | The system-generated number for the entry. |
| Code | A field to type a brief description of the tag. |
| Description | A field to type a description of the tag. |
| Menu (…) | Option to Delete the tag. |
Project Resources (tab)
Project Resources allow users to define the tools or people that process the projects. It provides for an hourly rate which is the rate that is billed out for that resource. This tab is only displayed if this setting is enabled: Projects > Enable Projects and Save (button) is clicked.
Buttons Explained
| Button | Description |
|---|---|
| Add Staff | Provides a list of staff. Staff can be selected and added by clicking the staff names and clicking Select (button). |
Fields Explained
| Field | Description |
|---|---|
| ID | The system-generated number for the entry. |
| Contact ID | The system-generated number for the Contact, if the resource is a contact. |
| Code | A field to type a brief description of the resource. The field is prefilled with the Contact’s Name (which can be edited) if staff were added. |
| Description | A field to type a description of the resource. The field is prefilled with the Contact’s Full Name (which can be edited) if staff were added. |
| Hourly Rate | A field to type the contact’s hourly rate. This should be the rate at which the contact is billed. |
| Created | The date on which the entry was created. |
| Updated | The date on which the entry was updated. |
| Updated By | The User who last updated the entry. |
| Active | A checkbox. If checked the Resource is active. |
| Widget | Option to Delete the resource. Staff are removed from the list but not deleted from the system. Directly created resources are deleted. |
Output Templates (tab)
Output Templates are the forms or reports that can be generated from the service ticket (e.g. customised emails, project status reports, and a list of project tasks).
Fields Explained
| Field | Description |
|---|---|
| Field Chooser (*) | Allows users to add or remove columns. |
| ID | The system-generated number for the entry. |
| Description | A field to type the name of the Output Template. |
| Follower | An option to select All, Internal, or External followers which determines the email recipients. Only applicable if the template is emailed. |
| Output | Option to select Print Only, Email Only, or Print & Email. |
| Allow Status | A dropdown list of Statuses to select the statuses in which output may be generated. |
| Email Subject | Checkbox which is automatically checked if an email subject is entered using the right-click context menu. |
| Email Body | Checkbox which is automatically checked if an email body is entered using the right-click context menu. |
| Uploaded (.rtm) | Checkbox which is automatically checked if a .rtm (reportbuilder) template is attached using the right-click context menu. |
| Created | The date on which the entry was created. |
| Updated | The date on which the entry was updated. |
| Updated By | The User who last updated the entry. |
| Widget | A submenu, which can also be accessed by right clicking the entry, with the following functions: – Load Reportbuilder (.rtm) file: Loads a Form Builder file to use as a template. – Edit Email Body: Creates the email body text. – Edit Email Subject: Creates the subject line for the email. – Delete: Deletes the template. |