Online Libraries
The online library interface allows users to import data. This feature works by copying information from one database to another: from the Library (source) to the Reader (destination). It is designed to simplify the task of setting up a new database (company) by importing features and items from an existing database.
When data is copied, any linked notes and attachments are copied along with the data. For attachments only the link (URL) is copied which becomes a shared link (i.e. if the attachment is deleted from the source library, it is deleted for everybody).
If the source library has prices in a specific currency, the prices are copied across in that currency. The target library must enable multiple currencies and do the conversions to their local currency manually.
Settings
General Settings
Navigation: Main Menu > Setup > Settings
- Online Library > Access Key:
- Field to type an access key to the online library.
- The library ID is automatically assigned and displayed in the footer of the online library interface.
- The library ID and access key is created in the source library and entered in the destination library (i.e. a user who wants to import data, must be given the library ID and access key for the database they are importing the data from).
Item Settings
Navigation: Main Menu > Setup > Items
- This setting determines which items can be exported.
- If checked, the items are available for export.
- The categories do not have to match or exist in the destination database because they can either be mapped to existing categories or imported.
- The category tree is not imported (e.g. on the screenshot below, Litho will be imported as a main category not a subcategory of Inks and Consumables).

Online Libraries Interface
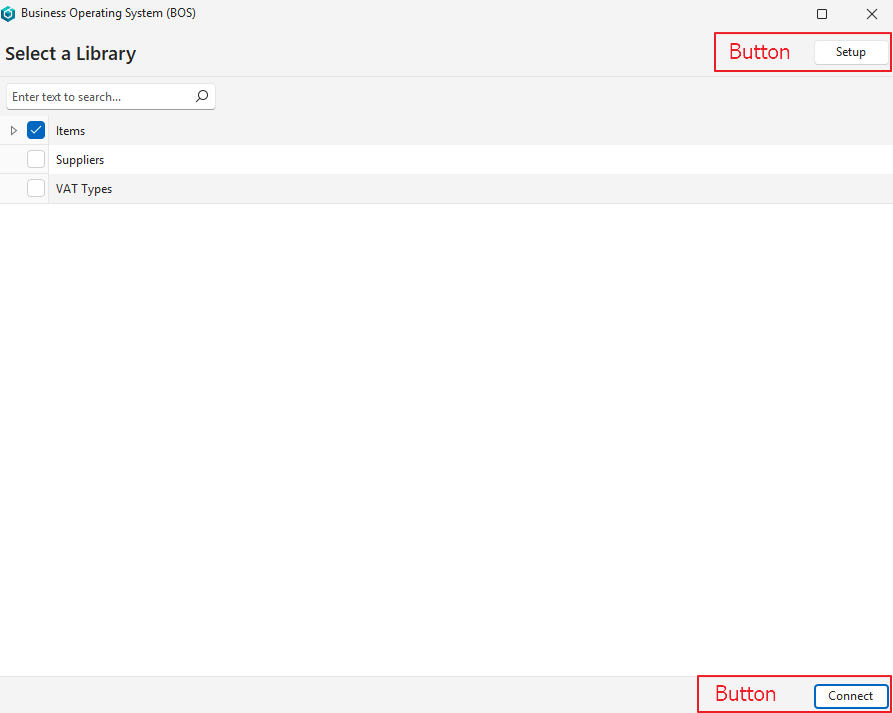
List View: Buttons
| Buttons | Description |
|---|---|
| Setup | Opens the setup interface. |
| Connect | Connects to the online library. |
List View: Fields
| Field | Description |
|---|---|
| Checkbox | If checked, the row is selected. |
| Description | The name of the library. |
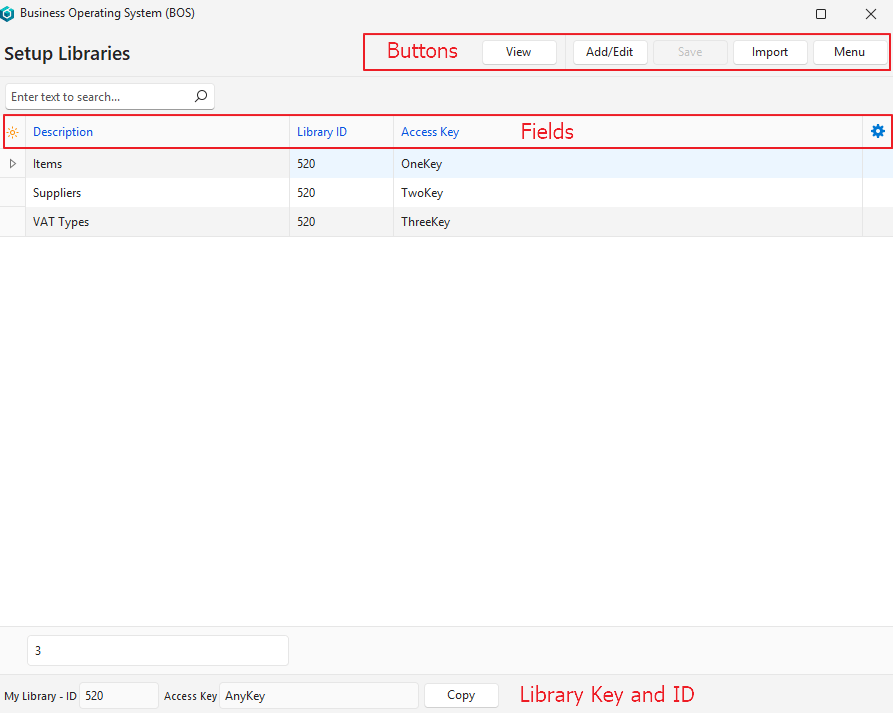
Setup View: Buttons
| Buttons | Description |
|---|---|
| View | Displays the list of libraries. |
| Add/Edit | Allows the information to be edited, or new rows to be added. |
| Save | Saves any changes. |
| Import | Switches to the import interface (list view). |
| Menu | – Show Notes: Toggles displaying or hiding notes (that are created from the right-click context menu). – Layout |
Setup View: Fields
| Field | Description |
|---|---|
| ID | The system-generated number allocated to the entry. |
| Description | The name of the library. |
| Library ID | The library ID key. |
| Access Key | The access key for the entry. |
| Created | The date on which the entry was created. |
| Updated | The date on which the entry was last updated. |
| Updated By | The user who last updated the entry. |
Tutorials
How to Prepare the Source (Library) to Export Items
- Navigate to Items (e.g. Main Menu > Setup > Items).
- Click Menu (button) > Edit Categories.
- Click Add/Edit (button).
- Check the checkbox in the Library column next to each category that you want to export. If categories have subcategories, then only the final subcategories can be selected.
- Click Save (button).
How to Setup the Online Libraries
- Navigate to Online Libraries (e.g. Main Menu > Setup > Online Libraries).
- Click Setup (button).
- Click Add/Edit (button).
- Complete the new row as follows:
- Description = Type a name for the entry.
- ID = Type the ID number that is displayed in the footer.
- Access Key = Type an access key for the entry.
- Click Save (button).
- Send the ID and Access Key to the user who is importing the data.
How to Import Items from an Online Library
- When items are imported, their statuses are set to Pending.
- Inventory Locations are not imported. Locations can be added in the new database using Batch Update.
- Notes and attachments are imported. However, only the URL is imported for attachments (i.e. the image link, not the image itself) which is shared across all the libraries.
- Custom attributes are automatically imported.
- Navigate to Online Libraries (e.g. Main Menu > Setup > Online Libraries).
- Setup an online library as follows:
- Click Setup (button).
- Click Add/Edit (button).
- Complete the new row as follows:
- Description = Type a name for the entry.
- ID = Type the ID number that was received from the source library.
- Access Key = Type the access key that was received from the source library.
- Click Save (button).
- Click Import (button).
- Click the applicable library on the list.
- Click Connect (button).
- On the import interface:
- Click View (button).
- Select a specific category from the dropdown list (optional).
- Select all the items to import (use Shift left click or Ctrl left click to multi select).
- Note: If an item was previously imported, information is displayed in the Updated and Updated By columns. In this case, the existing items are updated (not duplicated).
- Click Next (button).
- On the Map Categories interface:
- If there are no categories in the new database or some categories are missing:
- Check the checkbox to Insert missing Categories.
- Note: The categories are imported as main categories. No other information such as the tree (Main Category > Subcategory) is imported.
- Check the checkbox to Insert missing Categories.
- If there are categories:
- Select the applicable category from the dropdown list in the Local column.
- If there are no categories in the new database or some categories are missing:
- Click Next (button).
- On the Map Suppliers interface:
- If there are no suppliers in the new database or some suppliers are missing:
- Check the checkbox next to Insert missing Suppliers.
- If there are suppliers:
- Select the applicable supplier from the dropdown list in the Local column.
- If there are no suppliers in the new database or some suppliers are missing:
- Click Next (button).
- On the Map Cost Centres interface:
- If there are no cost centres in the new database or some cost centres are missing:
- Check the checkbox next to Insert missing Cost Centres.
- If there are cost centres:
- Select the applicable cost centre from the dropdown list in the Local column.
- If there are no cost centres in the new database or some cost centres are missing:
- Click Next (button).
- On the Map VAT Types interface:
- If there are no VAT types in the new database or some VAT types are missing:
- Check the checkbox next to Insert missing VAT Types.
- If there are VAT types:
- Select the applicable VAT types from the dropdown list in the Local column.
- If there are no VAT types in the new database or some VAT types are missing:
- Click Next (button).
- Click Import (button).
- Once the import is complete a log is displayed that shows how many records were imported or updated.
- Click Next (button) to return to the Online Libraries interface or click Finish (button) to close the import popup.