Layout
The QuickEasy BOS interface can be fully customised, including the Menus and the Layout. This customisation extends to the organisation’s users, who can be allocated custom Menus.
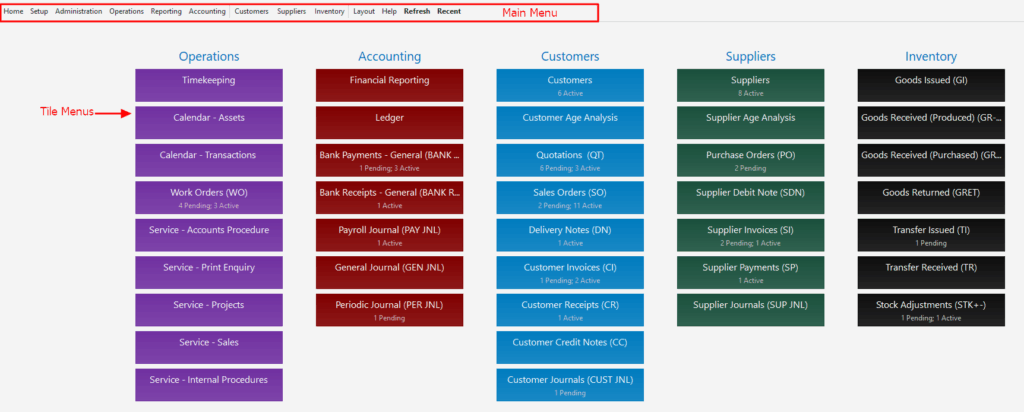
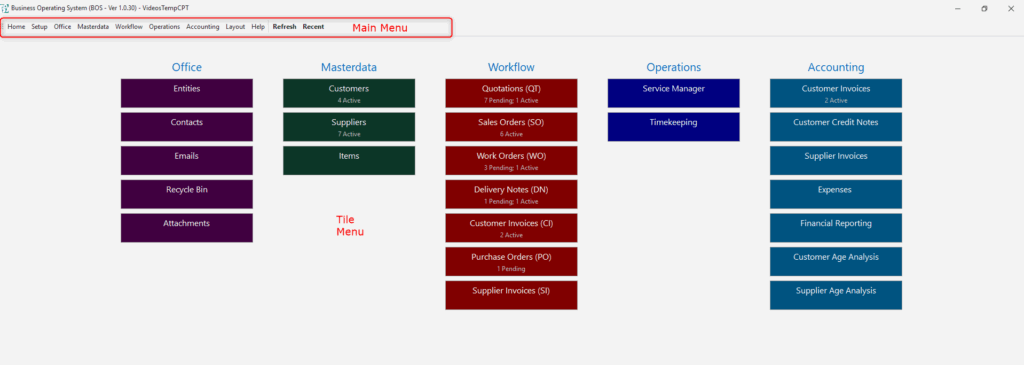
The display is divided into components:
- Main Menu that includes links to all the functions.
- Tile Menu that provides shortcuts to the most used functions.
- Workspace where data is entered and viewed.
Menus
Overview
| Menu | Description |
|---|---|
| Main Menu | Main Menu refers to the row of buttons that are positioned at the top of the screen. It should include links to all the Modules in the application. |
| Tile Menu | Tile Menu refers to the clickable, coloured, rectangular blocks that are displayed when all the other interfaces are closed. |
| Workspace | Workspaces are the interfaces used to view and edit data. Most workspaces are divided into left and right panels. |
| Footer | The Footer refers to the bar at the bottom of the screen that displays information. |
Main Menu
| Action | Description |
|---|---|
| Customising | When BOS is first opened a default menu is shown with links to all the Setup modules. The default menu can be edited. Additional menus can be created. Users can be linked to a menu. Users who are not linked to a menu are automatically be linked to the default menu if one has been created. |
| Fixed Menu Group | Fixed Menu groups cannot be added to the tile menu. However, items from the fixed menu groups can be added to other menu groups and then added to the tile menu. The Fixed Menu groups are: Help: – Enable DB Monitor: Enables a database monitor. – Knowledge Base: Opens the online documentation which includes explanations of the fields and tutorials. – About QuickEasy Software: Displays the version number of the desktop and mobile apps. – Email QuickEasy Helpdesk: Opens the internal email app with the helpdesk email address prefilled. – Recycle Bin: Opens the recycle bin from where entries can be restored or permanently deleted. Home: – Restart: Restarts QuickEasy BOS without the need to login again. – Exit: Exits QuickEasy BOS. The user must login again the next time they open QuickEasy BOS. Layout: – Light Mode: Switches to a grayscale background with black text. – Dark Mode: Switches to a dark grey and black background with white text. – Window: Options to choose one of these resolutions: –800 x 600 –1024 x 768 –1280 x 720 –1366 x 768 –1920 x 1080 Reset Layout: Resets the layout to the default widths. The panel sizes are saved per user. However, if the user logs in from a computer with a different resolution, the panel sizes might crop or obscure vital navigation elements. Resetting the layout solves the problem but will restart QuickEasy BOS. Setup: Contains all the Setup options. Accounting: – Ledger – Customer Age Analysis (includes the Customer ledger) – Supplier Age Analysis (includes the supplier ledger) – Financial Reporting |
| Fixed Item | Fixed Items cannot be added to the tile menu or to other menu groups. The items are: – Language: Toggles between default and second languages. Only displayed if the user’s language is not English. – Recent: Displays a dropdown list of recently opened modules including details of the view (report). – Refresh: Refreshes all the lookups for the open module. |
Tile Menu
| Action | Description |
|---|---|
| Positioning | The position of the Tile Menu cannot be changed. |
| Customising | The Tile Menu can be enabled or disabled when creating menus (Menu Template Setup). The Tile Menu should link to frequently used modules and shows key Status indicators. Users can select which Tiles should appear on the Tile Menu. Users can change the colour of the Tiles Menus. However, the text is always white, therefore darker colours work best. Tile menus have fixed lengths. If the name on a tile is too long (e.g. a transaction name), the name is truncated. |
| Transactions | If Transaction Types are added to tile menus, the number of records with Pending or Active statuses are displayed on the tile menu. |
Layout Button on the Main Menu
| Option | Description |
|---|---|
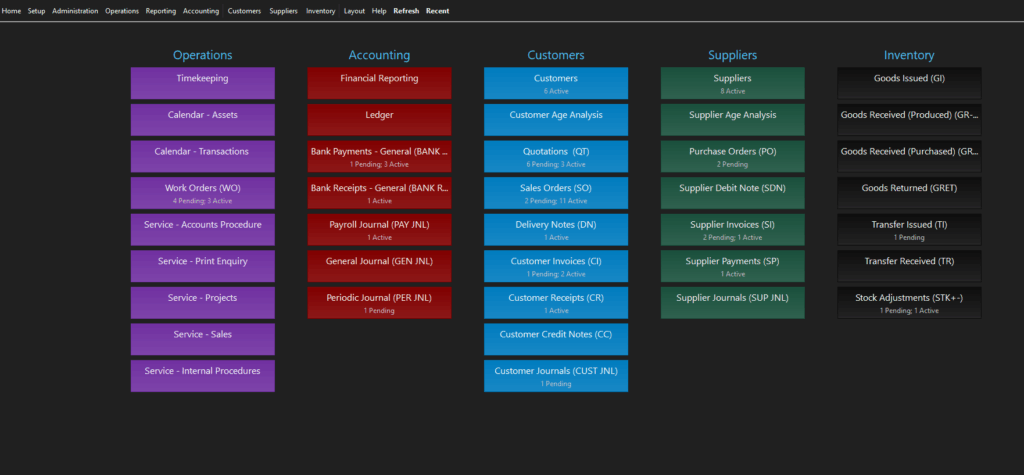
| Light Mode | Switches the display to have a light grey background with black text. |
| Dark Mode | Switches the display to have a black background with white text. |
| Window | QuickEasy BOS can be resized using normal Windows tools by dragging the sides or the corners. The main screen can be minimised, but popup screens cannot be minimised. There are also built-in layout options to change the layout by selecting an option from Layout (menu) > Window: – 800 x 600 – 1024 x 768 – 1280 x 720 – 1366 x 768 – 1920 x 1080 These options resize the windows, they do not change the resolution of your device. |
| Reset Layout | QuickEasy BOS saves the size of the right panel when you logout and reopens it the same size when you login again. If you login again and want to reset the size of the panel, you can click Reset Layout on the Layout menu option to change the right panel to its default size. This step is necessary if you login again from a device with a smaller screen. QuickEasy BOS must restart to apply this change. |
| Popups | Certain functions open a window on top of the current display. These popups can be moved (click and drag) or resized (drag the sides or corners). Popups cannot be minimised because their existence blocks all functions on the screens behind them. Closing a popup issues no warning message (in contrast closing a main window requests confirmation for closing QuickEasy BOS). |
Workspace
| Action | Description |
|---|---|
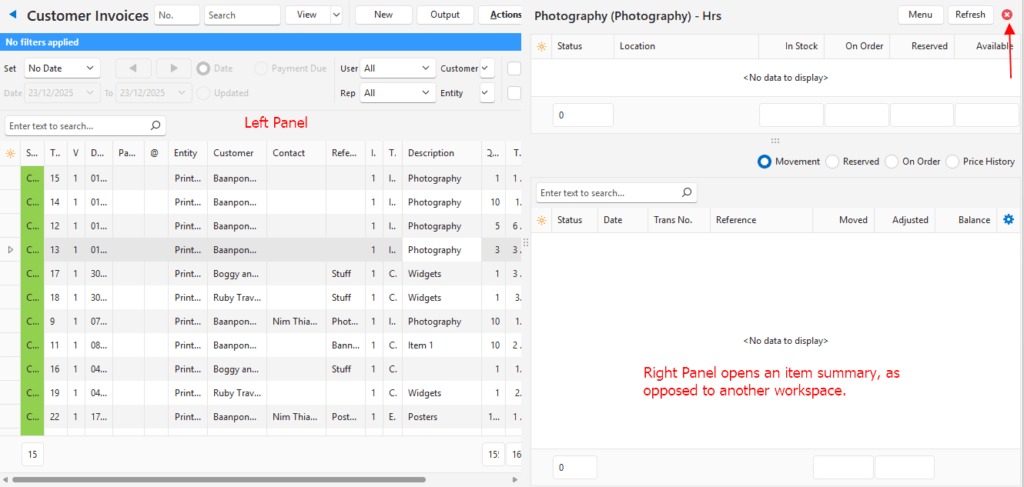
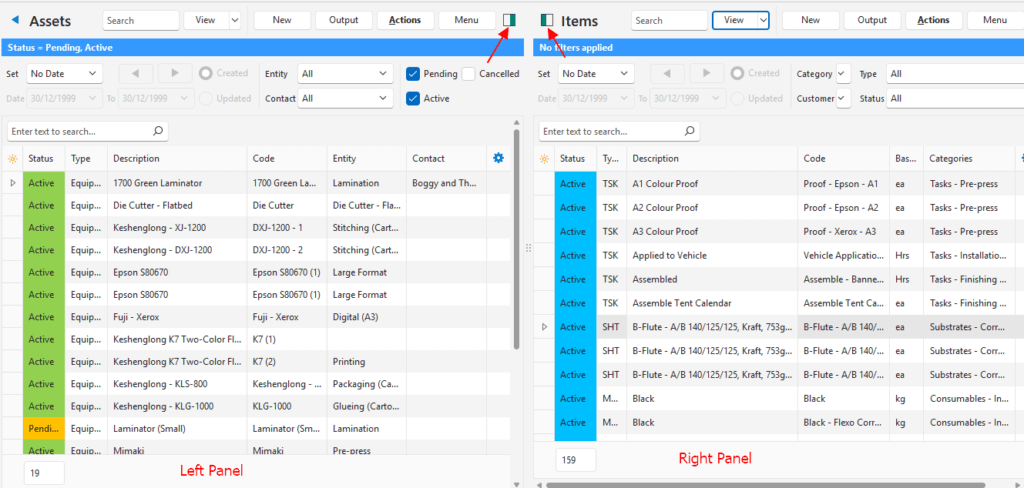
| Panels | The workspace is divided into left and right panels. The left panel is always visible. The right panel can be displayed or hidden. If there is no right panel, the left panel stretches to fill the screen. The size of the right panel is saved on exit. The panels are designed to fit in half of a full HD display (1920 pixels wide) without the need for horizontal scrolling. Any resizing of the panels overrides this setting. |
| Positioning | A single panel is docked on the right when the green bar is clicked. Click the red circle with the X to close the panel. If there is no block with a green bar, the panel cannot be moved (e.g. supporting panels are only docked on the right). A single panel may have horizontal or vertical dividing lines. In this case the panels can be resized by dragging the dividing lines, but they cannot be separated. |
| Resizing | Panels can be resized by hovering a mouse cursor over the central dots until it changes into a bar with two arrows and then moving the mouse left or right. |
| Dropdown Lists | Dropdown lists that are too narrow can be resized by dragging the four dots to the right. The four dots are placed on the bottom right of the dropdown list. |
Footer
The Footer is not editable. It displays information only.
| Display | Description |
|---|---|
| User | The name of the user. |
| Company | The name of the company. |
Troubleshooting: Right Panel Cannot be Resized
- The size of the right-panel is always saved.
- If you access QuickEasy BOS from a monitor with a different resolution, the right-panel may be too big, and the navigational elements needed to resize it might be obscured.
- To reset the right panel: click Layout > Reset Layout. (On the main menu.)
- Tip: Make a note of where you were and what you were viewing because resetting the layout restarts QuickEasy BOS which clears your navigational position and recent lists.