General Settings
- Certain settings affect multiple modules and are commonly referred to as general settings.
- Each setting has a default value. It is only necessary to add the setting to change the default value.
- When Add/Update (button) is clicked, only those settings that have not been added to the list are displayed, however, there is a checkbox to Show All settings.
Navigation: Main Menu > Setup > Settings
General Settings Interface
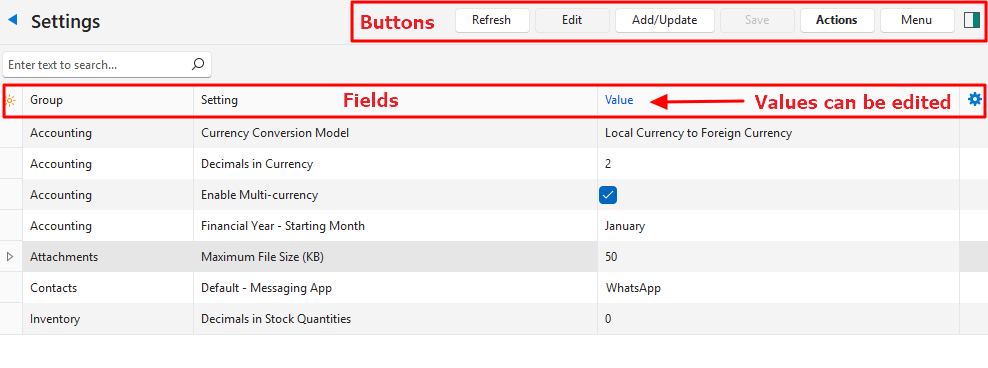
Buttons Explained
| Button | Description |
|---|---|
| Refresh | Refreshes the display. |
| Edit | Allows users to edit the fields in the Value column. |
| Add/Update | Allows users to add settings to change their default values. |
| Save | Saves any changes. |
| Actions | Update Settings Captions: Updates the settings’ captions (pending feature). Delete: Allows users to delete the entry. |
| Menu | Layout |
Fields Explained
| Field | Description |
|---|---|
| Field Chooser (*) | Allows users to add or remove columns. |
| Editor | The system-generated number for the Language Editor. |
| ID | The system-generated number for the entry. |
| ModuleID | The system-generated number for the Module. |
| Group | The name of the Group to which the setting belongs. |
| Setting | A description of the Setting. |
| Value | The editable Values for the setting. |
| Created | The date on which the entry was created. |
| Updated | The date on which the entry was updated. |
| Updated By | The User who last updated the entry. |
| Widget | A submenu that allows the entry to be Deleted. Settings that are deleted are removed from the interface and revert to their default values. |
Add/Update Interface Explained
Buttons and Filters Explained
| Button | Description |
|---|---|
| Add/Update (button) | Adds the selected records to the Settings interface. |
| Show All (checkbox) | Checkbox. If checked all the available settings are shown, including those that have already been added to the Settings interface. |
Fields Explained
| Field | Description |
|---|---|
| Field Chooser (*) | Allows users to add or remove columns. |
| ID | The system-generated number for the setting. |
| Group | The Group that the setting affects (e.g. Timekeeping, Accounting). |
| Setting | A description of the setting. |
| User Setting | Feature is pending. |
| Default Value | The setting’s Default Value that can be changed after the setting is Added/Updated. |
Settings Explained
| Setting | Description | Default |
|---|---|---|
| Accounting > Currency Conversion Model | The available options are: – Local Currency to Foreign Currency (How much of the foreign currency can one unit of the local currency buy?) – Foreign Currency to Local Currency (How much of the local currency can one unit of the foreign currency buy?) | Local Currency to Foreign Currency |
| Accounting > Decimals in Currency | The amount of decimal numbers to use when converting currencies. Choose 2 or 3. | 2 |
| Accounting > Enable Customer and Supplier Allocations | Checkbox. If checked, payments and credit / debit notes can be allocated to specific invoices. | Unchecked |
| Accounting > Enable Multi-currency | Checkbox: – If checked, multi-currency is enabled. – If unchecked, the currency lookups and columns in the Customer Age Analysis, Supplier Age Analysis, Ledger, and Transactions are disabled. | Unchecked |
| Accounting > Financial Year – Starting Month | A dropdown list of months for users to select in which month their financial or fiscal year starts. | January |
| Attachments > Maximum File Size (KB) | The maximum file size that can be uploaded when using the Notes & Attachment feature. If this size is exceeded when uploading an attachment, an error message is displayed. Captured Images (e.g. from a camera) are resized to Max FHD 1920×1080. | 50 KB |
| Contacts > Default – Messaging App | A field to type in the name of the default messaging app. This name appears on forms for users to type in the applicable number. It also appears on the Mobile App and includes features to automatically open the messaging app. | |
| Inventory > Decimals in Stock Quantities | A dropdown list to select from 0 to 4 decimals. | 0 |
| Items > Enable Item Types | Allows users to select which item types to enable. The options are: – Material: A general all-purpose item. – Task: A general service-related item, or item that is part of a costing or assembly. – Outwork: Services or products that are outsourced. – Costing: A collection of items used to calculate a cost and selling price. – Substrate (Sheets): Applicable to industries that use substrate sheets (e.g. printing). – Substate (Reels): Applicable to industries that use substrate reels (e.g. printing). – Assembly: Allows items to be combined to incorporate all the processes in production and costings. Used for a bill of materials. – Substrate (Square Meters): Applicable to industries that use substrates that are measured in square metres (e.g. printing). | Material, Task |
| Items > Enable Qty Types | A dropdown list of all the available quantity types. Click those that apply. | |
| Shopify > Access Token | A field to enter the access token for Shopify. | |
| Shopify > Client ID | A field to enter the client ID for Shopify. | |
| Shopify > Client Secret | A field to enter the client secret for Shopify. | |
| Shopify > Shop URL | A field to enter the URL for the shop that is integrated with Shopify. | |
| WooCommerce > Consumer Key | A field to enter the consumer key for WooCommerce. | |
| WooCommerce > Consumer Secret | A field to enter the consumer secret for WooCommerce. | |
| WooCommerce > WordPress Domain | A field to enter the WordPress Domain on which WooCommerce is installed. |
Tutorials
How to Add General Settings
- Navigate to Settings.
- Click Add/Update (button).
- Click any settings that appear on the list. (Use Ctrl + Left Click to multi-select).
- Note: Settings that you previously added are not shown. To see them, check the checkbox next to Show All. If a setting is added twice, it is not duplicated. It will only appear once.
- If the default values (as explained on the tab Settings Explained) meet your needs, you do not have to add the setting.
- Click Add/Update (button).
- Confirm that you want to add the setting.
- Edit the settings as needed.
How to Edit General Settings
- Navigate to Settings.
- Click Edit (button).
- Click the Value column next to the setting you want to edit.
- Make the necessary changes.
- Click Save (button).