Estimate Types Edit View
In QuickEasy BOS, the first step to Estimating is to create an Estimate Type.
Estimate Types are used to define the structure of an estimate and to limit the components and items that can be used in an Estimate.
Navigation: Main Menu > Setup > Estimate Types
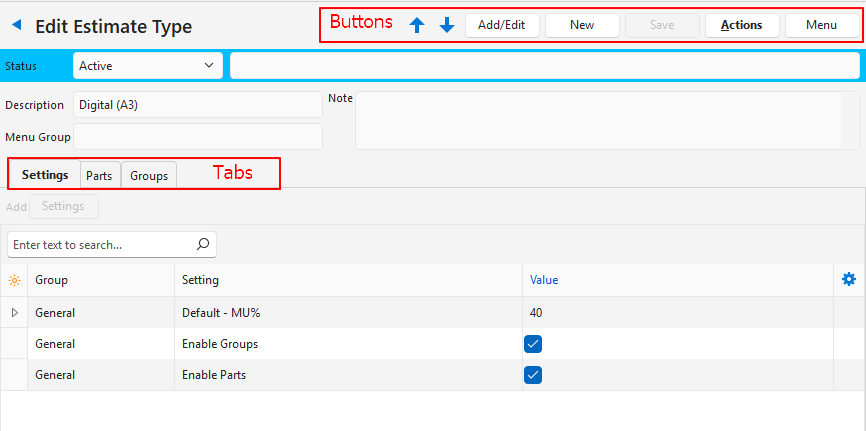
Buttons Explained
| Button | Description |
|---|---|
| ↑ ↓ | Navigates to the next or previous Estimate Type |
| Add/Edit | Allows Users to edit the entries. |
| New | Creates a new Estimate Type. |
| Save | Saves any changes. |
| Actions | Copy Estimate Type: Copies the estimate to create a new estimate type. Delete Estimate Type: Deletes the estimate type if it has not yet been used. |
| Menu | Settings – Edit Statuses – Edit Item Categories Layout |
Fields Explained
| Field | Description |
|---|---|
| Status | A field to set the Status for the estimate type. |
| Status Note | A field to type a note about the status. |
| Description | A field to type the description of the estimate type. |
| Menu Group | An optional field to group the Estimate Types by typing a Group Name. |
| Note | A field to type a note. |
Settings (tab)
The settings tab is always displayed. However, settings must be added using Settings (button). The button is active only after Add/Edit (button) on the top row is clicked.
Settings Explained
| Setting | Options | Explanation |
|---|---|---|
| General > Default – MU% | Field to type a default markup percentage for the estimate. | This markup is added to the item’s adjustment as per the Attribute settings. If items have different markups, set the markup on the item’s Attribute settings (adjustment field) and leave this field blank. It is advisable to add a default Markup by Product or Estimate Type and then to add an adjustment percentage (Adj%) as a discount. |
| General > Enable Groups | Checkbox. Checked if Groups are enabled. | A Groups tab is opened for users to create groups and assign categories to each group. If Groups are used, a category cannot be selected because it performs much the same function. |
| General > Enable Parts | Checkbox. Checked if Parts are enabled. | A Parts tab is opened for users to select the parts that can be added to an estimate. When creating the estimate users can only add parts from the list created on the Parts tab. If Parts are used, a category cannot be selected because it performs much the same function. |
| General | Item Category – Costings | Only one category can be selected. Items can be added to an estimate only if they belong to the selected category. If a category is selected, Groups and Parts are automatically disabled. |
Buttons Explained
| Button | Description |
|---|---|
| Settings | Opens an interface with all the available settings. Settings that have already been added are hidden by default unless Show All (checkbox) is checked. Settings must first be added before they can be edited. |
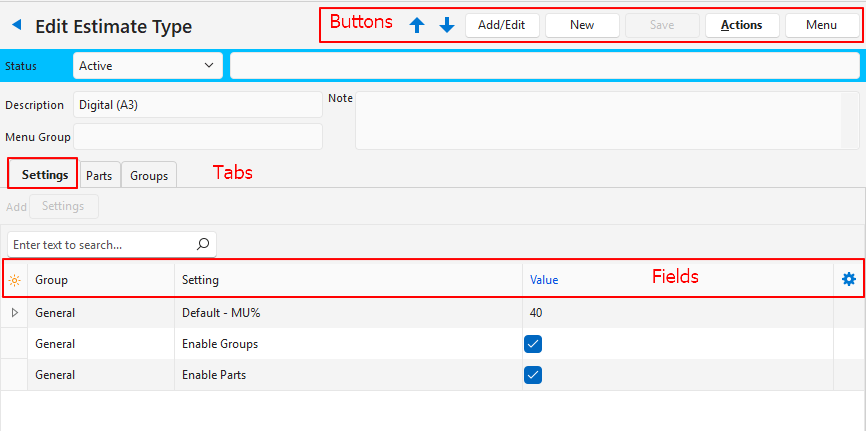
Fields Explained
| Field | Description |
|---|---|
| Field Chooser (*) | Allows users to add or remove columns. |
| Editor | The system-generated number for the entry in the Language Editor. |
| ID | The system-generated number for the entry. |
| Module ID | The system-generated number for the Module. |
| Group | The group the setting belongs to. |
| Setting | The name of the setting. |
| Value | A field to enter the setting’s value. |
| Created | The date on which the entry was created. |
| Updated | The date on which the entry was updated. |
| Updated By | The User who last updated the entry. |
| Widget | A submenu allowing users to Delete the entry. |
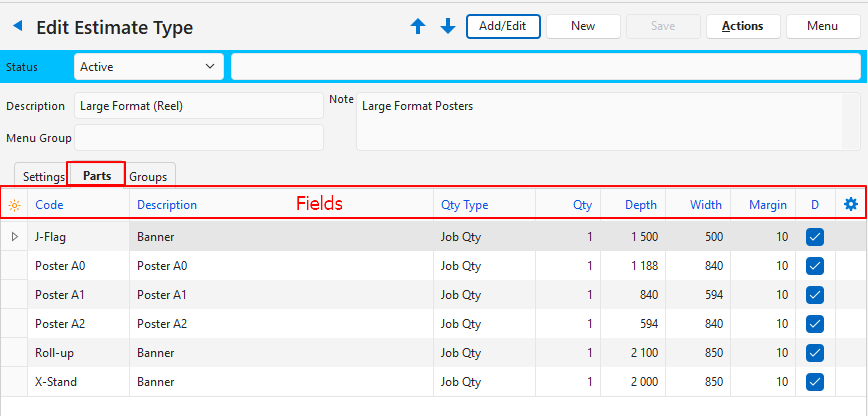
Parts (tab)
- The Parts tab is only displayed if the setting General > Enable Parts is added to Settings (tab) and the checkbox in the Value column is checked. The tab appears after Save (button) is clicked.
- Fields with blue captions may be edited.
Fields Explained
| Field | Description |
|---|---|
| Top Row | Allows users to add a new part. |
| Field Chooser (*) | Allows users to add or remove columns. |
| ID | The system-generated number for the entry. |
| Esttype ID | The system-generated number for the Estimate Type. |
| Code | A field to type a code for the part. |
| Description | A field to type a description for the part. |
| Qty Type | A dropdown list from which to select the Quantity Type. The options are: – Job Qty: The quantity is multiplied by the estimate quantity. – Fixed Qty: The quantity is fixed regardless of the estimate quantity. |
| Qty | The quantity of the part that is included in the estimate. |
| Depth | The depth of the part. |
| Width | The width of the part. |
| Margin | The margin allowance. |
| D | A checkbox. If checked the part’s description is included in the estimate description on Output forms (e.g. on the quotation). |
| Created | The date on which the entry was created. |
| Updated | The date on which the entry was last updated. |
| Updated By | The User who last updated the entry. |
| Widget | A submenu, which can also be accessed by right clicking the entry, with the following functions: – Copy: Copies the part. – Delete: Deletes the part. |
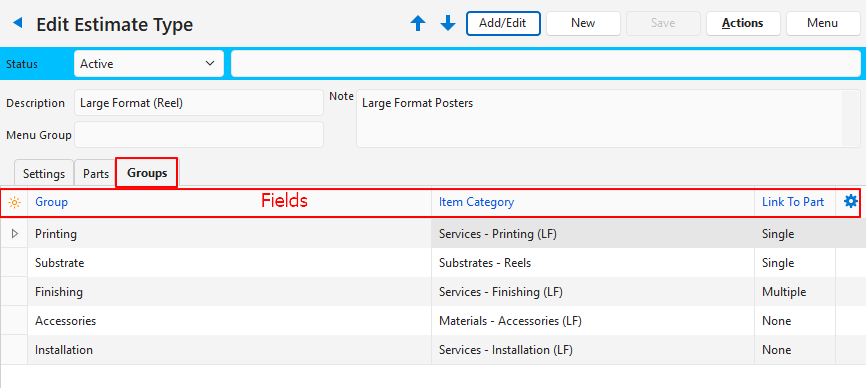
Groups (tab)
- The Groups tab is only displayed if the setting General > Enable Groups is added to Settings (tab) and the checkbox in the Value column is checked. The tab appears after Save (button) is clicked.
- Fields marked in blue, in QuickEasy BOS may be edited.
Fields Explained
| Field | Description |
|---|---|
| Top Row | Allows users to add a new group. |
| Field Chooser (*) | Allows users to add or remove columns. |
| ID | The system-generated number for the entry. |
| Order ID | A sequential number indicating the order of the entry (the order in which groups appear on the estimate). |
| Group | A field to type a name for the group (e.g. Printing, Substrate, or Finishing). |
| Item Category | A dropdown list of Item Categories for users to select the categories that apply to the estimate. When adding items to an estimate, users are limited to selecting items from the selected categories. New categories can be created using Menu (button) > Edit Item Categories. |
| Link To Part | A dropdown list to select one of these options: – None: No items may be linked to a part. – Single: Only one item may be linked to a part. – Multiple: Multiple items may be linked to a part. |
| Created | The date on which the entry was created. |
| Updated | The date on which the entry was updated. |
| Updated By | The User who last updated the entry. |
| Widget | A submenu, which can also be accessed by right clicking the entry, with the following functions: – Move Up Ctrl + U: Moves the entry one line higher. – Move Down Ctrl + D: Moves the entry one line lower. – Delete Ctrl + Del: Deletes the entry if confirmed. |