Estimate Tutorials
- To use estimates in transactions, you must add the Transaction Type setting: Estimating > Enable Estimating and select Quotations or Production as the option from the dropdown list in the Value column. The Production option is usually selected for Work Orders and activates Production Planning functions.
- Estimates are created as line items in transactions and are added by clicking the Estimate button which is placed directly above the line items to the right.
- The Estimate button provides a dropdown list of Estimate Types for users to select one.
- The estimate is divided into tabs. Items are added to the Input tab from the categories specified on the Estimate Type.
- Items can be used for estimating if:
- Estimating Attributes have been added to the applicable items and the attribute fields have been completed.
- The items are allocated to the specific Categories as specified by the Estimate Type.
- Assembly Items can be converted to limited estimates manually or automatically. When converted a single tab displays the materials and routing and allows the quantity and costs to be edited.
- Automatically: Add the setting Estimating > Convert Assembly (ASM) Items to Estimates to the applicable Transaction Type and check the checkbox. In this case, all assembly items that are added to the transaction are immediately converted. Right click the assembly item on the transaction and select Open Estimate from the context menu to display and edit the estimate.
- Manually: By right clicking the line item on the transaction and selecting Convert to Estimate from the context menu. Once converted, the estimate can be opened from the right-click context menu.
How to Add an Estimate to a Quotation
- Create or Edit a Quotation.
- Complete the Header.
- Complete Input (tab).
- Complete Costs (tab).
- Complete Prices (tab).
- Add quantities.
- Edit the imposition (if applicable).
How to Complete the Header
- Description = Type a description for the estimate. This description is displayed on the transaction as the name of the entry. It also appears on the quote letter as a heading for the section.
How to Complete Input (tab)
- On Input (tab) you select the component options for the item you are estimating. The tab consists of sections (e.g. parts, substrates, processes, and finishing). The sections that appear are determined by the setup of the Estimate Type.
- The groups (e.g. Printing, Finishing, Substrates) are linked to the parts. If a part is deleted, the linked groups are also deleted.
- This example is based on an Estimate Type that only allows one item each for printing and substrates and multiple items for finishing services.
- From editing an Estimate: click Input (tab).
- Click the part you want to add on the popup of available parts.
- Edit the part’s details on the popup (optional):
- Description = Change the description.
- Qty = Select a Quantity Type and Quantity in the x field.
- Size (DxW) = Type a size depth x width in the fields provided.
- Margin = Type a margin.
- Add Printing as follows:
- Click Link to Part on the left (it should be selected automatically).
- Click an option on the list in the centre.
- Add Substrates as follows:
- Click Substrate under Link to Group on the left.
- Click an option on the list in the centre.
- Add Finishing as follows:
- Click Finishing under Link to Group on the left.
- Click an option on the list in the centre (use Ctrl + Left click to multi-select).
- Close the popup by clicking the X in the top right corner.
How to Complete Costs (tab)
- From editing an Estimate: click Costs (tab).
- Costs are automatically filled in once the Input tab is completed.
- All the fields in blue may be edited.
- However, fields are mostly edited to:
- Choose a different supplier:
- Materials: Click the dropdown list in the Supplier column and select a different supplier.
- Routing: Only applicable if some of the work is outsourced. Click the dropdown list in the Supplier column and select a different supplier.
- Edit the price adjustment: A positive number increases the price (surcharge). A negative number decreases the price (discount).
- Under Materials: Type a number in the Adj % column.
- Under Routing: Type a number in the Adj % column.
- Choose a different supplier:
How to Complete Prices (tab)
- From editing an Estimate: click Prices (tab).
- If the items are setup correctly, the prices should be correct for each quantity. Negative quantities are shown in red and deleted once Save (button) is clicked.
- The tab is populated with additional quantities as they are added.
- Fields in blue may be edited by overtyping the fields.
- If the checkbox in the Fix column is checked, the Fixed and Unit Sell Prices may be edited but not the MU%.
- If the checkbox in the Fix column is unchecked, the MU% may be edited, but not the Fixed and Unit Sell Prices.
How to Add Quantities
- Only one quantity can be the active quantity, and it determines the final price on the quotation.
- You may include multiple inactive quantities to show customers the effect of selecting different quantities.
- Negative quantities are not allowed.
How to Add a Single Quantity
- From editing an Estimate, look at the summary section:
How to Add a Range of Quantities
- Any entered quantities are replaced with the new set of quantities generated by this procedure.
- The first quantity on the generated list becomes the active quantity.
- From editing an Estimate: Click Prices (tab).
- Click Actions (button) > Add Quantities and fill in the fields as follows:
- Type the Start quantity in the first block (e.g. 100).
- Type the End quantity in the second block (e.g. 500).
- Type the Step amount in the block next to Step (e.g. 100).
How to Change the Active Quantity
- When preparing a quotation, the price for the active quantity is shown in the total column.
- However, inactive quantities can still be included to allow customers to see the price effect of choosing a different quantity.
How to Edit the Imposition
The imposition is created from the part’s dimensions and only limited editing is allowed.
- From editing an Estimate: click Input (tab).
- Double-click the image to open the interface.
- On the Constraints section:
- Edit the margins by overtyping them.
- Check the checkbox next to Allow Rotate to allow the substrate to be rotated.
- On the Imposition section:
- Check the checkbox next to Override to edit the layout (i.e. how many items fit on a page) where applicable.
- Note: The editable fields have a slight drop shadow to indicate they are editable.
- Check or uncheck the checkboxes to allow or prevent rotation.
- Check the checkbox next to Override to edit the layout (i.e. how many items fit on a page) where applicable.
How to Complete Description (tab)
- From editing an Estimate: click Description (tab).
- The description is created from the items for which the D column of the Input tab is checked.
- You can add information to this description by clicking Note (button) next to Add.
How to Override the Description
If a description is overridden, any changes to the Input tab is not reflected (e.g. checking or unchecking the D column, adding or deleting items).
- From editing an Estimate: click Description (tab).
- The description status changes to Override.
- Edit the description as needed.
How to Remove an Override Description
- If you use Auto descriptions and delete an item that has its own Description, the auto-generated description is also deleted.
- However, the description is not deleted if you have overridden it. In this case, right click the description and select Auto from the context menu to delete it.
- From editing an Estimate: click Description (tab).
- The description status changes to Auto.
- The description is replaced by the default description.
How to Understand the Summary Section
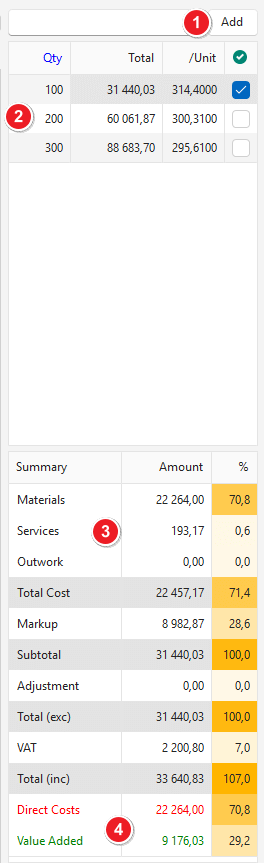
- Displays the quantities that have been added. The blue checkbox indicates the active quantity. The prices for the Active Quantity are shown in the summary section (3).
- The Estimate Summary has two columns. The first column shows an amount and the column next to it shows the percentage. The fields are:
- Materials: The total cost of materials (e.g. substrates and parts).
- Services: The total cost of services (e.g. finishing).
- Outwork: The total cost of services that were outsourced.
- Total Cost: The cost of materials, services, and outwork.
- Markup: The expected profit.
- Subtotal: The total cost plus the markup.
- Adjustment: Any additional markup or discount.
- Total (exc): The VAT exclusive amount (Subtotal plus Adjustment).
- VAT: The VAT as per the VAT Type on the transaction.
- Total (inc): The total including VAT (Total (exc) plus VAT).
- Summary:
- Direct Costs: The costs of parts or materials.
- Value Added: The extra income on the job.
Deleting Estimates
How to Delete an Estimate – Option 1
- Confirm that you want to delete the line item.
How to Delete an Estimate – Option 2
- Confirm that you want to delete the estimate.
Additional Features (viewing linked items, updating entries)
How to Update an Estimate with Estimate Type changes
- Check or uncheck the boxes to update the Description, Attributes, or Prices for each of these groups: All, Materials, Services and Outwork.
- The features that were checked and / or updated are displayed on the popup.
- Close the popup using the X in the corner.
How to View a Linked Item
- From editing an Estimate: click Input (tab) or Costs (tab).
- A popup displays the linked item which can be edited. This popup has limited functionality.
How to View an Item Summary
- From editing an Estimate: click Input (tab) or Costs (tab).
- A summary of the applicable item’s transactions is opened on the right.
- Note: Click the red circle with the x to close the summary.
How to Reorder Estimate Entries
- From editing an Estimate: click Input (tab).
How to Delete Estimate Entries
- From editing an Estimate: click Input (tab).
- Right click an entry and select Delete from the context menu.
- Note: If you delete a Part, the linked items are also deleted.
How to Delete Estimate Quantities
- From editing an Estimate: click Prices (tab).
- Right click an entry and select Delete from the context menu.
- Note: You can also delete quantities from the Summary in the same way.
How to Copy an Estimate
- The copied estimate is opened and a new entry on the transaction is created with the copied estimate.