Edit Views
Example: Customer and Supplier Transactions
Example: Accounting Transactions
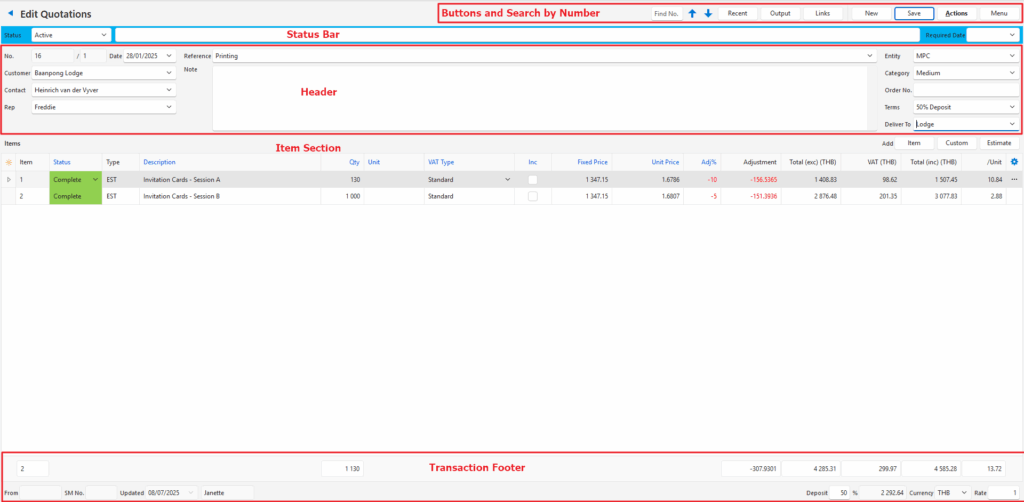
Sections Explained
| Sections | Descriptions |
|---|---|
| Caption | Name of the form (Edit View) at the top with an arrow to navigate back to the List View. |
| Buttons | – Menu buttons with options and actions for the report. – Menu buttons may include options to view how the transaction will be posted in the ledger or how the transaction affects inventory. |
| Warning | A Warning bar (e.g. if something is not filled in correctly). |
| Header | Dropdown lists with information relating to the transaction (e.g. Customer or Supplier Names, Categories, Order Numbers). |
| Columns | – The actual transaction (e.g. Item, Quantity, Price). – Usually, the first column is a Field Chooser (*) from which columns can be added or removed. – Usually, the last column includes additional actions which are also available on a right-click context menu. – Columns can be resized by dragging the line next to the caption. – Columns include a Soft Filter Icon (small funnel icon) to filter the contents in the column. – If the caption is blue, it indicates an editable field. – If the caption is black, it indicates a field is automatically calculated or completed. |
| Rows | Most rows include a context menu with shortcuts to various functions. The context menu can be accessed by right clicking any field in the row. The context menu is also available by left clicking the last column. |
Edit View Buttons
| Button | Description |
|---|---|
| Find No. | Displays the transaction that has the number typed in the Find No. field. |
| ↑ ↓ | Navigates between the records or transactions. |
| Recent | Lists the recent transactions. |
| Output | Generates Output to the screen, email, or printer. Output is created for each module separately. |
| Links | Provides clickable links to any linked documents. A linked document is one that the current transaction was copied from or copied to, or service tickets that are linked to the transaction. |
| Save | Saves any changes and recalculates the totals (all the columns with black captions). |
| Actions | The actions available for that transaction (e.g. Copying options or Batch Updates). |
| Menu | The menu options change depending on what is being edited. It includes all the settings that apply to that transaction type or record. View/Edit Notes & Attachments: Allows notes and attachments to be created, viewed, or edited. Layout Options: – Save: Saves the current layout and filters for the specific user. – Save (All Users): Saves the current layout and filters for all the users. – Restore: Restores the layout only for the current user. – Restore Default (All Users): Restores the default layout for all the users but requires BOS to be restarted to apply the changes. |
Edit Views: Transaction Fields
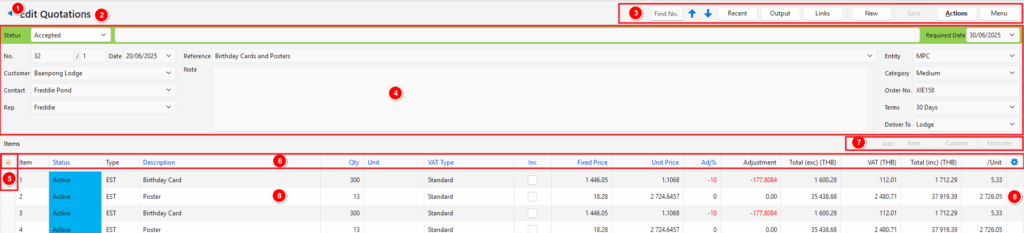
- Back button returns you to the list from which you accessed the transaction.
- Description of the Transaction Type displayed for information purposes only.
- Main Buttons and Filters for the module.
- Header, including the colour-coded Status bar that must be completed for the transaction.
- Field Chooser column from which columns can be added or removed.
- Captions for the columns. Column headings can be right clicked to display a context menu for grouping and filtering options. Blue Captions indicate the field is editable.
- Buttons to add Items to the transaction. Transaction entries consist of items which can be custom (users type in the information) or pre-created. Buttons are greyed out when the transaction can no longer be edited (i.e. the option selected for the Status that the transaction is in does not allow editing).
- Right click any line item to display a Context Menu. The entries on the context menu differ per transaction. You can also left click the ellipses in the last column to access the context menu. (First click displays the ellipses, second click opens the context menu.)