Custom Attributes
How to Create Custom Attributes
- Navigate to Edit Attributes.
- Click Add/Edit (button).
- Fill in the details on the top row as follows:
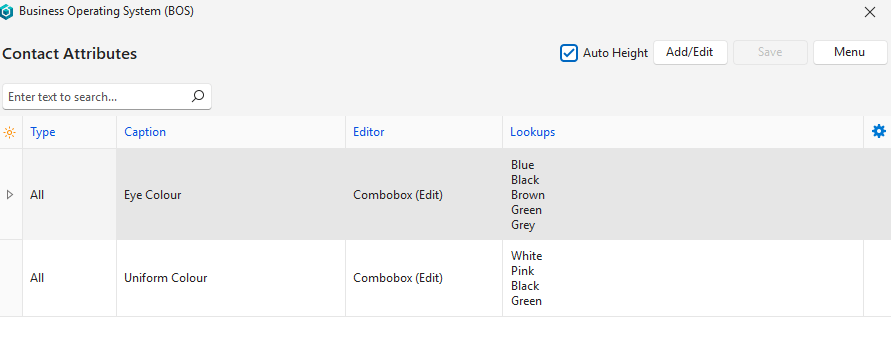
- Type = Select whether the attribute applies to All, Entity, or Person.
- Caption = Type a descriptive heading for the attribute (e.g. BEE Rating).
- Editor = Applies to the answer that users must provide. Select one of these options:
- Text: Any text can be typed.
- Number (0 Decimals): Only an integer can be typed.
- Number (2 Decimals): A number with 2 decimals can be typed.
- Number (4 Decimals): A number with 4 decimals can be typed.
- Combobox (Fixed): An answer must be selected from a lookup list.
- Combobox (Edit): An answer may be selected from a lookup list or typed in the block.
- Checkbox (Y/N): A checkbox. Checked for yes, left unchecked for no.
- Lookups = If Combobox (Fixed) or Combobox (Edit) is selected, type the expected answers in the field provided – one entry per line.
- Note: Check or uncheck the Auto Height checkbox to display or hide the full lookup list.
- Note: In certain circumstances the system allows you to create lookup lists without first selecting Combobox, but the lookup lists do not work until you select Combobox in the editor column.
- Click Save (button).
How to Edit a Custom Attribute
- Navigate to Edit Attributes.
- Click Add/Edit (button).
- Edit the fields as needed.
- Note: Check or uncheck the Auto Height checkbox to display or hide the full lookup list.
- Click Save (button).
How to Delete a Custom Attribute
If a custom attribute has been added to a contact it cannot be deleted from the list of custom attributes unless it is first removed from that contact.
- Navigate to Edit Attributes.
- Right click an attribute and select Delete from the context menu.
- Confirm the deletion.
How to Add Custom Attributes to a Contact
- Navigate to Contacts (Main Menu > Setup > Contacts).
- Right click the contact you want to edit and select Edit Contact from the context menu.
- Click Edit (button) on the top row.
- Click Attributes (tab).
- On the right side, click Attributes (button) next to Add.
- Click the Attribute/s you want to add (Use Ctrl Left Click to multi-select).
- Click Select (button).
- The added attributes will be displayed on the right, and the necessary information can be provided in the Value column.
- Click Save (button) on the top row.