
Transaction Type Settings
Before transactions can be captured, these steps must be completed:
- Create a Transaction Type for every transaction needed (e.g. Customer Invoices, Credit Notes, General Journal, Bank Payments) and complete the additional tabs:
- Choose the Settings (this page).
- Create Statuses.
- Create Categories (optional).
- Create rules for copying the transactions and set user access for those rules (referred to as Copy Rules).
- Create or import forms (e.g. Invoices) that are applicable to the transactions (known as Output Templates).
- Set the User Access for the Transaction Type.
- Add the Transaction Type to the Menu.
Organisations may create as many Transaction Types as they want.
Navigation: Main Menu > Setup > Transaction Types > Double click a Transaction Type > Settings (tab)
Settings (tab)
- Each Transaction Type can have its own custom settings.
- Each setting has a default value. It is only necessary to add the setting to change the default value.
- When Settings (button) is clicked, only the settings that have not yet been added to the list are displayed. There is a checkbox to Show All settings.
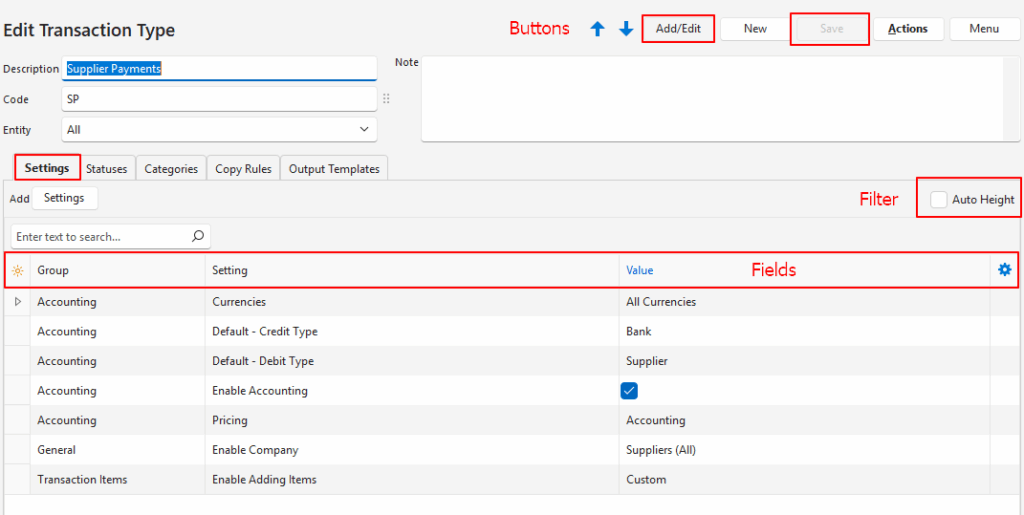
To clear the value selected from a dropdown list in the Value column, select the blank space on the top row of the dropdown list, remove the setting, or select a different option.
Settings with Default as part of the name can be changed when entering a transaction. The selected value for the setting should be applicable to most transactions.
Settings Explained
Accounting
Field | Description | Default | When Required |
Accounting > | |||
Credit Account Filter (Enter string contained in Accounts > Lookup) | Limits the accounts that can be selected to those that include the letters typed in. The filter is case-insensitive. | Applies to all transaction types that are posted to the ledger. For example, if you prefix all sales accounts with SLS, and enter SLS in the Value column, then only the sales accounts are displayed when selecting an account to credit. | |
Credit Type | Select the applicable account type from this list:
| Applies to all transaction types. Examples: Customer: Select for Credit Notes. (Cr Customer, Dr Sales) Supplier: Select for Supplier Invoices. (Cr Supplier, Dr Purchases or Inventory) Ledger: Select for Other Income, Sales, and VAT Refunds. (Cr Other Income, Dr Bank) | |
Currencies | Select a currency option from this list:
| Local Currency | Applies to all transaction types. |
Debit Account Filter (Enter string contained in Accounts > Lookup) | Limits the accounts that can be selected to those that include the letters typed in. The filter is case-insensitive. | Applies to all transaction types that are posted to the ledger. For example, if you prefix all Cost of Sales Accounts with COS, and enter COS in the Value column, then only the Cost of Sales accounts are displayed when selecting an account to debit. | |
Debit Type | Select the applicable account type from this list:
| Applicable to all transaction types. Examples: Customer: Select for Customer Invoices (Dr Customer, Cr Sales). Supplier: Select for Supplier Debit Notes (Dr Supplier, Cr Purchases or Inventory). Ledger: Select for Expenses, Purchases, VAT Payments (Dr Expense, Cr Bank). | |
Default – Credit Account | A dropdown list of all the created accounts as per the Chart of Accounts to select a default account to credit. | Applies when a specific ledger account must be credited. | |
Default – Debit Account | A dropdown list of all the created accounts as per the Chart of Accounts to select a default account to debit. | Applies when a specific ledger account must be debited. | |
Default – Deposit % | Enter the default deposit that will be calculated and shown at the bottom of the transaction. | 0% | Applies to customer and supplier invoices. |
Default – Price includes VAT | Checkbox. If checked the prices include VAT for calculation purposes. Prices are calculated as follows:
| Unchecked | Applies to all transactions. |
Default – VAT Category (Input/Output) | Select a VAT Category from these options:
| N/A | Applies to all transaction types on which VAT is either charged or claimed. Determines whether the VAT Control account is debited or credited and how VAT is treated in the VAT reconciliation. |
Default – VAT Type | Select the applicable VAT Type from the dropdown list of all the created VAT Types. | No VAT | Applies to all transaction types on which VAT is either charged or claimed. |
Enable Accounting | A checkbox. If checked, accounting is enabled. If unchecked, transactions are created in the module and not posted to the Ledger. | Unchecked | Should be unchecked for transaction types that relate to internal procedures (e.g. Purchase Orders, Work Orders, Quotations, Sales Orders). Should be checked for all other transaction types. Checked for inventory transactions that must be posted to the ledger. If enabled, transactions can be created from the Ledger. |
Enable Withholding Tax (WHT) | Select one of these options:
| None | Applies to invoices, payments and receipts if tax must be withheld from suppliers or is withheld by customers. |
Pricing | Select a pricing option from this list:
| Sell Price | Applies to all transaction types. A price must be selected to enter an amount on a transaction. Select Supplier Price for supplier transactions (e.g. Purchase Orders, Supplier Invoices). Select Sell Price for customer transactions (e.g. Quotations and Customer Invoices). Select Cost Price for Work Orders and inventory transactions (e.g. Goods Issued). Select Accounting Price for Bank Payments, Bank Receipts, and Journal Entries (e.g. Payroll, General Journal). Items can only be added to transactions if the matching prices are filled in on their Prices’ tab. |
Set Due Date from Credit Terms | Checkbox. If checked the credit terms are used to prefill due dates. | Unchecked | Applies to customer and supplier transactions (e.g. invoices) that have payment due dates. |
Sum Active Transactions to Work in Progress in Customer Age Analysis | Checkbox. If checked customer transactions with Active statuses are shown on the Customer Age Analysis as work in progress. | Unchecked | Applies to sales orders. |
Sum Active Transactions to Work in Progress in Supplier Age Analysis | Checkbox. If checked supplier transactions with Active statuses are shown on the Supplier Age Analysis as work in progress. | Unchecked | Applies to purchase orders. |
Update Bank | Specifies how to treat entries imported from a bank statement:
| None | Any transaction that updates a bank account using a Bank Import. For example: Bank Payments = Credit (Dr. Expenses, Cr Bank) Bank Receipts = Debit (Dr. Bank, Cr Income Received) |
Calendar
Field | Description | Default | When Required |
Calendar > | |||
Resource Calendar (Transaction Items) | Provides a dropdown list of calendar types to select one for the transaction. | Any transaction that has line items that should be linked to a calendar. | |
Enable Date Start (Enter Caption) | Specify a caption for the transaction’s start date on the calendar. | Any transaction that has line items that should be linked to a calendar. | |
Enable Date End (Enter Caption) | Specify a caption for the transaction’s end date on the calendar. | Any transaction that has line items that should be linked to a calendar. | |
Calendar > Set Quantity from Calendar (Duration between Start and End Dates | Checkbox. If checked the durations on transactions are automatically changed to the working hours between the end and start calendar dates. The quantity is rounded to the calendar’s smallest scale. Days are calculated on a check-in/check-out model: 12/10/25 – 13/10/25 = 1 day Transaction update method:
| Unchecked | Any transaction that has line items that should be linked to a calendar. |
Defaults
Field | Description | Default | When Required |
Defaults > | |||
Default – Data Filter | Select the default display for viewing a list of transactions:
| Pending & Active | Applies to all transaction types. |
Estimating
Field | Description | Default | When Required |
Estimating > | |||
Convert Assembly (ASM) / Costing (CST) Items to Estimates | Checkbox. Checked: Assembly and costing items are automatically converted to estimates when added to transactions that use estimating. This process automatically generates the Bill of Materials (BoM) and Routing necessary for production. Unchecked: Assembly and costing items can be converted manually to estimates on transactions that use estimating. | Unchecked | Applies to transaction types that have estimating enabled. |
Enable Estimating | Select an option to enable estimating:
| None | Allows estimates to be created as line items. Mostly applies to quotations and work orders (production). |
General
Field | Description | Default | When Required |
General > | |||
Add Items from the following Categories | Limits the items that can be added to those in the selected categories. Click Edit in the value column and select the Item categories. | Applies to inventory, customer, and supplier transactions. Useful if multiple transaction types were created for the same function (e.g. work orders), to delineate which items apply to which transaction type. | |
Add to Followers | A dropdown list of Follower options. Multiple categories can be selected:
| N/A | Applies to any transaction that someone wants to be notified of. Followers must be Contacts and have email addresses. |
Contact Lookup | Select the contact fields to include from this list:
| Name | Applies to transactions where contact people are selected (e.g. customer and supplier transactions). |
Default – Attribute Sets | Provides a list of custom attributes created for transactions to select the ones that apply. | This is an optional feature. It can be added to any transaction if you want additional fields to be entered. | |
Enable Artwork | Checkbox. If checked artwork is enabled and can be attached to a line item on a transaction. | Unchecked | Applies to transactions with custom specifications (e.g. quotations or work orders). |
Enable Assets | Checkbox. If checked, an asset can be selected in the transaction header. | Unchecked | Applies to transactions that involve assets. The transactions depend on the type of business. Businesses that lease out or maintain assets would include this setting in most transactions. Business that only occasionally buy assets would including this setting only on transactions like supplier invoices. When transactions are copied, the assets are also copied if both the source and target transactions have assets enabled. |
Enable Company | Select what type of company should be in the header:
| N/A | Applies to all transaction types that involve customers or suppliers. Customers (All) and Suppliers (All) should be used for transactions that involve payments so that all the payments can be recorded. Customers (Active) and Suppliers (Active) should be used for transactions that involve purchases or sales to stop doing business with suspended customers or suppliers. |
Enable Delivery Address | A checkbox. If checked, the Delivery Address is enabled. | Unchecked | Applies to customer transactions (e.g. Customer Invoices, Delivery Notes). |
Enable Due Date (Enter Caption) | Type a caption if the Due Date field should be added to the transaction (e.g. Due Date). | Applies to inventory, customer, and supplier transactions. Can be used to indicate the date on which production should finish the job. Can also be used to indicate when the payment is due. | |
Enable Entities | Select an option from this list:
| Registered | All transactions that should be allocated to entities other than registered entities. |
Enable Item Status | Checkbox. If checked transaction items can have statuses. If unchecked, only the overall transaction has a status (referred to as the transaction header status). | Unchecked | All transactions. |
Enable NCR (Problem) | Checkbox. If checked, transactions can be marked as problem transactions for NCR purposes. | Unchecked | Normally applied to Purchase Orders (to re-order supplies) and Work Orders (to remake faulty goods). |
Enable Proposals | Checkbox. If checked, proposals can be created from the transaction. | Unchecked | Applies to customer transactions like quotations and invoices (if quotations are not used). |
Enable Required Date (Enter Caption) | Type a caption if the Required Date field should be added to the transaction (e.g. Req. Date). | Applies to inventory, customer, and supplier transactions. Normally used to indicate the date on which customers require the goods. | |
Enable Staff | Select an option from this list:
| None | Applies to inventory, customer, and supplier transactions. |
Enable Timekeeping | Allows timekeeping to be tracked against the transaction. | Unchecked | Applies to inventory, customer, and supplier transactions that involve tasks or projects that are tracked. |
Enable Version Numbers | A checkbox. If checked version numbers are enabled (e.g. Quotation versions). | Unchecked | Applies to quotations where different options for the same product are offered. |
Reference Lookup | A field to type Reference lookup lists. | Applies to any transaction where a lookup list is needed for the reference field (e.g. to speed up input, or to ensure consistency). | |
Transaction Number | Specifies how transaction numbers are allocated when the transaction type is first created.
| Generate | Applies to all transactions. Customer documents: Generate or Generate (Entity) ensures invoices and credit notes are issued in sequence. Supplier documents: Edit allows users to type the supplier’s document number in the document number field. (The number can also be typed in the reference field.) |
Inventory
Field | Description | Default | When Required |
Inventory > | |||
Default Inventory Location (Production Materials) | Select a default inventory location for production materials. (Inventory locations are created under Entities.) | Applies to transactions linked to production (e.g. Work Orders). | |
Default Inventory Location (Transaction) | Select a default inventory location for the transaction type. (Inventory locations are created under Entities.) | Applies to all transactions that are used to manage inventory. | |
Enable Inventory Replenishment | Select one of these option to enable replenishment:
| N/A | The produce option should be applied to work orders, and the purchase option should be applied to purchase orders. |
Enable Resolves | Specify what must happen to inventory items. Multiple options may be selected from this list:
| N/A | Applies to all transactions in which inventory items are used with the exception of Stock Adjustments which has its own setting. |
Enable Stock Adjustment | Checkbox. If checked, the transaction is used for stock adjustments when a stock count is done. The following fields are enabled:
| Unchecked | Stock Adjustment transactions |
Enable Transfer Issue | Checkbox. If checked enables the From / To fields in the transaction header and assigns the location selected under “From” to items. | Unchecked | Applies to Transfer Issue transactions. |
Enable Transfer Receive | Checkbox. If checked, enables the From / To fields in the transaction header (read-only) and assigns the location selected under “To” to items. | Unchecked | Applies to Transfer Receive transactions. |
Update Supplier Prices on linked Items | Checkbox. If checked the Supplier price is updated when the transaction’s status is changed to a Complete status. The Supplier Price is matched on Supplier, Unit and Currency. | Unchecked | Applies to supplier transactions such as supplier invoices. |
Mobile
Field | Description | Default | When Required |
Mobile > | |||
Enable in Mobile App | Checkbox. If checked, the transaction can be accessed from the mobile app. | Unchecked | Applies to production and stock-movement transactions that can be managed from the mobile app. |
Transaction Items
Field | Description | Default | When Required |
Transaction Items > | |||
Enable Adding Items | Specify which items can be added to transactions:
All the buttons to add items are still displayed. The features that are disabled return an error message if clicked. | All | Applies to all transaction types. |
Incorrect Mix of Settings Warnings
- The warning is displayed on an orange warning bar when selecting settings for the Transaction Type.
- Warnings are not displayed on the transactions.
- See Copy Rules and Statuses for additional warnings.
Warning | Applicable Settings | Problem | Solution |
Customer (Company) and Supplier Price |
| Customer transactions such as Quotations, Sales Orders, and Customer Invoices should use Sell Prices. | If General > Enable Company = Customers (All) or Customers (Active) then Accounting > Pricing must equal Sell Price (invoices) or Accounting Price (payments). |
Supplier (Company) and Sell Price |
| Supplier transactions such as Purchase Orders and Supplier Invoices should use Supplier Prices. | If General > Enable Company = Suppliers (All) or Suppliers (Active) then Accounting > Pricing must equal Supplier Price (invoices) or Accounting Price (payments). |
Cost Price and Price includes VAT |
| Cost Prices are calculated and saved as VAT exclusive; therefore, they must be entered as VAT exclusive. | For work orders, or sales orders, uncheck the block next to the setting Accounting > Default – Price Includes VAT. For other transactions, check if the correct price is selected. |
Cost Price can only be selected with No VAT |
| Cost Prices are used for internal transactions like stock transfers and work orders. VAT is not applicable to these transactions. | If the Cost Price is correct, select No VAT as the default VAT Type. If VAT is applicable, select a different option under Pricing (e.g. Sell Price for Customer Invoices, or Supplier Price for Supplier Invoices). |
Convert Assembly (ASM) Items to Estimates can only be used if Estimating is enabled |
| Estimating is not enabled, but the checkbox to Convert Assembly (ASM) Items to Estimates is checked. | Enable Estimating by selecting Quotations or Production from the dropdown list. or Uncheck the checkbox next to the setting Convert Assembly (ASM) Items to Estimates. |
Debit and Credit types cannot both be assigned to a Customer or Supplier |
| You cannot create direct transactions between two customers, two suppliers, or between a customer or supplier. Either the Debit or Credit Type must be a ledger account. | To transfer an invoice that cannot be edited, issue a credit or debit note, and create a new invoice. To transfer a payment or receipt, cancel the wrongly allocated payment or receipt and enter a new one. To offset a customer and supplier account, use an accrual or suspense account (e.g. Cr Customer, Dr Suspense and Dr Supplier, Cr Suspense.) |
The Debit Type or Credit Type does not match the Company |
| The selection made under Enable Company must match either the Debit or Credit Type. You can ignore this warning if you specifically want to expose a customer field on a stock movement transaction to link the customer account. | If Enable Company = Customers (All) or Customers (Active), the following types are allowed:
If Enable Company = Suppliers (All) or Suppliers (Active), the following types are allowed:
|
Stock Adjustment must be Cost Price. |
| Only Cost Price is a valid selection. | Select Cost Price from the dropdown list next to Pricing. |
The Company needs to be enabled if the Debit Type or Credit Type is set to Customer or Supplier |
| General > Enable Company defaults to N/A. This setting must be added and changed if Customer or Supplier is selected for either the Credit or Debit Type. | Add the setting and select an option that matches the Credit or Debit Type selection. For example, if the Debit or Credit Type = Customer, select either Customers (All) or Customers (Active) for this setting. |
Accounting is enabled, but the Dr Type or Cr Type setting is blank. |
| Even if you selected a specific account, you must still select a Type. | Add the setting and select a Credit and Debit Type. |
Settings Tutorials
How to Add Transaction Settings
- Navigate to Main Menu > Setup > Transaction Types > Double-click a Transaction Type > Settings (tab).
- Click Add/Edit (button) unless it is greyed out.
- Click Settings (button) next to Add.
- Check any settings that appear on the list.
- Note: Settings that have already been added are not on the list unless you check the checkbox next to Show All.
- If the default values meet your needs, you do not have to add the setting.
- Click any setting for which you want to change the default value.
- Click Add/Update (button)
- Confirm that you want to add the setting.
- Close the popup with the settings (it remains open for you to select more settings).
- Edit the settings that were added by selecting or typing an option in the Value column.
How to Edit Transaction Settings
- Navigate to Main Menu > Setup > Transaction Types > Double-click a Transaction Type > Settings (tab).
- Click Add/Edit (button) unless it is greyed out.
- Click the Value column next to the setting you want to edit.
- Make the necessary changes.
- Click Save (button).
How to Delete Transaction Settings
Deleting a setting removes it from the list of settings on Settings (tab). The setting reverts to its default value and can be added again if needed.
- Navigate to Main Menu > Setup > Transaction Types > Double-click a Transaction Type > Settings (tab).
- Right click the Setting to delete and click Delete on the context menu.
- Confirm that you want to delete the setting.
Learn More
- Copying Transactions (Copy Rules): Explains what copy rules are and includes tutorials that explain how to implement the rules.
- Followers: These tutorials explain what followers are and how to use the feature.
- Linking Transactions: Explains how a transaction flow is created.
- Transaction Categories Interface and Tutorials: Explains the transaction categories’ interface and how to create categories.
- Transaction Type Statuses Interface and Tutorials: Explains the interface for transaction statuses and how to set them.
- Transaction Type Tutorials: These tutorials explain how to create Transaction Types.
- Transaction Types Edit View: Explains the interface from which Transaction Types are created.
- Transaction Types List View: Explains the interface that lists all the Transaction Types.
- Transaction Types Output Tab: Explains the Output (tab) of Transaction Types.