Transactions List View Tutorials
In QuickEasy BOS, transactions (e.g. Customer Invoices, Quotations, Supplier Invoices) have two interfaces. The first lists the transaction with details such as the Status, Date, Customer, or Supplier, and the transaction amounts. This is known as the List View. List View is further divided into two views: Items which lists every item on the transaction and Transactions which only lists the transaction totals. The second, known as Edit View, is where transactions are captured.
A transaction type must be added to a menu before transactions can be entered. Transaction types can be added to any menu. User access is set per transaction type.
How to Display a List of Transaction Entries
This view lists the transactions and includes information that is most relevant to that Transaction Type.
- Navigate to any Transaction.
- Note: If your interface shows Edit, you are in Edit View. Click the arrow next to the word Edit to return to List View.
- Click Menu (button) > Transactions.
- Apply any of the filters.
- Click View (button).
How to View a List of Transaction Items
This view provides more detailed information about the line items that are on the transactions.
- Navigate to any of the Transactions that you have created.
- Note: If your interface shows Edit, you are in Edit View. Click the arrow next to the word Edit to return to List View.
- Click Menu (button) > Items.
- Apply any of the filters.
- Click View (button).
How to Filter a View by Date
- When filtering by date, the arrows next to Set can be used to adjust the date forwards or backwards.
- The dates work with the radio buttons as follows:
- Date: Filters the list based on the transaction dates.
- Updated: Filters the list based on when the transaction was last updated.
- Required Date: Filters the list based on when the goods were required. This is a date that is filled in on the status bar. The caption on the status bar is user-defined and might not be required date.
- Due Date: Filters the list based on when the goods are due (i.e. production must be complete). This is a date that is filled in on the status bar. The caption on the status bar is user-defined and might not be due date.
- When viewing a List of Transactions or Transaction Items, click the arrow on View (button) and select one of these options:
- Today: Changes the date to today.
- This Month: Changes the date range to the current month.
- or select one of these options next to Set:
- No Date: Displays all the transactions.
- User Date: Allows you to type the From and To Dates.
- Today: Changes the date to today.
- This week: Changes the date range to the current week from Monday to Sunday.
- This month: Changes the date range to the current month.
- This year: Changes the date to the current calendar year.
How to Filter a View by Status
- The built-in filters allow you to filter per Status Group. To filter using customised statuses, use the Soft Filter Icon next to the Status column header and select the custom filters there.
- The Soft Filter Icon appears when you hover over the column’s caption.
- When viewing a list of Transactions or Transaction Items, click the arrow on View (button) and select one of these options:
- Pending
- Active
- Pending & Active
- or select one or more of the Status checkboxes in the header. If no boxes are checked, all the statuses are included.
- Pending
- Active
- Complete
- Cancelled
How to Filter a View by Customer or Supplier
- The filter in the header allows you to filter the transactions to a single customer in customer-related transactions or to a single supplier in supplier-related transactions.
- To view a report with several customers or suppliers, use the Soft Filter Icon next to the Company column header and select the customers or suppliers to include there.
- The Soft Filter Icon appears when you hover over the column’s caption.
- When viewing a list of Transactions or Transaction Items:
- Next to Customer or Supplier in the header, select the Customer or Supplier you want to view from the dropdown list.
- Click View (button).
How to Filter a View by User
In this context, the user is the person who created or edited the transaction.
- When viewing a list of Transactions or Transaction Items:
- Next to User in the header, select the User you want to view from the dropdown list.
- Click View (button).
How to Filter a View by Entity
- The built-in filters allow you to filter to a single registered Entity in cases where there are multiple registered entities.
- To view a report with several Entities, use the Soft Filter Icon next to the Entity column header and select the Entities to include there. This filter excludes other types of entities (e.g. locations or cost centres).
- The Soft Filter Icon appears when you hover over the column’s caption.
- When viewing a list of Transactions or Transaction Items:
- Next to Entity in the header, select the Entity you want to view.
- Click View (button).
How to Filter a View by Rep
- The built-in filters allow you to filter to a single Rep if reps are enabled for the transaction type.
- To display a report with several Reps, use the Soft Filter Icon next to the Rep column header and select the Rep to include there.
- The Soft Filter Icon appears when you hover over the column’s caption.
- When viewing a list of Transactions:
- Next to Rep in the header, select the Rep you want to view.
- Click View (button).
How to Export the List of Transactions or Items
- When viewing a list of Transactions or Transaction Items:
- Click Output (button) > Export (.xlsx).
- Navigate to the folder where you want to save the report.
- Click Save (button).
How to Copy Transactions
- Navigate to the applicable list of transactions.
- Right click the transaction you want to copy and select the applicable copy option from the context menu.
- Note: The list of copy options depends on the Copy Rules setup for the transaction.
- A popup lets you select the items, groups of items, and status options.
- Note: If there are no items, the transaction has already been copied, or there are no qualifying items based on the copy rule.
- Click Copy (button).
- If the Open New Transaction checkbox is checked (on the popup), you are transferred to the new transaction.
How to Copy Multiple Transactions
If you copy multiple transactions, you cannot select individual items. Transactions are copied as per the copy rules.
- Navigate to the applicable list of transactions.
- Select the transactions you want to copy. (Use Ctrl Left click to multi-select).
- Click Actions (button) > Copy to …
- Note: The list of copy options depends on the Copy Rules setup for the transaction type.
- Click Yes (button) on the confirmation that you want to copy x number of transactions.
- A confirmation message displays the number of transactions successfully copied.
- You are returned to the list of transactions.
How to Update Multiple Transactions
The Batch Update options depend on whether you are viewing a list of items, or a list of transactions. They also depend on features setup for the transaction type.
- Navigate to the applicable list of transactions.
- Select the transactions you want to copy. (Use Ctrl Left click to multi-select).
- Click Actions (button) > Batch Update.
- Select a batch-update option on the left and provide the required information:
- Options for List View > Transactions:
- Category: Select a category from the dropdown list.
- Due Date: Select a due date on the adjacent calendar. (This is user-defined field and may differ.)
- Entity: Select a registered entity from the dropdown list.
- Required Date: Select a required date on the adjacent calendar. (This is a user-defined field and may differ.)
- Status: Select a new status from the adjacent dropdown list.
- Options for List View > Items:
- Adj %: Type a number in the adjacent block by which the prices must be adjusted. Adjustments can be positive (additional markup) or negative (discount).
- Cr Account: Select a ledger account that must be credited from the dropdown list.
- Dr Account: Select a ledger account that must be debited from the dropdown list.
- Fix: Checkbox: Check or uncheck the checkbox.
- If checked both the fixed and unit prices can be edited, and they override the mark-up percentage (MU%) which is calculated based on the entered prices.
- If unchecked, the MU% is applied to the cost price to determine both the fixed and unit prices. The MU% overrides any entered prices and the prices are adjusted to reflect the MU%.
- Changes made to the transaction automatically adjust this checkbox: If a price is entered the checkbox is checked. If a MU% is entered, the checkbox is unchecked.
- Group: Type a name for the group. Group names are transaction specific. Groups allow items to be sorted.
- Location: Select a location for the inventory item from the dropdown list.
- MU%: Type a number in the adjacent block to change the markup percentage. This process automatically unchecks the Fix checkbox.
- Resolve: Select a resolve option from the dropdown list of resolves selected for the transaction type.
- Service Number: Select a service ticket number from the dropdown list.
- Status: Select a new status from the dropdown list.
- Transaction Calendar: Select a new resource from the dropdown list. (Transaction Calendar is a custom description. The name of the calendar selected for the transaction is displayed.)
- Calendar Start: Sets the date and time to the ones selected. (Calendar Start is a custom description.)
- Calendar End: Sets the date and time to the ones selected. (Calendar End is a custom description.)
- VAT: Changes the VAT Type to the one selected and whether prices are entered inclusive or exclusive.
- VAT Category: Changes the VAT Category to the one selected.
- Click Update (button).
- Confirm the change.
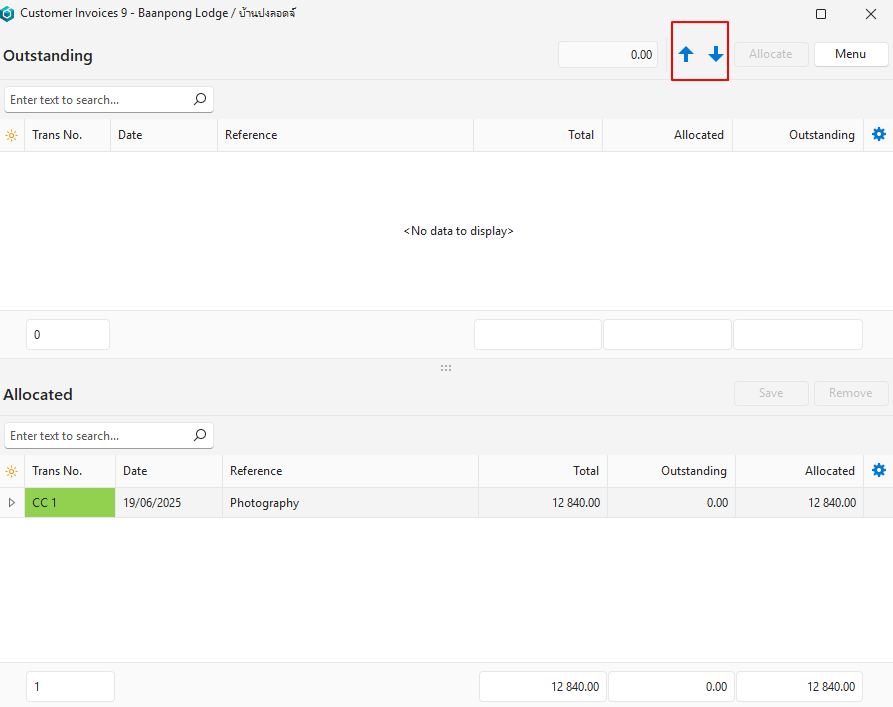
How to View Transaction Allocations
- Navigate to the applicable list of transactions.
- Right click a transaction and select View/Edit Allocation from the context menu.
- Use the scroll arrows on the allocation popup to scroll through all the transactions on the list.
- Allocations can be edited only if the transaction is in an editable status.
- If a transaction is not in an editable status, most buttons are greyed out to indicate the allocation cannot be edited (see screenshot below).