Transaction Type Statuses Interface and Tutorials
- All the Master Data and Transaction modules have Status fields which can be used to manage the data.
- Transactions can have both Header and Item statuses.
- Item statuses are enabled by checking the checkbox for the setting: General > Enable Item Status.
- Users may create as many statuses as they need. However, there is a finite list of Status Groups to which each status must be allocated.
- Status settings define conditions within the workflow.
- Statuses for the main status groups are automatically created when a new transaction type is created. The default New is automatically assigned to the Pending status, and the default Complete is automatically assigned to the Complete status. However, these statuses and settings can be changed.
Navigation: Main Menu > Setup > Transaction Types > Double-click to open a Transaction Type > Statuses (tab)
Statuses (tab)
If item statuses are disabled, the Status Item section is not displayed.
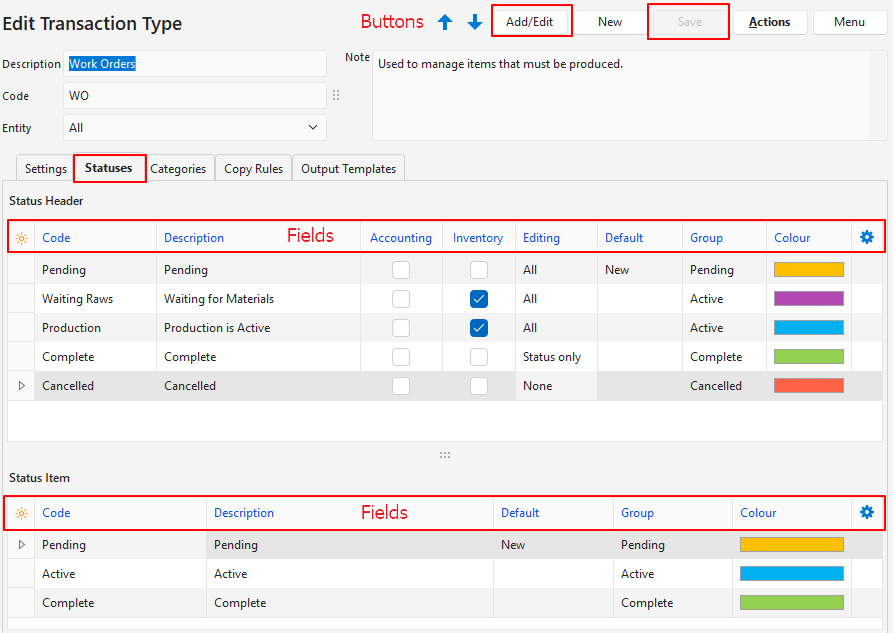
Buttons Explained
The other buttons affect the transaction type, not statuses.
| Button | Description |
|---|---|
| Add/Edit | Allows the statuses to be added and edited. |
| Save | Saves any changes. |
Header Section
| Field | Description |
|---|---|
| Field Chooser (*) | Allows users to add or remove columns. |
| ID | A system-generated number for the status. |
| Order ID | A system-generated number for the order of the transaction’s statuses. |
| Code | The short description of the status which is displayed in the transaction view (e.g. Pending). |
| Description | The long description of the status (e.g. Pending – waiting for approval). |
| Accounting | A checkbox. If checked the transaction is posted to the ledger once it reaches that status. The transaction is removed from the ledger if its status is changed to a non-accounting status. |
| Inventory | A checkbox. If checked, inventory is updated when the transaction reaches that status. If the status is changed, the inventory transaction is changed or cancelled accordingly. |
| Editing | A dropdown list of editing options: – None: No changes may be made (e.g. Complete). Users with admin rights can still change the status to any other status. – All: The transaction may be edited (e.g. Pending). – Status Only: Only the status may be changed (e.g. Active). |
| Default | Option to select New or Output from the dropdown list if applicable. –New: Every transaction must have a default New status for its header (usually Pending). This status is assigned to all new transactions and must allow editing. – Output: This is an optional default. If this default is selected, and output is generated, the transaction is changed into this status if the status is higher than the status that the transaction is in. Output includes previewing the transaction on screen. This setting works in conjunction with the Output Template settings. Output must be allowed for the status before the one for which the default is selected. For example, if Output is allowed for Active and Complete, this default should be set for Complete. –Complete: This status is automatically set when Done (button) is clicked. If an option is not selected, the Done button is supressed. When a new transaction type is created, certain statuses are automatically |
| Group | Every status must be allocated to a status group. The group options are: – Pending: Used for transactions which are new or incomplete. – Active: Used for transactions that are in progress or require approval. – Complete: Used for transactions that should no longer be changed. – Cancelled: Used to create an audit trail for transactions that cannot or should not be deleted. |
| Colour | Users can choose a colour for each status by clicking the colour block and selecting a different colour. It is recommended that status colour choices are consistently applied (e.g. all Pending statuses across the system are yellow). |
| Widget | A submenu, which can also be accessed by right clicking the entry, with the following functions: – Delete: Deletes the status if it has not yet been used. – Move Up: Moves the status one line higher. Statuses should be in the order that they are used so functions such as next or previous status work correctly. – Move Down: Moves the status one line lower. |
Item Section
| Field | Description |
|---|---|
| Field Chooser (*) | Allows users to add or remove columns. |
| ID | A system-generated number for the status. |
| Order ID | A system-generated number for the order of the item’s statuses. |
| Code | The short description of the status. |
| Description | The long description of the status. |
| Default | Every transaction must have a default New status for its items (e.g. Pending). The New status is assigned when a new record is created. |
| Group | Every status must be allocated to a group. The group options are: – Pending: Used for items that are newly added or incomplete. – Active: Used for items that are in progress or ordered. – Complete: Used for items that should no longer be changed. – Cancelled: Used to create an audit trail for items that cannot or should not be deleted. |
| Colour | Users may choose a colour for each status by clicking the colour block and selecting a different colour. Best practise is to apply status colour choices consistently (e.g. all Pending statuses are yellow). |
| Widget | Delete: Deletes the status if it has not yet been used. Move Up: Moves the status one line higher. Statuses should be in the order that they are used so functions such as next or previous status work correctly. Move Down: Moves the status one line lower. |
Status Tutorials for Transactions
How to Create Statuses for Transactions
- From editing a Transaction Type click Statuses (tab).
- Click Edit (button).
- In the Status Header section, click the top row and fill in the details as follows:
- Code = Type a brief description for the status (e.g. Pending).
- Description = Type an explanation of when the status is used (e.g. Pending Approval).
- Accounting = Check the checkbox if the transaction should be posted to the ledger when that status is selected (e.g. Active, Complete). Else leave it unchecked (e.g. Pending, Cancelled).
- Inventory = Check the checkbox if the inventory movement should be recorded (e.g. if stock should be issued or received).
- Editing = Select an editing option for the transaction from the dropdown list. The options are:
- None: No editing is allowed (e.g. transactions that are Complete or Cancelled).
- All: The transaction can be edited (e.g. Pending transactions).
- Status only: Only the status can be changed (e.g. transactions that must be approved or reconciled).
- Default:
- Select New from the dropdown list if the status applies to newly created entries. This default is normally selected for the Pending status.
- Select Output from the dropdown list if the transaction must be changed to this status after it is output (printed, previewed, or emailed). Normally selected for a status in the Complete group.
- Select Complete from the dropdown list for the final status. If this default is selected, users can click Done (button) which changes the transaction’s status and saves any changes.
- Group = Select a group from the dropdown list of groups. The options are:
- Pending: Use for transactions that are incomplete and can be changed.
- Active: Use for transactions that are active but may be waiting for an extra step (e.g. to be reconciled).
- Complete: Use for transactions that are complete and should no longer be edited.
- Cancelled: Use to cancel transactions instead of deleting them.
- Colour: Click inside the colour block and select a different colour from the available colours.
- In the Status Item section, click the top row and fill in the details as follows:
- Code = Type a brief description for the code (e.g. Pending, Active).
- Description = Type an explanation of when the status is used (e.g. New Transactions).
- Default = Select New from the dropdown list next to the status that new transactions should default to. This default is normally selected for the Pending status.
- Group = Select a group from the dropdown list of groups. The options are:
- Pending: Use for entries that are incomplete and can be changed.
- Active: Use for entries that are active but could change.
- Complete: Use for entries that are complete and should no longer be edited.
- Cancelled: Use to cancel entries instead of deleting them.
- Colour = Click inside the colour block and select a different colour from the available colours.
How to Edit Statuses
- From editing a Transaction Type click Statuses (tab).
- Click Add/Edit (button).
- Edit any of the fields.
- Click Save (button).
How to Delete Statuses
Once a Status is used, it cannot be deleted.
- From editing a Transaction Type click Statuses (tab).
- Click Edit (button).
- Right click the status to remove and select Delete from the context menu.
- Confirm the deletion on the popup.
How to Change the Order of Statuses
- The order of the statuses should match the order in which they are used (e.g. Pending > Active > Complete).
- This order helps to automatically set the next status in the hierarchy when certain processes are complete.
- From editing a Transaction Type click Statuses (tab).
- Right click the status to move and select Move Up or Move Down from the context menu.
- Note: The shortcuts for Move Up Ctrl U and Move Down Ctrl D can only be used if Add/Edit (button) is not greyed out (i.e. not in edit mode).