Setup Example – Work Orders
- Work Orders
- are used to manage production,
- include all the parts and services of products that must be manufactured or produced,
- may be integrated with Production Planning.
Header
- Description: Work Orders
- Code: WO
- Entities: All
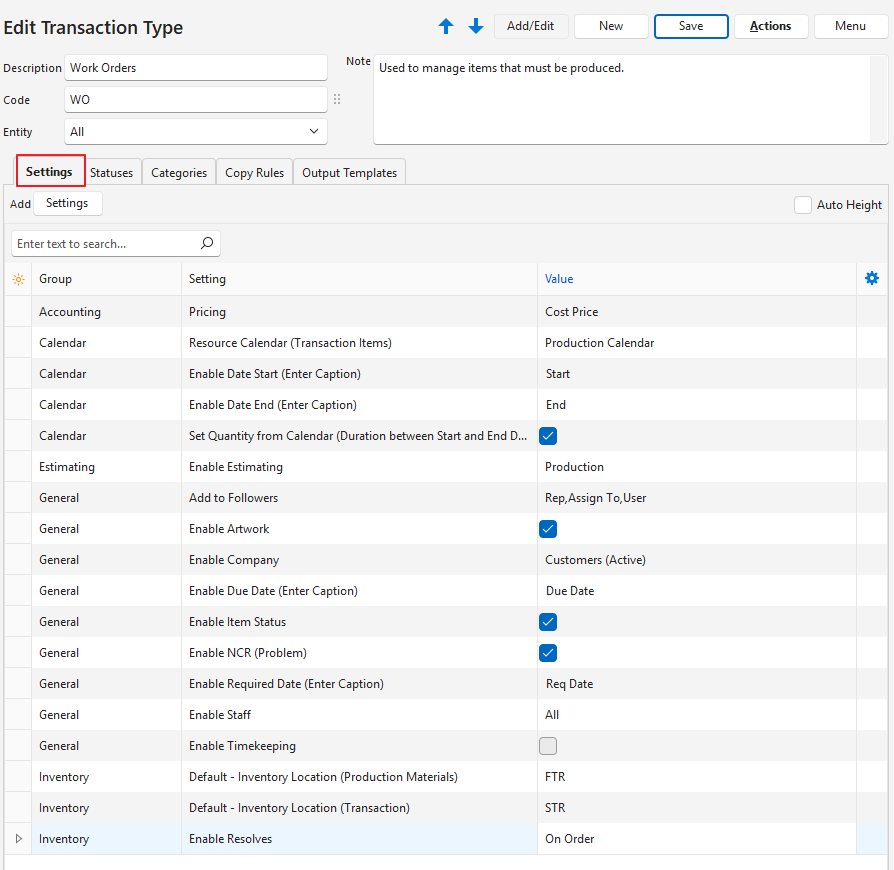
Settings (tab)
- This section lists the compulsory and optional settings that can be used to customise work orders.
- Settings with Default as part of the name, can be changed when capturing a transaction.
| Field | Description | Value | When Required |
|---|---|---|---|
| Accounting > Pricing | A dropdown list to select a pricing option: – None – Cost Price – Sell Price – Supplier Price – Accounting | Cost Price | Always |
| Defaults > Default – Data Filter | The default display when a list of transactions for the transaction type is viewed. The options are: – Today – This Month – Pending – Active – Pending & Active | Select an option from the dropdown list. | The default filter is: Pending & Active. Add the setting if you want a different default filter. |
| Estimating > Enable Estimating | A dropdown list with the following options: – None: Estimating is not used. – Quotations: Estimating is used to quote for jobs. – Production: Enables the production planning modules for the transaction type. | Production | Always |
| General > Add Items from the following Categories | This action adds items from the selected categories. Click Edit in the value column and select the categories. | Click Edit. Move the categories from the Available to the Selected section to include them. Move the categories from the Selected to the Available section to exclude them. | Add the setting if you want to limit the items that can be added to a work order. |
| General > Add to Followers | A dropdown list of Follower options. Multiple categories can be selected: – N/A (automatically appears if no selection is made) – Contact (Transactions) – Contact (Accounts) – Rep – Assign To – User | Check the checkboxes that apply. | Add the setting if you want multiple people to receive a copy of the invoice when it is emailed out. |
| General > Contact Lookup | A dropdown list to select which Contact fields should be included when selecting a contact for a transaction. The options are: – Name – Name (Position) – Name (Location) – Name (Position & Location) | Select the applicable option from the dropdown list. | Add the setting if you want to select the contact by position or location. |
| General > Enable Artwork | Checkbox. If checked artwork is enabled and can be uploaded to a line item on a transaction as an attachment. | Check the checkbox. | Add the setting if you want to show the artwork on the work order. |
| General > Enable Company | Users can select an access option as follows: – N/A – Customers (All) – Customers (Active) – Suppliers (All) – Suppliers (Active) | Customers (Active) | Always |
| General > Enable Due Date (Enter Caption) | Type a caption if the Due Date field should be added to the transaction (e.g. Due Date). | Type a caption (e.g. Prod. Complete). | Always |
| General > Enable NCR (Problem) | Checkbox. If checked, transactions can be marked as problem transactions for NCR purposes. | Check the checkbox. | If you use the NCR processes. |
| General > Enable Required Date (Enter Caption) | Type a caption if the Required Date field should be added to the transaction (e.g. Req. Date). | Type a caption (e.g. Req Date). | Always |
| General > Enable Staff | Allows an organisation to assign transactions: – None: Transactions are not assigned. – All: Transactions can be assigned to Users, and a Rep can be selected. – Rep: Transactions can only be linked to a Rep. – Assign To: Transactions can only be assigned to a User. | Select an option from the dropdown list. | If you want to allocate the work order to staff. |
| General > Enable Timekeeping | Enables the Timekeeping module. | Check the checkbox. | If you want to track the time it takes to complete a task. |
| General > Reference Lookup | A field to type Reference lookup lists. | Click the Value column and enter the lookup fields, one entry per line. Check the Auto Height checkbox to display the lookup list in full. | If you want staff to select a reference from a lookup list instead of typing one. |
| Inventory > Default Inventory Location (Production Materials) | Allows users to select a default inventory location for production materials. (Inventory locations are created under Entities.) | Select a location from the dropdown list. | If you want to specify a default location. |
| Inventory > Default Inventory Location (Transaction) | Allows users to select a default inventory location for the transaction type. (Inventory locations are created under Entities.) | Select a location from the dropdown list. | If you want to specify a default location. |
| Inventory > Enable Resolves | Allows users to specify what must happen to inventory items. The options are: – Purchase: The inventory must be purchased. This resolve is used for copying transactions and does not affect inventory. – Produce: The inventory must be produced. This resolve is used for copying transactions and does not affect inventory. (e.g. Work Orders). – Reserve: The inventory is reserved for an order (e.g. Sales Orders). – Issue: The inventory is issued to a job or customer (e.g. Work Orders, Sales Orders, Customer Invoices). – On Order: The inventory has been ordered, but not yet received (e.g. Purchase Orders, Work Orders). – Receive: The inventory has been received (e.g. Supplier Invoices, Work Orders). – Adjust: The inventory is adjusted to reflect the correct stock on hand (e.g. Stock Take Adjustments). | On Order | Always |
| Mobile > Enable in Mobile App | Checkbox. If checked, the transaction can be accessed from the mobile app. | Check the checkbox. | If you want to manage production from the mobile app. |
| Transaction Items > Enable Adding Items | Allows users to specify which type of items can be added to a transaction. The options are: – None: No items are added, only the header information is displayed. This option should be used sparingly and not for accounting transactions because there will be no fields for amounts. – All: Users may add items and custom items. – Custom: Users my only add custom items. Typically used for ledger transactions. – Items: Users may only add items. They may not add custom items. Typically used for Invoicing, credit and debit notes. All the buttons to add items are still displayed. The features that are disabled return an error message if clicked. | Select Custom or Items. | If you want to limit the items that can be added to a work order. |
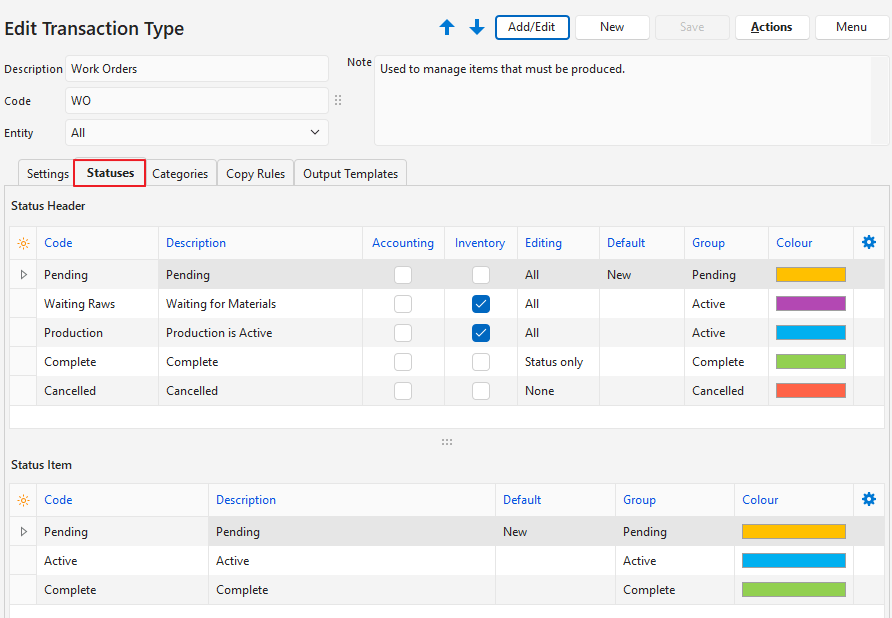
Statuses (tab)
- You may create an unlimited number of Statuses.
- However, there are only four Status Groups (Pending, Active, Complete, and Cancelled).
- The first status should allow editing.
- The final status should ideally not allow editing.
- If the setting Accounting > Enable Accounting is checked, at least one status should have the Accounting column checked.
- If Inventory is used, at least one status should have the Inventory column checked.
- If editing is allowed when the inventory or accounting columns are checked, any accounting or inventory reports should be considered provisional.
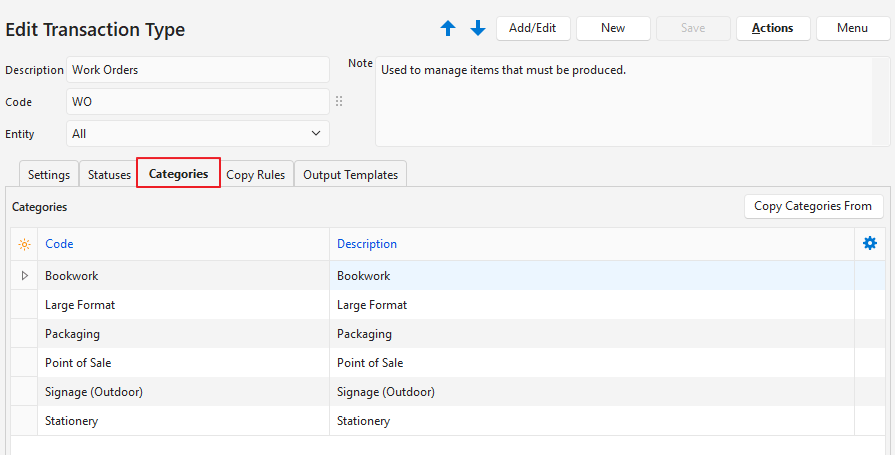
Categories (tab)
- Categories are used to sort records.
- The categories you choose should be meaningful to your business.
- Using categories is optional but recommended.
- Categories can be copied from another transaction type. The existing categories are replaced by the copied categories.
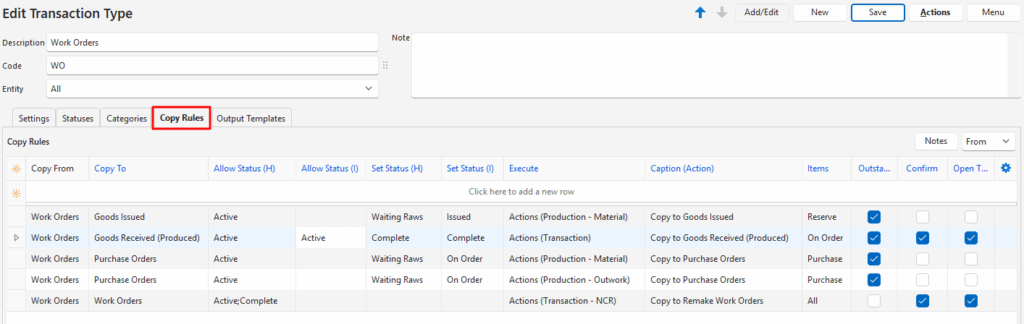
Copy Rules (tab)
- Copy Rules determine the circumstances under which transactions may be copied.
- Although there are two transactions involved in the copy, you only need to create one copy rule.
- User access must be set for each copy rule.
- You can automate copying transactions by selecting a Trigger status.
- Columns that were hidden in the screenshot were left blank or unchecked.
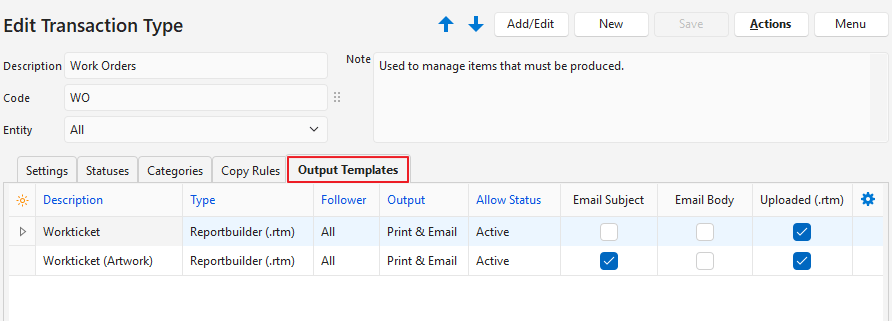
Output Templates (tab)
- Output templates are the forms you need to print, preview or email a transaction (e.g. invoices).
- Default templates are included which will automatically include your company name, logo, and bank details as filled in on the Output tab of a registered Entity.
- You may edit these templates to include or exclude information.
- You may also create your own forms and templates from scratch.