Setup Example – Transfer Received
- Transfer Received transactions are only needed if your inventory is stored in multiple locations and you keep counts for each location.
- For example, a Transfer Issued (transaction) is created at head office to transfer stock to a branch. The branch counts the stock and approves or edits the Transfer Received (transaction) which is copied from the Transfer Issued (transaction).
- Items cannot be added to a Transfer Received (transaction) because it should be copied fro a Transfer Issued (transaction).
Header
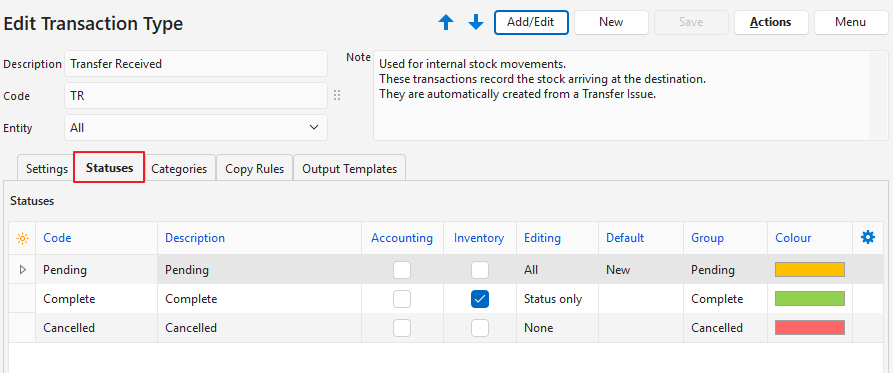
- Description: Transfer Received
- Code: TR
- Entities: All
Settings (tab)
- This section lists the compulsory and optional settings that can be used to customise Transfer Received transactions.
- Settings with Default as part of the name, can be changed when capturing a transaction.
- Items cannot be added because the Transfer Receive is designed to be copied from a Transfer Issue, therefore, the item settings are redundant.
| Setting | Description | Value | When Required |
|---|---|---|---|
| Accounting > Pricing | A dropdown list to select a pricing option: – None – Cost Price – Sell Price – Supplier Price – Accounting | Cost Price | Always |
| Defaults > Default – Data Filter | The default display when a list of transactions for the transaction type is viewed. The options are: – Today – This Month – Pending – Active – Pending & Active | Select an option from the dropdown list. | The default filter is: Pending & Active. Add the setting if you want a different default filter. |
| General > Enable Staff | Allows an organisation to assign transactions: – None: Transactions are not assigned. – All: Transactions can be assigned to Users, and a Rep can be selected. – Rep: Transactions can only be linked to a Rep. – Assign To: Transactions can only be assigned to a User. | Select the applicable option from the dropdown list. | If you want to allocate the transaction to a staff member. |
| Inventory > Enable Transfer Receive | Checkbox. If checked, enables the From / To fields in the transaction header (read-only) and assigns the location selected under “To” to items. | Checked | Always |
| Inventory > Enable Resolves | Allows users to specify what must happen to inventory items. The options are: – Purchase: The inventory must be purchased. This resolve is used for copying transactions and does not affect inventory. – Produce: The inventory must be produced. This resolve is used for copying transactions and does not affect inventory. (e.g. Work Orders). – Reserve: The inventory is reserved for an order (e.g. Sales Orders). – Issue: The inventory is issued to a job or customer (e.g. Work Orders, Sales Orders, Customer Invoices). – On Order: The inventory has been ordered, but not yet received (e.g. Purchase Orders, Work Orders). – Receive: The inventory has been received (e.g. Supplier Invoices, Work Orders). – Adjust: The inventory is adjusted to reflect the correct stock on hand (e.g. Stock Take Adjustments). | Receive | Always |
| Mobile > Enable in Mobile App | Checkbox. If checked, the transaction can be accessed from the mobile app. | Check the checkbox. | If you want to manage the transactions from the mobile app. |
Statuses (tab)
- You may create an unlimited number of Statuses.
- However, there are only four Status Groups (Pending, Active, Complete, and Cancelled).
- The first status should allow editing.
- The final status should ideally not allow editing.
- If the setting Accounting > Enable Accounting is checked, at least one status should have the Accounting column checked.
- If Inventory is used, at least one status should have the Inventory column checked.
- If editing is allowed when the inventory or accounting columns are checked, any accounting or inventory reports should be considered provisional.
Categories (tab)
- Categories are used to sort records.
- The categories you choose should be meaningful to your business.
- Using categories is optional but recommended.
- Categories can be copied from another transaction type. The existing categories are replaced by the copied categories.
No Categories
Copy Rules (tab)
- Copy Rules determine the circumstances under which transactions may be copied.
- Although there are two transactions involved in the copy, you only need to create one copy rule.
- User access must be set for each copy rule.
- You can automate copying transactions by selecting a Trigger status.
- Columns that were hidden in the screenshot were left blank or unchecked.
See Transfer Issued.
Output Templates (tab)
- Output templates are the forms you need to print, preview or email a transaction (e.g. invoices).
- Default templates are included which will automatically include your company name, logo, and bank details as filled in on the Output tab of a registered Entity.
- You may edit these templates to include or exclude information.
- You may also create your own forms and templates from scratch.
Learn More
- Setup Example – Goods Issued: Screenshots and explanations on how to create a transaction type for Goods Issued transactions.
- Setup Example – Goods Received: Screenshots and explanations on how to create a transaction type for Goods Received transactions.
- Setup Example – Goods Returned: Screenshots and explanations on how to create a transaction type for Goods Returned transactions.
- Setup Example – Stock Adjustments: Screenshots and explanations on how to create a transaction type for Stock Adjustments.
- Setup Example – Transfer Issued: Screenshots and explanations on how to create a transaction type for Transfer Issued transactions.
- Transaction Examples – Inventory: Brief explanation and screenshots of stock-movement transactions.
- Transaction Type Examples – Inventory: Examples of inventory-movement transactions and stock adjustments.