Setup Example – Customer Invoices
- Customer Invoices are used to invoice customers for goods or services.
- The invoice line items can be created as items with selling prices.
- Invoices can also have custom entries in which case the person creating the invoice must enter the information and prices when they capture the invoice.
- You can specify a fixed ledger account (e.g. sales or service rendered) or allow bookkeepers to select the ledger account when entering the transaction by selecting Default – Credit Type and selecting Ledger in the Value column.
Header
- Description: Customer Invoices
- Code: CI
- Entities: All
Settings (tab)
- This section lists the compulsory and optional settings that can be used to customise customer invoices.
- Settings with Default as part of the name, can be changed when capturing a transaction.
| Setting | Description | Value | When Required |
|---|---|---|---|
| Accounting > Currencies | Field to select which currencies apply to the transaction type. The options are: – Local: The transaction type can only use the local currency. – Company Currency: The transaction type can use the customer or supplier’s currencies. – All: The transaction type can use all the currencies set up for the organisation. | Company Currency | If you use multiple currencies. |
| Accounting > Default – Credit Account | A dropdown list of all the created Accounts for users to select a default account. | Revenue – Sales (or similar) | If you want to specify the sales account to credit. |
| Accounting > Credit Type | A dropdown list of Account Types for users to select one. The options are: – Customer – Supplier – Ledger | Ledger | Always |
| Accounting > Default – Debit Account | A dropdown list of all the created Accounts for users to select a default account. | Assets – Receivables Debits the Customer Control account in the ledger | Always |
| Accounting > Debit Type | A dropdown list of Account Types for users to select one. The options are: – Customer – Supplier – Ledger | Customer | Always |
| Accounting > Default – Deposit % | Field to type the default Percentage Deposit customers must pay or that must be paid to suppliers. | Type the number that represents the percentage deposit customers pay on average (e.g. 50 for 50%). | If customers pay deposits. |
| Accounting > Default – Price includes VAT | A checkbox that is checked if the price includes VAT. Determines how VAT is calculated. – Exclusive (unchecked) = VAT is added to determine the VAT-inclusive price. – Inclusive (checked) = VAT is subtracted to determine the VAT-exclusive price. | Check the checkbox. | If you use VAT inclusive prices. |
| Accounting > Default – VAT Category (Input/Output) | Select a VAT Category from these options: – N/A – Output + (e.g. Customer Invoices) – Output – (e.g. Customer Credit Notes) – Input + (e.g. Supplier Invoices) – Input – (e.g. Supplier Debit Notes) | Output + | Always if you are registered for VAT. |
| Accounting > Default – VAT Type | Select a default VAT Type for the transaction type from a dropdown list of all the created VAT types. | Select the Standard VAT Type. | Always if you are registered for VAT. |
| Accounting > Enable Accounting | A checkbox. If checked, accounting is enabled. If unchecked, transactions are created in the module and not posted to the Ledger. | Check the checkbox. | Always |
| Accounting > Set Due Date from Credit Terms | Checkbox. If checked the credit terms are used to prefill due dates. | Check the checkbox. | If you use due dates to indicate payment dates. |
| Calendar > Enable Date End (Enter Caption) | Allows users to specify a caption for the transaction’s start date on the calendar. | Type a caption (e.g. Cal End Date). | If you are integrating customer invoices with calendars (e.g. to show delivery schedules or payment due dates.) |
| Calendar > Enable Date Start (Enter Caption) | Allows users to specify a caption for the transaction’s end date on the calendar. | Type a caption (e.g. Cal Start Date). | If you are integrating customer invoices with calendars (e.g. to show delivery schedules or payment due dates.) |
| Calendar > Resource Calendar (Transaction Items) | Provides a dropdown list of calendar types to select the one applicable to the transaction. | First create a calendar for customer invoices. Select that calendar from the dropdown list. | If you are integrating customer invoices with calendars (e.g. to show delivery schedules or payment due dates.) |
| Calendar > Set Quantity from Calendar (Duration between Start and End Dates | Checkbox. If checked the durations on transactions are automatically changed to the working hours between the end and start calendar dates. The quantity is rounded to the calendar’s smallest scale. Days are calculated on a Check-in/Check-out model – so 12/10/25 – 13/10/25 = 1 day Transaction update method: Update Start Date: Qty is updated. Update End Date: Qty is updated. Update Qty: End Date is updated. | Check the checkbox. | If you are using calendars and the start and end dates are not on the same day. |
| Defaults > Default – Data Filter | The default display when a list of transactions for the transaction type is viewed. The options are: – Today – This Month – Pending – Active – Pending & Active | Select an option from the dropdown list. | The default filter is: Pending & Active. Add the setting if you want a different default filter. |
| General > Add Items from the following Categories | This action adds items from the selected categories. Click Edit in the value column and select the categories. | Click Edit. Move the categories from the Available to the Selected section to include them. Move the categories from the Selected to the Available section to exclude them. | If you want to limit the items that can be added to a customer invoice. |
| General > Add to Followers | A dropdown list of Follower options. Multiple options can be selected: – N/A (automatically appears if no selection is made) – Contact (Transactions) – Contact (Accounts) – Rep – Assign To – User | Check the checkboxes for all the groups you want to send the invoice to. | If you want multiple people to receive a copy of the invoice when it is emailed out. |
| General > Contact Lookup | A dropdown list to select which Contact fields should be included when selecting a contact for a transaction. The options are: – Name – Name (Position) – Name (Location) – Name (Position & Location) | Select the applicable option from the dropdown list. | If you want to select the contact by position or location. |
| General > Enable Artwork | Checkbox. If checked artwork is enabled and can be uploaded to a line item on a transaction as an attachment. | Check the checkbox. | If you want to show the artwork on the invoice. |
| General > Enable Assets | Checkbox. If checked a dropdown list of Assets becomes available for users to select one. | Check the checkbox. | If assets are used to generate income (e.g. you service or repair assets for customers). |
| General > Enable Company | Users can select an access option as follows: – N/A – Customers (All) – Customers (Active) – Suppliers (All) – Suppliers (Active) | Select Customers (Active) to prevent invoices from being generated for suspended customers. Select Customers (All) if you generate invoices for customers regardless of their status (e.g. to charge them interest). | Always |
| General > Enable Delivery Address | A checkbox. If checked, the Delivery Address is enabled. | Check the checkbox. | If you want to show the delivery address on the invoice. |
| General > Enable Due Date (Enter Caption) | Type a caption if the Due Date field should be added to the transaction (e.g. Due Date). | Type a caption based on how you are going to use the due date (e.g. Payment Due). | If you want to indicate a Due Date. |
| General > Enable Required Date (Enter Caption) | Type a caption if the Required Date field should be added to the transaction (e.g. Req. Date). | Type a caption based on how you are going to use the required date (e.g. Delivery By). | If you need an additional date field. |
| General > Enable Staff | Allows an organisation to assign transactions: – None: Transactions are not assigned. – All: Transactions can be assigned to Users, and a Rep can be selected. – Rep: Transactions can only be linked to a Rep. – Assign To: Transactions can only be assigned to a User. | Select the applicable option from the dropdown list. | If you want to allocate the invoice to a rep or staff member. |
| General > Enable Timekeeping | Enables the Timekeeping module. | Check the checkbox. | If there are any tasks related to the invoice that must be tracked. |
| General > Reference Lookup | A field to type Reference lookup lists. | Click the Value column and enter the lookup fields, one entry per line. Check the Auto Height checkbox to display the lookup list in full. | If you want staff to select a reference from a lookup list instead of typing one. |
| General > Transaction Number | Specifies how transaction numbers are allocated when the transaction type is first created. The options are: – Edit: Allows users to edit/enter numbers only (e.g. for supplier invoices). A warning is displayed on the red warning bar if a duplicate transaction number is entered. – Generate: The system automatically generates numbers in sequence. – Generate (Entity): The system automatically generates numbers in sequence for each entity. This setting cannot be changed if there are transactions. | Select an option from the dropdown list (e.g. Generate (Entity). | If you have multiple entities that each have their own VAT numbers. |
| Inventory > Enable Resolves | Allows users to specify what must happen to inventory items. The options are: – Purchase: The inventory must be purchased. This resolve is used for copying transactions and does not affect inventory. – Produce: The inventory must be produced. This resolve is used for copying transactions and does not affect inventory. (e.g. Work Orders). – Reserve: The inventory is reserved for an order (e.g. Sales Orders). – Issue: The inventory is issued to a job or customer (e.g. Work Orders, Sales Orders, Customer Invoices). – On Order: The inventory has been ordered, but not yet received (e.g. Purchase Orders, Work Orders). – Receive: The inventory has been received (e.g. Supplier Invoices, Work Orders). – Adjust: The inventory is adjusted to reflect the correct stock on hand (e.g. Stock Take Adjustments). | Issue | If you use inventory management. |
| Transaction Items > Enable Adding Items | Allows users to specify which type of items can be added to a transaction. The options are: – None: No items are added, only the header information is displayed. This option should be used sparingly and not for accounting transactions because there will be no fields for amounts. – All: Users may add items and custom items. – Custom: Users my only add custom items. Typically used for ledger transactions. – Items: Users may only add items. They may not add custom items. Typically used for Invoicing, credit and debit notes. All the buttons to add items are still displayed. The features that are disabled return an error message if clicked. | Select an option from the dropdown list (e.g. Items to prevent custom entries.) | If you want to limit the items that can be added to an invoice. |
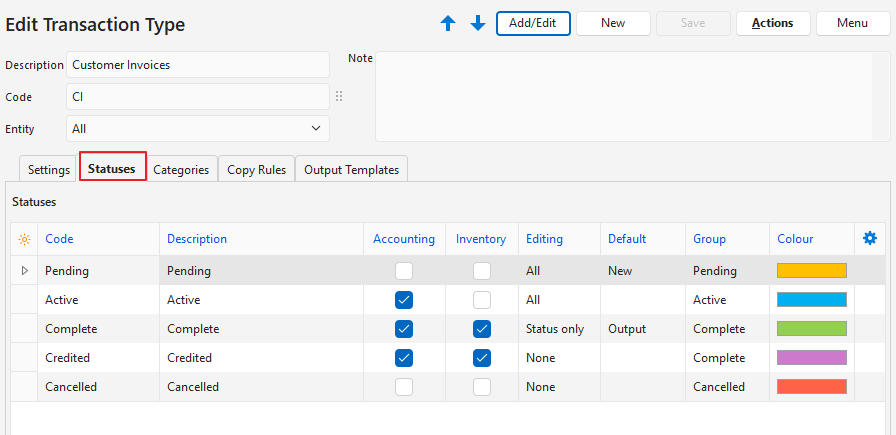
Statuses (tab)
- You may create an unlimited number of Statuses.
- However, there are only four Status Groups (Pending, Active, Complete, and Cancelled).
- The first status should allow editing.
- The final status should ideally not allow editing.
- If the setting Accounting > Enable Accounting is checked, at least one status should have the Accounting column checked.
- If Inventory is used, at least one status should have the Inventory column checked.
- If editing is allowed when the inventory or accounting columns are checked, any accounting or inventory reports should be considered provisional.
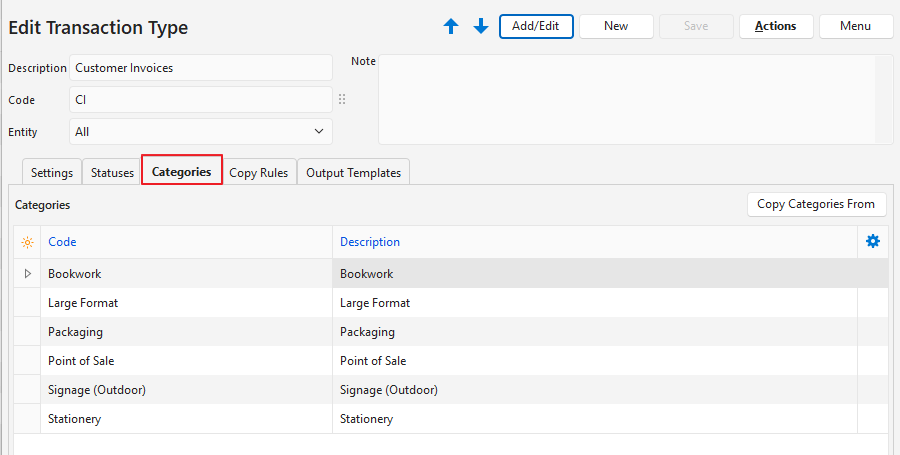
Categories (tab)
- Categories are used to sort records.
- The categories you choose should be meaningful to your business.
- Using categories is optional but recommended.
- Categories can be copied from another transaction type. The existing categories are replaced by the copied categories.
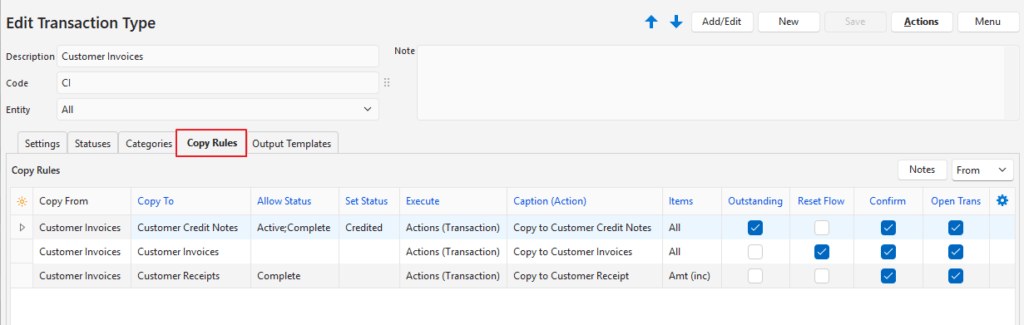
Copy Rules (tab)
- Copy Rules determine the circumstances under which transactions may be copied.
- Although there are two transactions involved in the copy, you only need to create one copy rule.
- User access must be set for each copy rule.
- You can automate copying transactions by selecting a Trigger status.
- Columns that were hidden in the screenshot were left blank or unchecked.
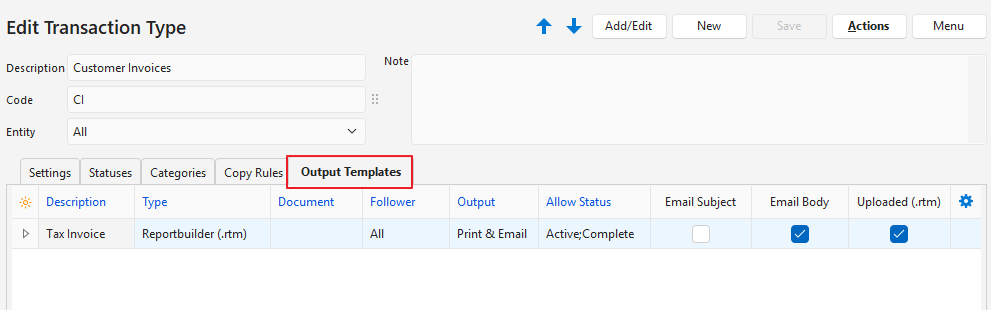
Output Templates (tab)
- Output templates are the forms you need to print, preview or email a transaction (e.g. invoices).
- Default templates are included which will automatically include your company name, logo, and bank details as filled in on the Output tab of a registered Entity.
- You may edit these templates to include or exclude information.
- You may also create your own forms and templates from scratch.