Project Templates Tutorials
A service manager is a tool used to manage and streamline an organisation’s service management processes. It helps organisations automate and track service requests, incidents, queries, changes, and problems. It includes features for ticketing, management, and reporting. It aims to improve efficiency, reduce downtime, and ensure a higher level of service quality by enabling organisations to manage, prioritise, and resolve issues effectively.
The Service Manager in BOS can also be used to track and follow up on leads and to manage Projects.
Navigation: Main Menu > Setup > Service Types
How to Create or Edit a Project Template
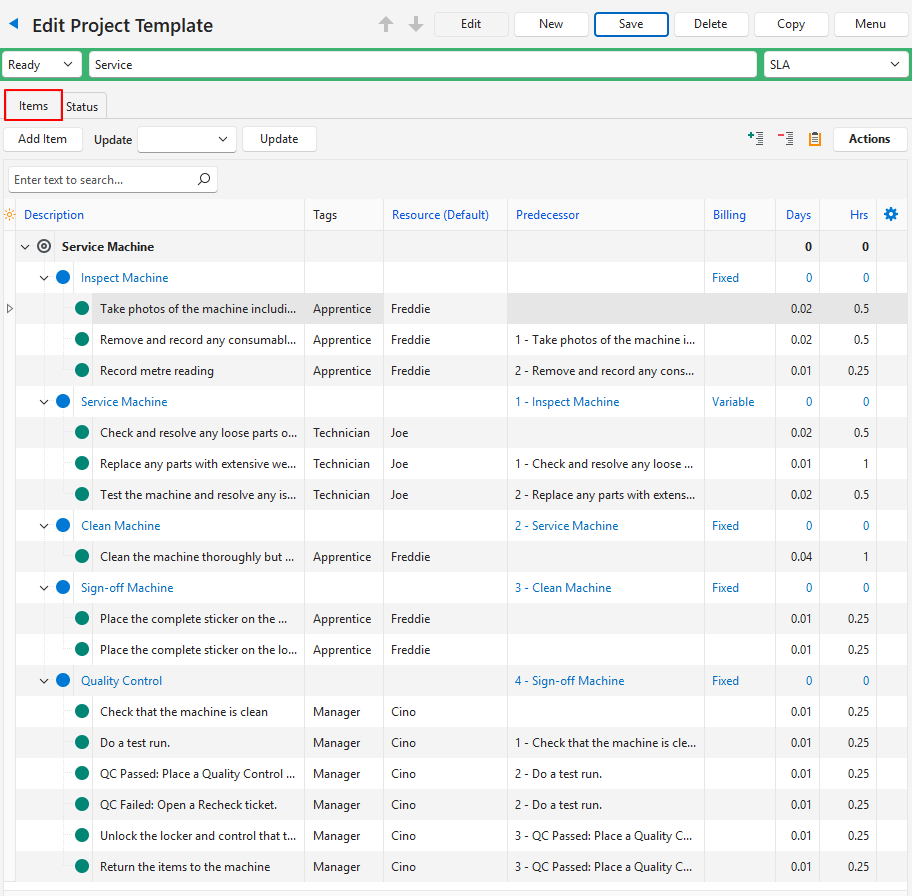
- Project Templates work across three levels:
- Name the project (Add Item.)
- Create sub-sections for the project and set the billing options. (Add Sub-Item.)
- Create the individual tasks and select the resource and duration for each task. (Add an entry above, below or duplicate the entry.)
- Navigate to Service Types.
- Right click a Service Type and select Edit Project Templates from the context menu.
- Click New (button).
- Click Edit (button) on the top row if it is not greyed out.
- Fill in the Status Bar section as follows:
- First field = Select a status from the dropdown list. The options are Draft, Review, or Ready.
- Second field = Type a Description for the template.
- Third field = Select a Service Type from the dropdown list.
- Note: If you right clicked a Service Type, it is automatically selected.
- Fill in Items (tab) as follows (it should be open by default, else click Items (tab)):
- Click Add Item (button).
- On the newly created row, type a description for the project in the Description column.
- Right click the description you just typed and select Add Sub-Item from the context menu.
- Description = Type a description for the sub-item.
- Billing = Select a billing option from the dropdown list.
- Right click the description of the sub-item you just added and select Add Sub-Item from the context menu.
- Description = Type a description for the sub-item.
- Resource (Default) = Select a resource from the dropdown list of resources. A different resource may be selected when the ticket is created.
- Predecessor = Select a task that must be completed before the current task can start. If there are valid predecessors, one can be selected from the dropdown list in the Predecessor column.
- Days = Type the number of days the task should take.
- Hrs = Type the number of hours the task should take.
- Right click the description of the sub-item you just added and select one of these options:
- Insert Item Above
- Insert Item Below
- Duplicate
- Edit the newly added item as explained in Step 6d.
- If you selected Insert Item Below or Duplicate, you can select a Predecessor from the dropdown list in the Predecessor column. You should select a predecessor if you want the stages to be performed consecutively and not concurrently.
- Repeat Step 6f to add all the tasks as sub-items.
- Repeat Step 6 for each independent stage of the project.
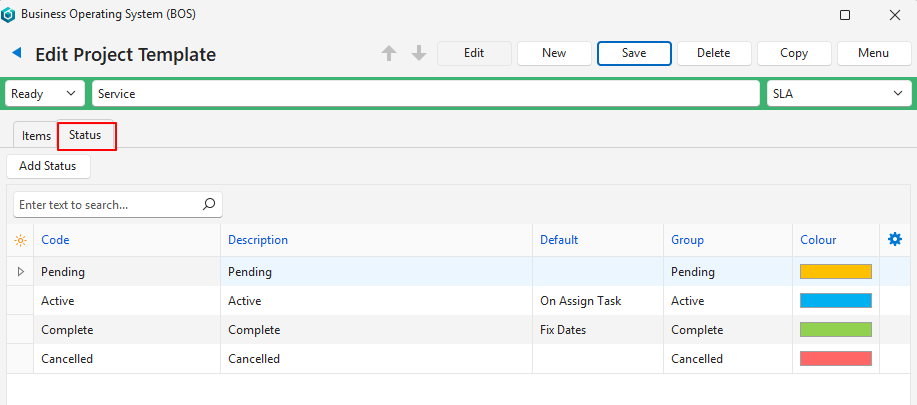
- Click Status (tab).
- Click Add Status (button) to add a status (optional).
- Fill in the line that opens at the bottom of the existing statuses as follows:
- Code = Type a short description for the status.
- Description = Type a longer description or explanation for the status.
- Default = Select whether the status if the default for Fix Dates or On Assign Task. Leave the column blank if the status is not a default.
- Select a Group for the status from the fixed status groups: Pending, Active, Complete, or Cancelled.
- Select a colour for the status by clicking the colour block to display an arrow and clicking the arrow to open a colour-selection interface.
- Edit the existing status descriptions and options in the Default column where applicable.
- Click Save (button) if not greyed out (if greyed out, the changes were already saved).
How to Copy a Project Template
- Edit a Project Template.
- Click Copy (button).
- Confirm that you want to copy the template.
- Click Edit (button) and edit the copied template as explained above.
- Click Save (button).
How to Edit a Project Template
- From a list of Project Templates, double click the template you want to edit.
- Click Edit (button) on the top row.
- Edit the fields as needed on the Items and Status tabs.
- Note: The usual options are available for the Status tab (e.g. Move Up, Move Down, Delete).
- Click Save (button) on the top row.
How to Edit Multiple Fields
- Edit a Project Template.
- Click Edit (button) on the top row of buttons.
- Select the entries you want to edit (Use Ctrl Left click to multi-select).
- Select one of these options next to Update:
- Tags:
- Select a Tag from the adjacent dropdown list.
- Click Add (button) to add the tag to the selected entries.
- Click Remove (button) to remove the tag from the selected entries.
- Confirm the action.
- Resource:
- Select a Resource from the adjacent dropdown list.
- Click Update (button).
- Confirm the update.
- Days:
- Type the number of days in the adjacent field.
- Click Update (button).
- Confirm the update.
- Hrs:
- Type the number of hours in the adjacent field.
- Click Update (button).
- Confirm the update.
- Tags:
How to Delete a Project Template
- Edit a Project Template.
- Click Delete (button).
- Confirm the deletion.
How to Delete Project Items
- Edit a Project Template.
- Click Items (tab).
- Click the + to expand the tree view.
- Start at the lowest entry on the branch you want to delete. Right click the entry and select Delete from the context menu.
- Confirm the deletion.
- Repeat Steps 4 and 5 while moving up the tree view (from the bottom up) until all the entries you wanted to delete are deleted.
How to Add Predecessors
Predecessors ensure that the right sequence is followed.
- Edit a Project Template.
- Click Items (tab).
- Click the + to expand the tree view.
- Select the entries you want to amend (Use Ctrl Left click to multi-select).
- Click Actions (button) > Add Predecessors.
- Confirm that you want to update the items.
- Predecessors are added according to the grouping and selected items as follows:
- If there are two or more entries on the same level, the second entry receives the first entry as a predecessor and so forth.
- If there is only one entry on a level, or if the entry is the first entry on its level, no predecessor is added.
- A section (level 2 entry) receives the previous section as a predecessor.
How to Remove Predecessors
- Edit a Project Template.
- Click Items (tab).
- Click the + to expand the tree view.
- Select the entries you want to amend (Use Ctrl Left click to multi-select).
- Click Actions (button) > Remove Predecessors.
- Confirm that you want to update the items.
How to Add or Remove Tags to Individual Items
- Edit a Project Template.
- Click Items (tab).
- Click the + to expand the tree view.
- Click Edit (button) on the top row.
- Right click the applicable entry and select Add/Remove Tags from the context menu.
- Move the tags from the Selected to the Available section to add them.
- Move the tags from the Available to the Selected section to remove them.
- Click Save (button).
- Note: See Editing > How to Edit Multiple Fields for instructions on adding or removing tags to multiple fields.