Production Planning Setup
- Production planning is activated per Transaction Type on the Settings tab.
- Organisations with multiple departments or processes, can create multiple Work Order Transaction Types and activate production planning for each one.
- Each Work Order Transaction Type has its own production planning board.
- A single Work Order can contain multiple items that must be produced. The production planning module separates the jobs and tasks for each item that is part of an estimate.
- The expected transaction flow is Quotation > Sales Order > Work Order. However, work orders may be created directly.
- Behind the scenes, planning fields are integrated into the materials and routing sections (tasks and outwork) of estimates.
- As part of the Work Order Menu options, production views are used to manage outwork, materials, services, and timekeeping.
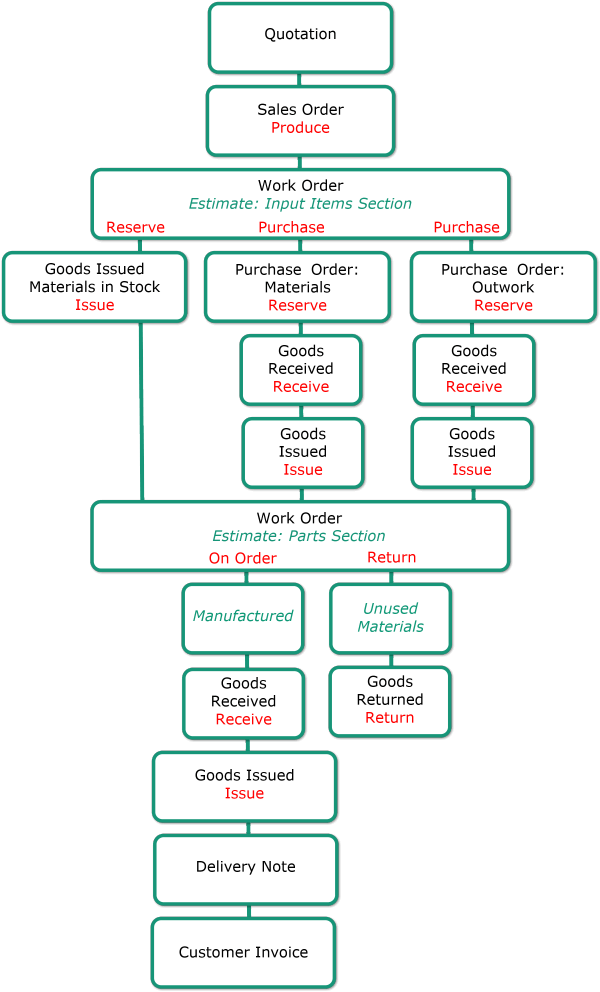
Organogram
- This organogram illustrates the transactions applicable to Production.
- Transaction Types must be created for every stage (black text).
- Transactions can be copied from one stage to the next. Copying transactions are managed by creating Copy Rules.
- The Resolve options (red text) are used to manage inventory items and ensure items are correctly copied from one transaction to the next.
- Organisations may streamline the process and remove the inventory movement transactions if they are not required.
Key:
- Black: Transaction
- Red: Resolve options
- Blue/Green: Explanation
Setting Up Transaction Types for Production
Step 1 Create Transaction Types
Navigation: Main Menu > Setup > Transaction Types > New (button)
- The following Transaction Types are needed:
- Work Orders
- Purchase Orders
- Goods Received
- Goods Issued
- The following settings must be added to these transaction types on the Settings tab:
| Setting | Value | Applicable to which Transaction Type | Explanation |
|---|---|---|---|
| Estimating > Enable Estimating | Production | Work Orders | Selecting Production enables the planning board. If you create more than one Work Order Transaction Type, you can activate production planning for each one. |
| Production > Transaction – Goods Issues | Checked | Goods Issued | The production module is used to create transactions for inventory transfers. This transaction type is used when goods are issued to production or customers. This default applies to all goods-issued transactions created from production planning. |
| Production > Transaction – Purchase Orders | Checked | Purchase Orders | The production module is used to create purchase orders for goods or services that are provided by third parties. This transaction type is used for purchase orders. This default applies to all purchase-order transactions created from production planning. If you prefer, you can create a separate purchase-order Transaction Type for production planning purposes. |
| Inventory > Enable Resolves | Purchase On Order | Work Orders | Items on Work Orders with the resolve Purchase are copied to Purchase Orders. Finished goods on Work Orders with the resolve On Order are copied to Goods Received. Production planning includes other resolves that are specific to the module and not affected by your selection here. |
| Inventory > Enable Resolves | Issue | Goods Issued | To ensure the correct items are copied. |
| Inventory > Enable Resolves | Reserve | Purchase Orders | To ensure the correct items are copied. |
Step 2 Create Copy Rules
To create the abovementioned transactions, the Work Orders is copied. Therefore, copy rules for work orders must be created on the Copy Rules tab for:
- Work Orders to Purchase Orders (Materials): Used when items are materials and their Resolve is Purchase.
- Work Orders to Purchase Orders (Outwork): Used when items are outwork and their Resolve is Purchase.
- Work Orders to Goods Received (Produced): Used to receive finished items (production complete, the items have been made) and their Resolve is On Order.
- Work Orders to Goods Returned: To return unused raw materials to stock.
Step 3 Create Statuses for Production
These menu options only appear once Production is chosen from the dropdown list for the setting: Estimating > Enable Estimating and Save (button) is clicked.
Add the default statuses, and edit them (optional) for each of these:
- Main Menu > Setup > Transaction Types > Double-click the Work Order Transaction Type > Menu (button) > Edit Statuses (Production Materials).
- Main Menu > Setup > Transaction Types > Double-click the Work Order Transaction Type > Menu (button) > Edit Statuses (Production Tasks).
- Main Menu > Setup > Transaction Types > Double-click the Work Order Transaction Type > Menu (button) > Edit Statuses (Production Outwork).
Setup Tutorials
- Create or edit each Transaction Types as per the tabs below:
- How to create a Transaction Type for Work Orders is explained in detail (below). If you already have a Work Order Transaction Type you may edit it to match these instructions or create another Work Order Transaction Type.
- The other transaction types can be created according to the Transaction Type Examples. When you create the transaction types, you can add the settings that affect Production as explained below.
- Create or edit the Copy Rules.
- Create Production Statuses (see Step 3 above).
- Set User Access for the Transaction Types and Copy Rules.
How to Prepare the Sales Order Transaction Type for Production
- Navigate to Transaction Types (Main Menu > Setup > Transaction Types).
- Double-click the transaction type you use for Sales Orders.
- Click Settings (tab) (it should be open).
- Type inv in the search block.
- Click the Value column next to the setting: Inventory > Enable Resolves and check these resolves: Purchase, Produce, Reserve.
- Note: If the setting is not there, click Settings (button) next to Add, find the setting on the popup, click Add/Update (button), close the popup.
- Click Copy Rules (tab).
- Check that there is a rule to copy a Sales Order to a Work Order (else create one as per the Copying Transactions tutorials below).
- Check the settings in the following columns:
- Execute = Actions (Transaction).
- Resolve = Produce.
How to Create a Work Order Transaction Type
- These steps are explained in the same order as the Transaction-Type tabs.
- You do not have to complete the setup in one go. You can save your progress at any point and return to the setups later.
- All the settings can be edited and changed until the first transaction is created. Thereafter, only certain settings can be edited.
- The captions (e.g. due date, required date) are suggestions, you may abbreviate or change them to suit your needs. However, we recommend you use due dates as your internal date on which production must be finished and required dates as the date on which your customer wants the goods.
- Navigate to Transaction Types (Main Menu > Setup > Transaction Types).
- Click New (button).
- Fill in the header details as follows:
- Description = Work Orders.
- Code = WO.
- Entity = All (or select a specific entity).
- Click Settings (tab) (it should be open).
- Click Settings next to Add.
- Click all the settings on the popup that is listed in the Settings Table below. (Use Ctrl Left click to multi-select.)
- Click Add/Update (button).
- Close the popup.
- On Settings (tab): Enter the details in the Value column as per the Settings Table below.
- Note: You may add any of the other settings as well.
- Click Status (tab) and edit any of the statuses (optional).
- Click Categories (tab) and create any categories (optional).
- Click Copy Rules (tab) and create the rules as explained on the Copy Rules tab.
- Click Output Templates (tab):
- Click the top row and enter the details as follows:
- Description = Work Ticket.
- Follower = Internal.
- Output = Print & Email.
- Right-click the entry and select Load Reportbuilder (.rtm) file from the context menu.
- Navigate to your templates folder and click Workticket.rtm.
- Click Open (button).
- Click the top row and enter the details as follows:
- Click Save (button).
Settings Table
| Group | Setting | Value |
|---|---|---|
| Accounting | Pricing | Cost Price |
| Estimating | Enable Estimating | Production |
| General | Enable Company | Customers (Active) |
| General | Enable Due Date (Enter Caption) | Internal Due Date |
| General | Enable Required Date (Enter Caption) | Customer Req. Date |
| General | Enable Staff | All |
| General | Enable Timekeeping | Checked |
| Inventory | Enable Resolves | Check Purchase, On Order |
| Inventory | Default Inventory Location (Production Materials) | Select a default location from the dropdown list. (Optional) |
| Transaction Items | Enable Date End (Enter Caption) | Date End |
| Transaction Items | Enable Date Start (Enter Caption) | Date Start |
How to Prepare the Purchase Order Transaction Type for Production
- Navigate to Transaction Types (Main Menu > Setup > Transaction Types).
- Double click the transaction type you use for Purchase Orders.
- Click Edit (button) on the top row.
- Click Settings (tab) (it should be open).
- Click Settings (button) next to Add.
- Type inv in the search block.
- Click the setting Inventory > Enable Resolves and click Add/Update (button).
- Type prod in the search block.
- Click the setting Production > Transaction – Purchase Orders click Add/Update (button).
- Close the popup.
- Note: if the settings are not there, they have already been added. Continue with Step 6.
- Navigate to the added settings:
- Click the Value column next to the setting: Inventory > Enable Resolves and check these resolves: Purchase, On Order, Reserve.
- Check the checkbox in the Value column next to the setting: Production > Transaction – Purchase Orders.
- Check that there is a Copy Rule to copy a Purchase Order to a Supplier Invoice (else create one as per the Copying Transactions tutorials).
How to Prepare the Goods Issued Transaction Type for Production
- Navigate to Transaction Types (Main Menu > Setup > Transaction Types).
- Double-click the transaction type you use for Goods Issued.
- Click Edit (button) on the top row.
- Click Settings (tab) (it should be open).
- Click Settings (button) next to Add.
- Type prod in the search block.
- Click the setting Production > Transaction – Goods Issues click Add/Update (button).
- Close the popup.
- Note: if the setting is not there, it has already been added. Continue with Step 6.
- Navigate to the added settings:
- Check the checkbox in the Value column next to the setting: Production > Transaction – Goods Issues.
- Click Save (button).
Creating Copy Rules Tutorials
- Copy Rules must be created for each of these transactions.
- The Allow and Set Statuses are suggestions; you may change them.
How to Create a Copy Rule for Goods Received
- Navigate to Transaction Types (Main Menu > Setup > Transaction Types).
- Double click the Work Order Transaction Type you created for production.
- Click Edit (button) if not greyed out.
- Click Copy Rules (tab).
- Click the Copy To field on the top row and select Goods Received (Produced) from the dropdown list.
- Fill in the remaining fields as follows:
- Allow Status (H) = Active.
- Allow Status (I) = Active.
- Set Status (H) = Complete.
- Set Status (I) = Complete.
- Execute = Actions (Transaction).
- Caption (Action) = Copy to Goods Received (Produced).
- Items = On Order.
- Outstanding = Checked.
- Confirm = Checked (optional).
- Open Trans = Checked (optional).
- Note: Fields that are not on this list should be left empty.
- Click Save (button).
How to Create a Copy Rule for Purchase Orders (Outwork)
- Navigate to Transaction Types (Main Menu > Setup > Transaction Types).
- Double click the Work Order Transaction Type you created for production.
- Click Edit (button) if not greyed out.
- Click Copy Rules (tab).
- Click the Copy To field on the top row and select Purchase Orders from the dropdown list.
- Fill in the remaining fields as follows:
- Allow Status (H) = Active.
- Allow Status (I) = Pending, Active.
- Set Status (H) = Waiting Raws.
- Set Status (I) = On Order.
- Execute = Actions (Production – Outwork).
- Caption (Action) = Copy to Purchase Order (Outwork).
- Items = Purchase.
- Outstanding = Checked.
- Confirm = Unchecked.
- Open Trans = Unchecked.
- Note: Fields that are not on this list should be left empty.
- Click Save (button).
How to Create a Copy Rule for Purchase Orders (Materials)
- Navigate to Transaction Types (Main Menu > Setup > Transaction Types).
- Double click the Work Order Transaction Type you created for production.
- Click Edit (button) if not greyed out.
- Click Copy Rules (tab).
- Click the Copy To field on the top row and select Purchase Orders from the dropdown list.
- Fill in the remaining fields as follows:
- Allow Status (H) = Active.
- Allow Status (I) = Pending, Active.
- Set Status (H) = Waiting Raws.
- Set Status (I) = On Order.
- Execute = Actions (Production – Material).
- Caption (Action) = Copy to Purchase Order (Materials).
- Items = Purchase.
- Outstanding = Checked.
- Confirm = Unchecked.
- Open Trans = Unchecked.
- Note: Fields that are not on this list should be left empty.
- Click Save (button).
How to Create a Copy Rule for Goods Issued
- Navigate to Transaction Types (Main Menu > Setup > Transaction Types).
- Double click the Work Order Transaction Type you created for production.
- Click Edit (button) if not greyed out.
- Click Copy Rules (tab).
- Click the Copy To field on the top row and select Goods Issued from the dropdown list.
- Fill in the remaining fields as follows:
- Allow Status (H) = Active.
- Allow Status (I) = Pending, Active.
- Set Status (H) = Waiting Raws.
- Set Status (I) = Issued.
- Execute = Actions (Production – Material).
- Caption (Action) = Copy to Goods Issued.
- Items = Reserve.
- Outstanding = Checked.
- Confirm = Unchecked.
- Open Trans = Unchecked.
- Note: Fields that are not on this list should be left empty.
- Click Save (button).
How to Create a Copy Rule for Goods Returned
- Navigate to Transaction Types (Main Menu > Setup > Transaction Types).
- Double-click the Work Order Transaction Type you created for production.
- Click Edit (button) if not greyed out.
- Click Copy Rules (tab).
- Click the Copy To field on the top row and select Goods Returned from the dropdown list.
- Fill in the remaining fields as follows:
- Allow Status (H) = Active.
- Allow Status (I) = Active.
- Set Status (H) = Active.
- Set Status (I) = Active.
- Execute = Actions (Transaction).
- Caption (Action) = Copy to Goods Returned.
- Items = Returned.
- Outstanding = Checked.
- Confirm = Checked.
- Open Trans = Checked.
- Note: Fields that are not on this list should be left empty.
- Click Save (button).
How to Create Production Statuses
- These menu options only appear if you have selected Production as the Estimating option on the Settings tab.
- Settings (tab) > Estimating > Enable Estimating > Production
- Navigate to Transaction Types (Main Menu > Setup > Transaction Types).
- Double-click the Work Order Transaction Type that you created for production.
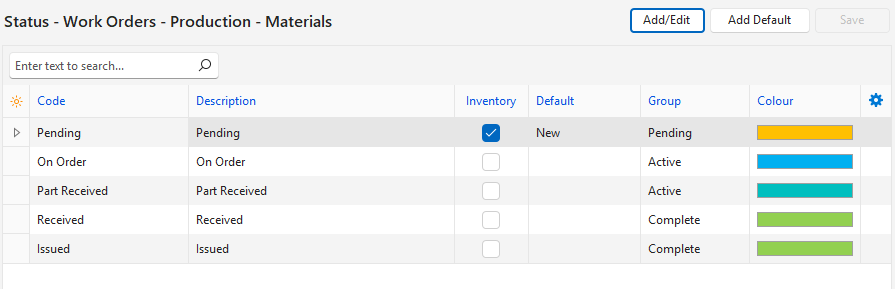
- Click Menu (button) > Edit Statuses (Production Materials).
- Click Add Default (button).
- Edit any of the fields (optional).
- Click Save (button) if you edited any of the fields, else close the popup (the default statuses will be saved).
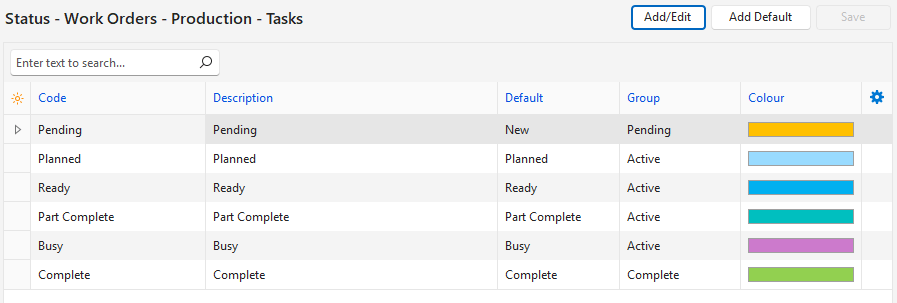
- Click Menu (button) > Edit Statuses (Production Tasks).
- Click Add Default (button).
- Edit any of the fields (optional).
- Click Save (button) if you edited any of the fields, else close the popup (the default statuses will be saved).
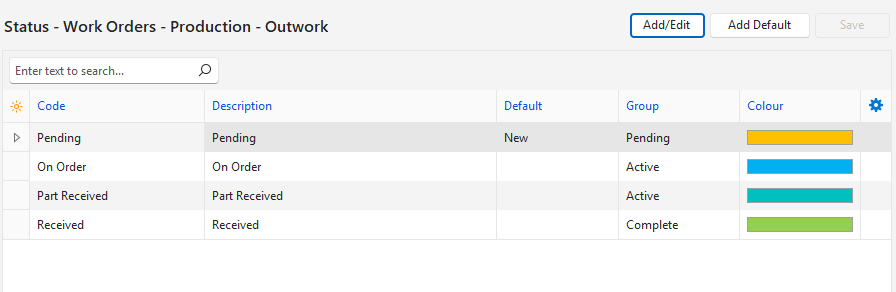
- Click Menu (button) > Edit Statuses (Production Outwork).
- Click Add Default (button).
- Edit any of the fields (optional).
- Click Save (button) if you edited any of the fields, else close the popup (the default statuses will be saved).
How to Set User Access for Transaction Types
- User Access must be set for each Transaction Type.
- Admin rights are required to set User Access.
- You can set access for all the Transaction Types from the Users’ interface.
- Navigate to Transaction Types (Main Menu > Setup > Transaction Types).
- For each Transaction Type, right click the transaction type and select User Access from the context menu.
- Click Actions (button) > Add Remove Users.
- Move the users from the Available to the Selected section using the navigational arrows.
- Set the access settings as needed. See Users for ways to speed up this process (e.g. by using Batch Updates).
How to Set User Access for Copy Rules
- User Access must be set for each Copy Rule.
- Admin rights are required to set User Access.
- You can set access for all the Copy Rules simultaneously from the Users’ interface.
- Navigate to Transaction Types (Main Menu > Setup > Transaction Types).
- For each Transaction Type:
- Double click the transaction type to open it.
- Click Copy Rules (tab).
- For each rule, right click the rule and select Edit Users Access from the context menu.
- Move the users you want to grant access to from the Available to the Selected section using the navigational arrows.
- Note: You can remove access by moving the users from the Selected to the Available section.
- Click Save (button).