Mobile App Timekeeping Interface
The Mobile App is a browser-based app that integrates to the desktop version of QuickEasy BOS.
It has three main functions:
- Allowing business owners and managers to view their key metrics from anywhere in the world.
- Allowing users to record their timekeeping, travel times, and distances from their mobile phones.
- Allowing reps to manage their customer records from anywhere.
To create dashboards (i.e. to create metrics for the mobile app), users must have admin rights to access the Users‘ setup page. However, dashboards can be copied to or created for other users.
To fully utilise the Customer Relationship Manager (CRM), users must have access rights to view and edit Contacts and Customer accounts.
Navigation: https://app.quickeasy.software/
Buttons Explained
The buttons change as a timekeeping record is created, active, edited, or stopped. The buttons are consistent across all the various timekeeping options (e.g. transactions, production, unlinked).

| Button | Description |
|---|---|
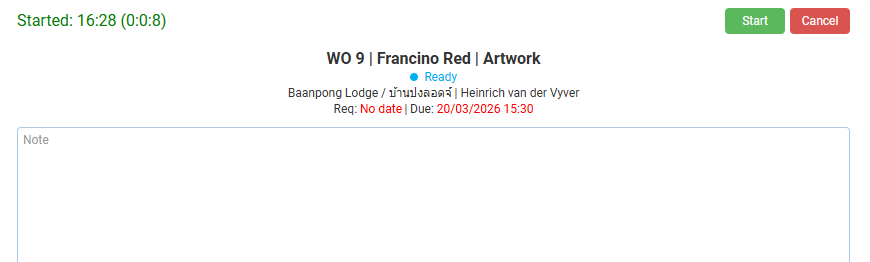
| Start (button) | Timekeeping is started when the form is opened. Once the Start (button) is clicked the form and the mobile app can be closed. |
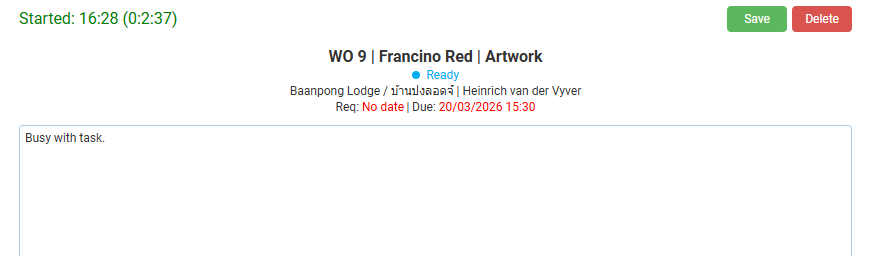
| Edit (button) | Displayed when a Timekeeping record is active. Allows the record to be edited without stopping timekeeping. |
| Delete (button) | Displayed when a Timekeeping record is edited. Deletes the timekeeping record if confirmed. Deleted timekeeping records cannot be recovered. |
| Cancel (button) | Start Timekeeping: The timekeeping record is cancelled, and no time is recorded. Stop Timekeeping: Places the timekeeping record back in active mode and does not stop the timekeeping. |
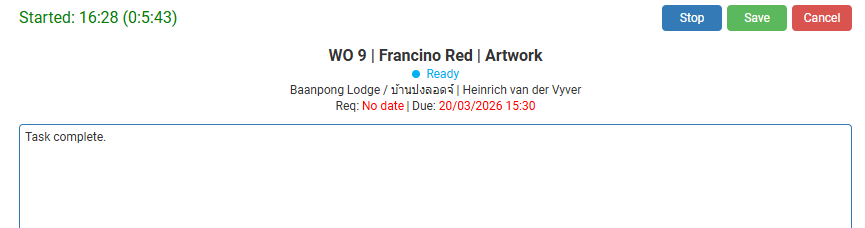
| Save (button) | Edit Timekeeping: Saves the changes. Stop Timekeeping: Saves any changes made to the timekeeping record without stopping it. |
| Stop (button) | Active when Stop Timekeeping was selected. Switches the timekeeping to Edit mode. Requires Stop (button) to be pressed again to stop. Stops the timekeeping only when the stop button is pressed for the second time. |
Context Menu
For transactions or tasks, a context menu is displayed when an entry is tapped or left clicked.
| Option | Description |
|---|---|
| Start Travel | Starts a travel timekeeping record for the task or transaction. |
| Start Work | Starts a general timekeeping record for the task or transaction. |
| View Detail | Displays additional information such as any notes attached to the task or transaction. |
| Complete | Sets the status of the task or transaction to complete which removes it from the mobile app’s interface. |
| Navigate | Opens a map app for users to navigate to the client. This feature requires the user to have a map installed on their device. It opens that map and auto completes the user’s current location as the start and the client’s GPS coordinates as the end location. |
| Add Image | Allows an image to be uploaded and attached to the transaction or task. |
| Add Note | Allows a note to be added to the transaction or task. |
Unlinked
| Section | Description |
|---|---|
| Unlinked | Users can start an Unlinked Timekeeping record by clicking either the Work or Travel buttons on the Timekeeping interface. Unlinked timekeeping is used when employees must record their time, but they are not busy with a specific task or transaction that was assigned to them. There are no special requirements for unlinked records, and it is up to users to provide all the information. |
Project Tasks
| Section | Description |
|---|---|
| Requirements | Users can only see the tasks if they are the Resource for that task. Staff must first be added on the Service Type’s Project Resources tab. Thereafter staff can be selected in the Resource column for a specific task on the service ticket’s Project tab. Tasks must be Active before they can be selected for timekeeping. |
| Grouping | Tasks are grouped according to their start dates into these categories: Earlier, Today, Tomorrow, and Later. Tasks without start dates are placed in the Earlier group. |
| Information | For each task the following information is displayed on the left: – Icon colour-coded to the ticket’s status. – The ticket number. – The name of the customer. – The main category of the ticket. – The subcategory of the ticket. – The task. For each task the following information is displayed on the right: – Expected Start Date. – Expected Duration. |
Transactions
| Section | Description |
|---|---|
| Requirements | The following two Transaction Type settings allow transactions to be displayed on the mobile app: – General > Enable Staff: Must be set to All or Assign To. – General > Timekeeping: The checkbox is checked (it is enabled). Users can only see transactions that are assigned to them. The transactions must be Active. |
| Grouping | Transactions are grouped according to their due dates into these categories: Earlier, Today, Tomorrow, and Later. Transactions without due dates are placed in the Earlier group. |
| Information | For each transaction the following information is displayed: – Colour-coded icon indicating the status of the transaction. – The transaction’s code and number (e.g. SO 11). – The name of the customer. – The transaction’s reference field. – The due date and time filled in on the transaction. |
Production Tasks
| Section | Description |
|---|---|
| Requirements | Production is enabled under the Transaction Type’s setting: Estimating > Enable Estimating. The user must be the operator who is selected under the applicable transaction (e.g. Work Order) > Production > Tasks > Operator (column). Users appear on the Operator dropdown list if they are added as staff on the Cost Centre’s Staff tab. The Transaction must be Active. The Task must be Active. |
| Grouping | Tasks are grouped according to their start dates into these categories: Earlier, Today, Tomorrow, and Later. Tasks without start dates are placed in the Earlier group. |
| Information | For each task, the following information is displayed: – Icon colour-coded to the transaction’s status. – The transaction’s code and number. – The name of the customer. – A description of the task. (Typically, this is the description of an item that was added to the Routing section of an Estimate.) – The name of the cost centre. – The expected Start Date. – The expected Duration. |
Timekeeping Record Fields Explained
| Field | Description |
|---|---|
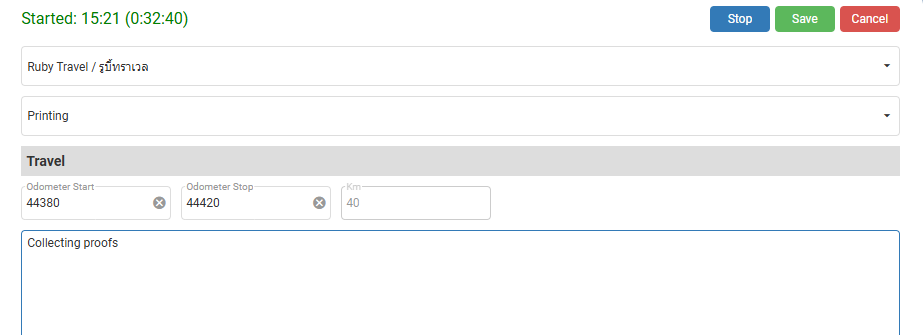
| Customer Name | The name of the customer. For tasks and transactions this field is prefilled. For unlinked records, a dropdown list is provided for the person to select a customer. |
| Description of the task | The description of the task. For tasks and transactions this field is prefilled. For unlinked records, the person can either select an entry from a dropdown list or enter the description. |
| Travel – Odometer Start – Odometer Stop – Km | Fields to enter the start and stop odometer readings. Either the stop odometer or the distance travelled can be entered (the other fields are auto filled). Only applicable if a Travel timekeeping record was started. These fields are not displayed if a work timekeeping record was started. |
| Note | An optional note to provide additional information (e.g. delays due to road works / customer kept me waiting for 10 minutes). |
| Start Signature (Sign Here) | A field for a Start Signature is displayed. A customer or supervisor can sign the device using their finger or a stylus. The signature is captured as an image and saved with the timekeeping record. Only applicable to Work timekeeping records, not travel. |
| Stop Signature (Sign Here) | A field for a Stop Signature is displayed. A customer or supervisor can sign the device using their finger or a stylus. The signature is captured as an image and saved with the timekeeping record. Only applicable to Work timekeeping records, not travel. |
Learn More
- Mobile App CRM Interface and Tutorials: Explains how to use the customer relationship features and context menus on the mobile app.
- Mobile App General Functions Tutorials: Explains the basics of using the mobile app.
- Mobile App Interface: Explains the mobile app’s menu and main interface.
- Mobile App Timekeeping Tutorials: These tutorials explain how to use the timekeeping and related functions on the mobile app.