Menu Templates
- Menus are graphical user interface (GUI) elements that allow users to access various features and functions of an application by clicking a button (menu option).
- The Menus in QuickEasy BOS can be customised by creating Menu Groups and linking components (modules) to these groups.
- Menu Groups and Fixed Menu Items are included in Menu Templates which are assigned to users.
Navigation: Main Menu > Setup > Menus
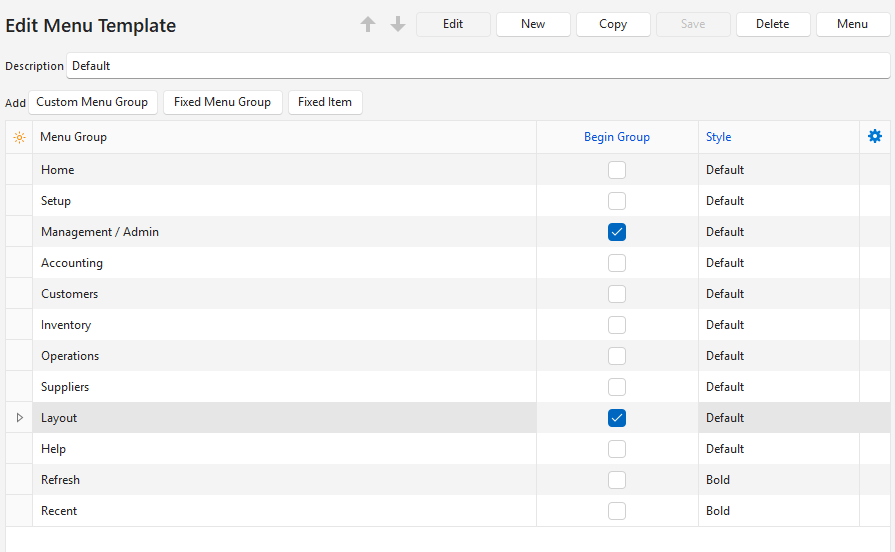
How to Create Menu Templates
- Navigate to Main Menu > Setup > Menus.
- Click New (button) next to the Menu Templates caption (right panel).
- Type a name for the menu in the Description field.
- Add items to the menu by clicking a button next to Add and selecting an option from the dropdown list:
- Custom Menu Group: Adds the Menu Groups that you created.
- Fixed Menu Group: Adds built-in menu groups. The following options are available:
- Help:
- Knowledge Base: Opens the online documentation.
- Email QuickEasy Helpdesk: Opens an email with the QuickEasy Helpdesk address prefilled.
- About QuickEasy Software: Includes the current desktop and mobile version numbers.
- Enable DB Monitor: Enables database monitoring.
- Recycle Bin
- Home:
- Restart: Restarts BOS without needing to login again.
- Exit: Exits BOS.
- Layout: The Layout menu options:
- Light Mode
- Dark Mode
- Window >
- 800 x 600
- 1024 x 768
- 1280 x 720
- 1366 x 768
- 1920 x 1080
- Reset Layout
- Setup: The setup menu options:
- Users
- Settings
- Entities
- Accounting
- Menus
- Contacts
- Customers
- Suppliers
- Items
- Assets
- Calendar Types
- Transaction Types
- Estimate Types
- Service Types
- Online Libraries
- Language Editor
- Form Designer >
- Reportbuilder
- BOS Document Designer
- Output Templates
- Edit Reports
- Accounting: Ledger, Customer Age Analysis, Supplier Age Analysis, Financial Reporting.
- Note: If you only want to include one of these options, create a Custom Menu Group and add only the applicable option.
- Help:
- Fixed Item: Adds built-in functions. The following options are available.
- Language: Allows users to switch between English and their preferred language.
- Note: This option is only displayed if the user’s selected language is not English.
- Recent: Displays a clickable dropdown list of recently opened modules and the views accessed.
- Refresh: Refreshes all the lookups for the open module.
- Language: Allows users to switch between English and their preferred language.
- Continue to add all the items you want on the menu.
- Rearrange the items by right clicking an item and selecting Move Up or Move Down from the context menu. Items can also be dragged and dropped.
- For each item added:
- Click the checkbox under Begin Group to include a separator line before the menu item (optional).
- Select Bold or Default (not bold) from the dropdown list under Style.
- Click Save (button) unless it is greyed out.
How to Edit a Menu Template
- Navigate to Main Menu > Setup > Menus.
- On the right panel, right click the name of the menu you want to edit and select Edit from the context menu.
- Click Edit (button) on the popup.
- Add items to the menu by clicking a button next to Add and selecting an option from the dropdown list:
- Custom Menu Group
- Fixed Menu Group
- Fixed Item
- Delete any items by right clicking the item and selecting Delete from the context menu.
- Rearrange the items by right clicking an item and selecting Move Up or Move Down from the context menu. Items can also be dragged and dropped.
- For each item on the list:
- Click the checkbox under Begin Group to include a separator line before the menu item (optional).
- Select Bold or Default (not bold) from the dropdown list under Style.
- Click Save (button) unless it is greyed out.
How to Copy a Menu Template to a New Menu Template
- Navigate to Main Menu > Setup > Menus.
- On the right panel, right click the name of the menu you want to edit and select Copy from the context menu.
- Double-click the menu item that has – Copy behind its name to open it.
- Edit the copied menu template as needed.
How to Delete a Menu Template
- Navigate to Main Menu > Setup > Menus.
- On the right panel, right-click the name of the menu you want to edit and select Edit from the context menu.
- Click Edit (button) on the popup.
- Right click every menu entry and select Delete from the context menu.
- When there are no entries left, click Delete (button) on the top row of the popup.
- Confirm the deletion on the popup.
How to Change the Tile Colours
- Navigate to Main Menu > Setup > Menus.
- On the left panel, right click an entry and select Edit from the context menu.
- On the popup: click the block next to Colour.
- Select a new colour from the colour chart.
- Click Save (button).
How to Preview Menu Templates
- Navigate to Main Menu > Setup > Menus.
- Right click the menu template you want to preview and select Preview from the context menu.
- To reset the preview menu, preview one of the other menus or restart QuickEasy BOS.
How to Link a User to a Menu Template
- Navigate to Main Menu > Setup > Users.
- Click Edit (button).
- Navigate to the user you want to change and select a template from the dropdown list in the Menu Template column.
- Click Save (button).
- Restart BOS if you changed your own Menu Template.