Estimate Type Tutorials
In QuickEasy BOS, the first step to Estimating is to create an Estimate Type.
Estimate Types are used to define the structure of an estimate and to limit the components and items that can be used in an Estimate.
Navigation: Main Menu > Setup > Estimate Types
How to Create an Estimate Type from Scratch
Before Estimate Types can be created for the first time, Statuses must be created: Menu (button) > Edit Statuses.
- Navigate to Estimate Types.
- Click New (button).
- Description = Type a description for the Estimate Type.
- Menu Group = Type a name for a Menu Group (optional, it allows the list of Estimate Types to be sorted).
- Type = Select a Type from the dropdown list of available types.
- Click Settings (button) next to Add on Settings (tab).
- Click the settings you want to add and click Add / Update (button). The options are:
- General > Default MU%: Type the Default Markup you want to apply.
- This markup is added to the item’s adjustment as per the Attribute settings.
- If items have different markups, set the markup on the item’s Attribute settings (adjustment field) and leave this field blank.
- It is advisable to add a default Markup by Product or Estimate Type and then to add an adjustment percentage (Adj%) as a discount.
- General > Enable Groups: Checkbox. If checked, you can create Groups and select a category for each group on the Groups tab.
- General > Enable Parts: Checkbox. If checked, Parts can be added.
- General > Item Category – Costings: Click Edit in the Value column and select the category to include. Only one category may be selected.
- Note: Selecting a category automatically disables Groups and Parts.
- General > Default MU%: Type the Default Markup you want to apply.
- Click Save (button) to create the additional tabs (if applicable).
- Complete Parts (tab) if applicable.
- Complete Groups (tab) if applicable.
- Change the Status to Active.
How to Create an Estimate Type by Copying another Estimate Type
- Navigate to Estimate Types.
- On the list of Estimates, right click the Estimate you want to copy and select Copy from the context menu.
- The new estimate is opened with ‘- Copy’ added to it.
- Edit the estimate as needed.
- Note: An estimate can also be copied from Edit mode by clicking Actions (button) > Copy Estimate Type.
How to Edit an Estimate Type
- Navigate to Estimate Types.
- Double-click the Estimate you want to edit (or right click and select Edit from the context-menu).
- Click Add/Edit (button).
- Change any of the fields as needed.
- Note: If you add or change settings, click Save (button) for tabs to be displayed or hidden.
- Click Save (button).
How to Complete Parts (tab)
This tab allows users to add the standard Parts and Components that are applicable to the Estimate Type.
- Edit an Estimate Type.
- Click Add/Edit (button) if it is not greyed out.
- Click Parts (tab).
- Click the top row to add a new Part as follows:
- Description = Type a Description for the part.
- Qty Type = Select a Quantity Type from these options on the dropdown list:
- Job Qty = The Quantity varies depending on the job size.
- Fixed Qty = The Quantity does not vary.
- Qty = Type the Quantity of the part that is used in the Estimate.
- Depth = Type the Part’s Depth.
- Width = Type the Part’s Width.
- Margin = Type the Margin allowance.
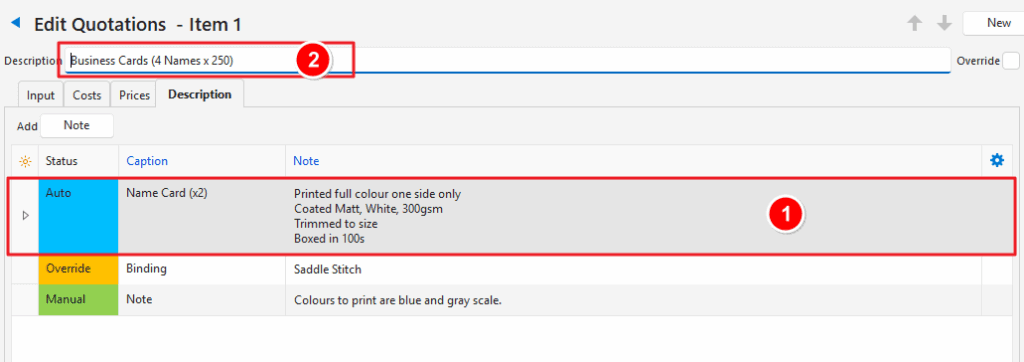
- D = Checkbox. If checked this part’s description is included in the estimate’s description on forms such as quotations.
- Note: The estimate’s description appears on a printed or emailed document (e.g. Quotations) (see 1 on the screenshot).
- Note: When adding an estimate to a transaction, there is a description field that is for internal purposes only and is typed in by the user (see 2 on the screenshot).
How to Complete Groups (tab)
- Groups organise the added items into sections (e.g. Printing, Substrate, Finishing).
- Users can specify whether only one or multiple costings can be linked to a part. For example, there might be only one substrate but there could be several finishing services.
- Category selections ensure that appropriate items are chosen for each group.
- Edit an Estimate Type.
- Click Add/Edit (button) if it is not greyed out.
- Click Groups (tab).
- Click the top row and add a new Group as follows:
- Group = Type a name for the Group.
- Item Category = Select a Category from the dropdown list of Categories.
- Link to Part = Select whether the group is linked to a Part. The options are:
- None: The item is not linked to a part. Applicable when it is an additional service.
- Single: There can only be one item linked to a part (e.g. substrates).
- Multiple: There can be multiple items linked to the part (e.g. finishing services).
How to Delete Line Items on Parts or Groups
- Right click the line and select Delete from the context menu.
- Confirm the deletion.