
Custom Actions Tutorials
Actions can be used to automate processes, to add a layer of control, or to provide additional information.
Actions can be created for:
- Transactions: The action is written for a specific transaction.
- Services: The action is written for a specific service type.
- Custom Reports: The action is written for a specific custom report.
- Global: These actions are not linked to specific modules but rather add specific functions to QuickEasy BOS such as generating commission invoices or printing point-of-sale receipts. These actions must be added to a menu and are executed by selecting the menu item.
How Actions Work
- Actions consist of an ordered list of items that are executed in sequence.
- Each item contains SQL that is run on the database and optionally returns a note.
- If a note is returned, it is displayed as a message to users.
- The input variables that can be used in the SQL are determined by the module the Action is linked to.
- Multiple items, including duplicate items (e.g. multiple error messages) can be linked to an Action.
- User Access must be assigned to each Action.
- Actions use a fixed Status list and only those with an Active status are executed.
- 0-Pending
- 1-Active
- 3-Cancelled
- Different Execute options are available as follows:
- Transactions / Service Types
- Actions (Single): Can be executed from the applicable Edit View > Actions (button).
- Actions (Multi-selected): Can be executed from the applicable
- List View > Actions (button)
- Edit View > Actions (button)
- Custom Reports
- Actions (Single): Can be executed from the applicable context menu.
- Actions (Multi-selected): Can be executed from Edit View > Actions (button).
- Transactions / Service Types
Creating Custom Actions
How to Create a Custom Action for a Transaction
- To use this feature, you must have a basic understanding of SQL and be able to create or modify SQL queries.
- The tables including field names, functions, and procedures are provided but you must still know how to modify a SQL template using this data.
- If you are unfamiliar with SQL contact QuickEasy Support for assistance.
- Navigate to Actions (e.g. Main Menu > Setup > Actions).
- Click New (button) > Transactions.
- Status = Select Active from the dropdown list.
- In the blank field next to Type > Transaction, enter a description for the action.
- Note: This description appears on the Actions button so ensure it is meaningful.
- Transaction = Select the Transaction Type from the dropdown list that the action is for.
- Execute =
- Select Actions (Single) if the action is used when creating a transaction (e.g. a warning or stock check).
- Select Actions (Multi-selected) if the action is used to check or update multiple transactions (List View) or transaction items (Edit View).
- Click Item (button) next to Add.
- Complete the new row as follows:
- Type = Select one of these options:
- Error: Used to return an error message and stop the transaction from being processed further.
- Warning: Used to warn the person capturing the transaction but allows them to continue.
- Confirm: Used to confirm something (e.g. that there is enough stock on hand).
- Execute SQL: Performs a query and does not return a note.
- Type = Select one of these options:
- Description = Describe what the line item does. This description is only displayed here.
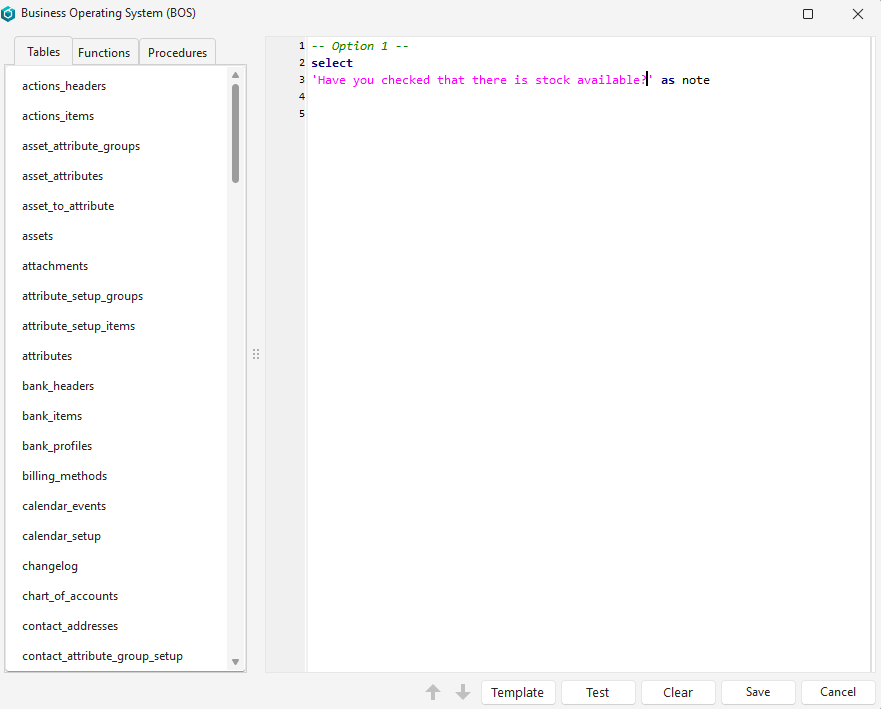
- Right click the entry and click View/Edit SQL on the context menu.
- Create the SQL query on the popup as follows:
- Click Template (button).
- Edit Option 1 to simply display a message or question (see screenshot below) and delete Option 2, or
- Edit Option 2 to execute a procedure that returns a message and delete Option 1, or
- Click Clear (button) and insert your own SQL.
- Click Test (button). This action only tests that the SQL is valid and does not test that a valid result will be obtained.
- Close the SQL popup using the X in the corner.
- Click Template (button).
- Repeat Steps 7 to 11 to add additional items if needed.
- Click Save (button) if it is not greyed out.
How to Create a Custom Action for a Service Type
- To use this feature, you must have a basic understanding of SQL and be able to create or modify SQL queries.
- The tables including field names, functions, and procedures are provided but you must still know how to modify a SQL template using this data.
- If you are unfamiliar with SQL contact QuickEasy Support for assistance.
- Navigate to Actions (e.g. Main Menu > Setup > Actions).
- Click New (button) > Services.
- Status = Select Active from the dropdown list.
- In the blank field next to Type > Service, enter a description for the action.
- Note: This description appears on the Actions button so ensure it is meaningful.
- Service = Select the Service Type from the dropdown list that the action is for.
- Execute =
- Select Actions (Single) if the action is used when creating a ticket.
- Select Actions (Multi-selected) if the action is used to check or update multiple tickets (List View) or multiple ticket items (e.g. on projects).
- Click Item (button) next to Add.
- Complete the new row as follows:
- Type = Select one of these options:
- Error: Used to return an error message and stop the ticket from being processed further.
- Warning: Used to warn the person capturing the ticket but allows them to continue.
- Confirm: Used to confirm something (e.g. that there is enough stock on hand).
- Execute SQL: Performs a query and does not return a note.
- Type = Select one of these options:
- Description = Describe what the line item does. This description is only displayed here.
- Right click the entry and click View/Edit SQL on the context menu.
- Create the SQL query on the popup as follows:
- Click Template (button).
- Edit Option 1 to update a field and delete Option 2, or
- Edit Option 2 to execute a procedure that returns a message and delete Option 1, or
- Click Clear (button) and insert your own SQL.
- Click Test (button). This action only tests that the SQL is valid and does not test that a valid result will be obtained.
- Close the SQL popup using the X in the corner.
- Click Template (button).
- Repeat Steps 7 to 11 to add additional items if needed.
- Click Save (button).
How to Create a Custom Action for a Custom Report
- To use this feature, you must have a basic understanding of SQL and be able to create or modify SQL queries.
- The tables including field names, functions, and procedures are provided but you must still know how to modify a SQL template using this data.
- If you are unfamiliar with SQL contact QuickEasy Support for assistance.
- Navigate to Actions (e.g. Main Menu > Setup > Actions).
- Click New (button) > Custom Reports.
- Status = Select Active from the dropdown list.
- In the blank field next to Type > Custom Report, enter a description for the action.
- Note: This description appears on the Actions button so ensure it is meaningful.
- Report = Select the Custom Report from the dropdown list that the action is for.
- Execute =
- Select Actions (Single) if the action is used on the context menu of a custom report.
- Select Actions (Multi-selected) if the action is used to check or update multiple report items (List View).
- Click Item (button) next to Add.
- Complete the new row as follows:
- Type = Select one of these options:
- Error: Used to return an error message and stop the report from being processed further.
- Warning: Used to warn the person viewing or editing the report but allows them to continue.
- Confirm: Used to confirm something (e.g. that there is enough stock on hand).
- Execute SQL: Performs a query and does not return a note.
- Type = Select one of these options:
- Description = Describe what the line item does. This description is only displayed here.
- Right click the entry and click View/Edit SQL on the context menu.
- Create the SQL query on the popup as follows:
- Click Template (button).
- Edit Option 1 to update a field and delete Option 2, or
- Edit Option 2 to execute a procedure that returns a message and delete Option 1, or
- Click Clear (button) and insert your own SQL.
- Click Test (button). This action only tests that the SQL is valid and does not test that a valid result will be obtained.
- Close the SQL popup using the X in the corner.
- Click Template (button).
- Repeat Steps 7 to 11 to add additional items if needed.
- Click Save (button).
How to Create a Global Custom Action
- To use this feature, you must have a basic understanding of SQL and be able to create or modify SQL queries.
- The tables including field names, functions, and procedures are provided but you must still know how to modify a SQL template using this data.
- If you are unfamiliar with SQL contact QuickEasy Support for assistance.
- Navigate to Actions (e.g. Main Menu > Setup > Actions).
- Click New (button) > Global.
- Status = Select Active from the dropdown list.
- In the blank field next to Type > Global, enter a description for the action.
- Note: This description appears on the Actions button so ensure it is meaningful.
- Click Item (button) next to Add.
- Complete the new row as follows:
- Type = Select one of these options:
- Error: Used to return an error message and stop the transaction from being processed further.
- Warning: Used to warn the person capturing the transaction but allows them to continue.
- Confirm: Used to confirm something (e.g. that there is enough stock on hand).
- Execute SQL: Performs a query and does not return a note.
- Type = Select one of these options:
- Description = Describe what the line item does. This description is only displayed here.
- Right click the entry and click View/Edit SQL on the context menu.
- Create the SQL query on the popup as follows:
- Click Template (button).
- Edit Option 1 to update a field and delete Option 2, or
- Edit Option 2 to execute a procedure that returns a message and delete Option 1, or
- Click Clear (button) and insert your own SQL.
- Click Test (button). This action only tests that the SQL is valid and does not test that a valid result will be obtained.
- Close the SQL popup using the X in the corner.
- Click Template (button).
- Repeat Steps 5 to 9 to add additional items if needed.
- Click Save (button).
Applying Custom Actions
How to Add Global Actions to a Menu
- Navigate to Menus (e.g. Main Menu > Setup > Menu).
- Double-click any menu group to edit it or click New (button) to create a new group.
- Click Edit (button) on the top row if it is not blue.
- Next to Add Module, look for the entry Actions – XXX where XXX is the name of your Global Action.
- Click Add (button).
- Move the newly added module if applicable.
- Check the Tile Menu checkbox to display the action on the Tile Menu (optional).
- Check the Begin Group checkbox to draw a line before the entry (optional).
- Click Save (button) if it is not greyed out.
- Close the Menu Group interface by clicking the X in the corner.
- If you created a new menu group, you must manually add it to a template.
- If you edited an existing menu group, the template will be updated and available to users after they restart BOS.
- If it affects your own menu template, right-click your menu template and click Preview on the context menu to view the new entry on the menu.
How to Find and Apply Custom Actions
- Transactions: In either List View or Edit View click Actions (button) and click the action under the heading Actions.
- Custom Reports: Generate the custom report. Right click an entry on the report and click the action on the context menu.
- Service Types: Navigate to the applicable service type. Double click a ticket to open it. Click Actions (button) and click the action under the heading Actions.
- Global Actions: Click the action on the menu where it was added (see How to Add Global Actions to a Menu above). The person creating the action chooses a name, and the person editing the menus choose the placement. It could be named anything and placed anywhere.
Learn More
- Custom Actions List and Edit Views: Explains the interface from which custom actions are created.