Calendar Tutorials
Adjusting a Calendar’s Display
- Navigate to a Calendar.
- User the slider on the right to zoom in or out. This slider scales from the smallest interval (15 minutes) to the largest interval (day).
- Check the Navigator checkbox to display a navigator:
- Click a calendar on the navigator to display the selected date.
- Check (include) or uncheck (exclude) the entries on the left to only display the selected entries.
How to Manually Create Calendar Events
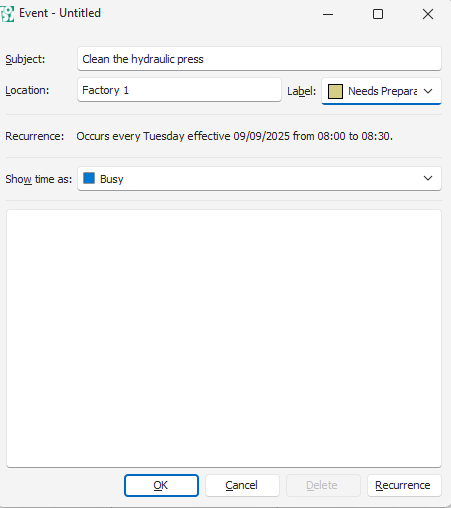
- Events can also be created by double-clicking an empty slot on the calendar. This pops up the form displayed on the screenshot below.
- You can also drag an event to a new spot, which creates a blank event on that spot. Press Enter to edit it.
- Navigate to the Calendar.
- Alternatively, left click a blank space on the calendar. The spot should be next to the name of the resource on the left, and for the timeslot on the top. The space should turn blue to indicate it is selected.
- Note: If you skip this step, the event is created for the first resource on the list.
- Right-click the spot you selected under Step 2 and choose one of these options from the dropdown list:
- New Event
- New All Day Event
- New Recurring Event (Different sequence)
- If recurring, complete the recurring details on the popup (see How to Complete the Recurring Fields below).
- Complete the popup that is opened:
- Subject = Type a name for the event.
- Location = Type a location.
- Label = Select a label from the dropdown list.
- Dates and Times: These fields are prefilled from the select you made but can be edited.
- Show time as: = Select an option from the dropdown list.
- Note = Type a note about the event.
- Click OK (button).
How to Complete the Recurring Fields
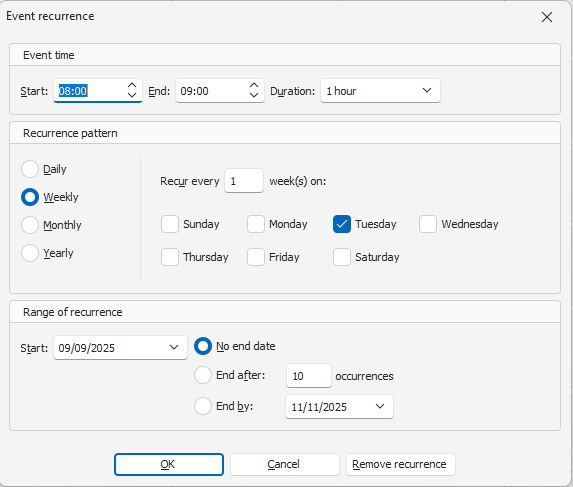
- Start = Select a start time for the event.
- End = Select an end time for the event or select a duration to automatically calculate and complete this field.
- Duration = Select a duration for the event. This field is automatically completed if an End time is selected.
- Recurrence = Click one of the radio buttons to indicate how often the even recurs. The options are:
- Daily
- Weekly
- Monthly
- Yearly
- Day of the Week = Select the day/s of the week on which the event recurs.
- End date = Select one of these options for when the event must stop:
- No end date: The event continues forever.
- End after = Type a number in the block to stop the event after the specified number of occurrences.
- End by = Select a date on the calendar.
- Click OK (button).
- Proceed with Step 4 of How to Manually Create Calendar Events.
How to Edit a Custom Event
- Navigate to the Calendar.
- Right-click an entry and select Open from the context menu.
- Edit any of the fields.
- Click OK (button).
How to Edit a Transaction Event
- Navigate to the Calendar.
- The following functions are available:
- Drag and drop the event to change the resource.
- Drag the sides of the event to change the event’s duration.
- Right-click an entry and select Open from the context menu to edit the note. Click OK (button) when done.
- Right-click an entry and select Open Transaction from the context menu to open the transaction. The fields, other than the note, can only be edited on the transaction.
- Return to the calendar and click Refresh (button) to apply the changes from the transaction.
How to Allocate an Unallocated Event
The name of this event is determined by the Calendar Type setting: Calendar > Resource used for unallocated Events (Enter Name). If no name is entered, the feature is supressed.